
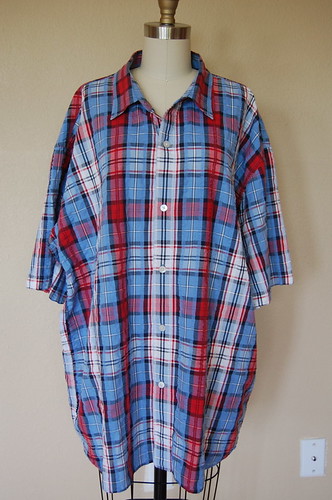
Every time I'd cut up a men's shirt and lay the sleeves out flat, I'd marvel over the amount of fabric it takes to wrap up two arms. Just looking at the shape of one of these big sleeves, it seemed to echo the shape I would expect for a shirred bust bodice -- then I'd use the shirt front and back as the dress front and back. A few months later, I picked up Simplicity 2902 and laid the pattern pieces on top of the largest men's shirt in my stash; there wasn't enough fabric for this pattern. As always, there are lots of ideas and only so much time, so I put this on the backburner in the R&D department.
 Front view, as modeled by Clementine.
Two days I ago, this idea made it back to the front burner, and I cut a men's size XL shirt, 100% cotton seersucker, and draped this babydoll dress right on Clementine.
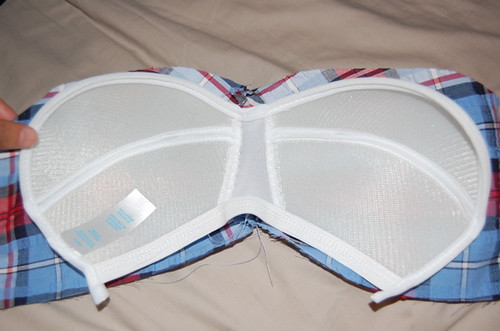
I had most of the dress done in a couple of hours -- it was fast! This bodice style does not lend itself to standard undergarments. Despite my *ahem* diminutive upper body, I feel most comfortable wearing a bra when I am ready to face the day. That's just me. So I took a Hancock break before sewing the bodice lining and evaluated their offerings for built-in bra inserts, which I've never used before. They had an impressive array of options. The "fits cup size A/B" versions were automatically out of the running, and the only "full bra" option was this one:
In the store I'd worried that the sew-in directions would be so complicated I might be frustrated, but as you can see, when I got home I discovered that the bra insert is actually bigger than the bodice front piece. So I dropped the bra insert idea, at least for the time being, and finished construction on the dress.
Front view, as modeled by Clementine.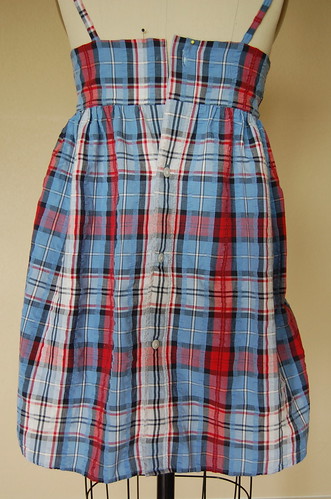
And the back view. Remember Clem's bust is a full inch larger than mine, when I'm wearing undergarments.

Me wearing the dress. It's comfy, though I still don't feel... protected up top. I'll probably buy some inserts or something, or make my own sew-in bra from some poly batting and bias tape.
Obligatory detail paragraph:
- I did not cut and re-shape the skirt part of the dress and re-sew the sides. The width of this dress is the exact width of the original shirt.
- The front of the men's shirt became the back of the dress so that the placket would be functional. I just had to add a buttonhole to the back band. (Now I need to sew on a button, haha!)
- Draping shirred pattern pieces never goes quite the way I think it will. It looked just right pinned on the form. Cut everything, gathered the fabric with thread, put it back on the form, and it was too big. There's another gap in my draping education to fill.
- I never know whether there will be quite enough length for a refashion to qualify as a dress. I thought this one would be a top, for sure, but it really is long enough! I ended up sewing the shirt placket from the second button from the bottom all the way to the bottom hem.
- I was able to match the pattern for the gathered front bodice, but after sewing in the gathering, it was harder to line up than I thought. This was one of those moments I thought I might unpick the piece and work really hard to align them. Then I decided I needed to get over it and get on with it. So it doesn't look very neat but this is the nature of research and development and trial and error, I guess.
- There was a lot of fabric left over -- the entire back yoke from the original shirt is still intact. This really surprises me! I'm thinking about adding some more random straps, you know, cause I really need the extra support. LOL

This is my optical illusion: If you stare long enough, the outwardly bending plaid design convinces you that contents are larger than they appear! ;)
It is a very easy dress/ top to just make up as you go along, and thus prob. an ideal tutorial garment. I'm just not 100% confident I can explain and photograph the steps very well... It's also very possible that one sleeve is not enough fabric to cover another woman's "dirty pillow" (I can't resist the chance to throw in that gem from Carrie). Note that one short sleeve gave enough fabric to cover both of mine! Hahahahahahahaha!!!
*crickets*
My thought is to try this on a larger form for a reality check, to see if a tutorial makes sense after all.
So, maybe another men's shirt refashion tutorial? Just in time for a beautiful spring. In Australia and New Zealand. Have a great weekend, everyone!


Darling! Amazing! I love it. You NEVER cease to impress. Very cute on you. And yes, tutorials are always welcomed!
ReplyDeleteThis is so cute!! I didn't even notice the lack of plaid matching in the front until you pointed it out. It looks awesome.
ReplyDeleteThis is soooooooo adorable. I love the print and colors and wish I had a men's shirt to cut up for a number of things. Thrift store is where I need to be.
ReplyDeleteI am LOVING this. You never cease to amaze me with your refashion ideas!
ReplyDeleteCute! And no, one sleeve wouldn't do it for me. ;) (Too bad the bra thing didn't work... I'm thinking about trying one of those for my next sewing project and it would be nice to see how they go first!)
ReplyDeleteAdorable!!! I love it!
ReplyDeleteFor the bra insert, go back to Hancocks and look for what looks like a pair of bra cups, they type used to sew into a swimsuit. They are smaller than a regular bra insert. You can use the extra fabric from the yoke to cover them, and just stitch them into the front. They don't provide support like a regular insert, but if you really don't need structural reinforcement to hold your bust up, they will provide a tremendous amount of modesty.
Gorgeous! Looks great on you!! So cute!!!! A tutorial would be great!
ReplyDeletewow -you are so clever - that dress looks fabulous - totally chic and fun.
ReplyDeleteOh My-it is lovely. I am amazed!
ReplyDeleteThis is sooo gorgeous! i love it, i love every single on of your creations, you're a sewing genius!
ReplyDeleteI love this dress. It might be my favorite! As you know, I know close to nuthin' 'bout sewing but, could you sew the center seam in the bodice before you gather it? If not, then you'll just have to do the tutorial so I can learn the reason! Anyway, from the small picture in my reader, it gave the illusion that you had twisted it somehow yet, I didn't really notice the plaid wasn't lined up until you said so.
ReplyDeleteI share your undergarment issues and preferences - especially with kids around - good luck with that!
I love the plaid for the dress! I can't believe you came up with this from a shirt! I think refashioning is so much harder than starting from scratch!
ReplyDeleteVery impressive--I must not be able to use that side of my brain!
You're so gosh darn clever! This dress looks fantastic on you! I want one.
ReplyDeleteDo you think you can make me one? (Pahahahhhhahahahhaa! See Mary Nanna's post.)
I used inserts for my McCall's 5315 dress (now OOP). The trick is to lay the insert and bodice lining on something round like an orange, and then stitch it down using a catchstitch. If you want more info, let me know.
very very cute! You really must be short if the light switch above your head is any indication. =) And let me tell you, having more baggage up top is no picnic either...
ReplyDeleteI think all dresses with non-bra-friendly top bits ought to have bra inserts. Why the heck don't they do this with RTW?
ReplyDeleteThis is awesome! I also didn't notice the bodice and thought you had twisted it in some fashion. Great job. I still haven't had the guts to take scissors to my shirt, I have to get a practice one from the thrift store first, I guess.
ReplyDeleteAre there any XL shirts left in Austin? :-) As others have said you continue to amaze me with your shirt refashion skills. I think this is one of my favorites, I am a complete sucker for plaids and they work wonderful for this dress, gives it a bit of and edge.
ReplyDeleteAntoinette, this is your best refashion ever. I plan to copy it for my daughter ...as a way of finally getting rid of my husband's absolutely horrible Hawaaian shirt. He won't mind so much that way!
ReplyDeleteThis is great! You are so clever!
ReplyDeletefreakin' fantastic as usual. I'm going to start hunting clearance racks for super duper large men's shirts!
ReplyDeleteYou're like my virtual model since we have the same body type, I didn't think I could pull off a dress like this, but now I think when I look through pattern catalogs I'll be more open minded!
Fabulous! As usual!
ReplyDeleteHey there... Hope all is well!
MsM
I need an "objects are larger than they appear" optical illusion too!
ReplyDeleteVery cute!
Your commenters are as entertaining as you are! I too thought the band was twisted. It's very adorable!!
ReplyDeletep.s. love your new banner!!
ReplyDeleteOooh, comments!
ReplyDelete@dana @Laura Gerencser - I'll try a "take two" on a larger form and see if I can photograph the steps along the way. :)
@KID, MD @lsaspacey @Kyle - It mainly bugs me that the plaids don't line up b/c I cut those parts out pretty carefully so they would! Dang gathers. I wonder whether a twist might be a lot simpler.....? There is a bit of bulk at that front seam.
@Sew-Ann @lsaspacey @bookwormbethie - Value Village/ Savers has that weekly color tag sale so you can pick up a men's shirt for a few dollars on Monday-Thursday. Or don't spend money: when I first started out, I sent an email to every man I knew in town, asking if they had just one shirt (bad style choice, stained, etc.) to donate to my R&D, and that alone yielded at least 10 shirts!
@Becky @Columbia Lily - I always thought it would be fab to have large bosoms, but I got them after my son was born and they never really felt like mine. (And sure enough, they went away after we stopped nursing, ha.) So it's not my world anymore and I should make sure that I try this out on a larger form, and address any variations for a tutorial.
@angelapea - Thanks for the suggestion! There were lots of swimsuit inserts but I didn't really look at any of them. I will check them out next time I'm in Hancock's.
@Mary Nanna @JoanneM @daer0n @Gail @Bek @McMica - Thank you, dears. It felt like I couldn't possibly be done because it came together so quickly. When you see the tutorial, whenever I post it, you'll see what I mean. :)
@Sarah - I considered doing that when I sewed the dress and talked myself out of it. Can't remember why... but maybe I'll try it on the next one!
@Cindy - In some ways, I think refashioning is easier than sewing from "origins" because the field of options is narrowed just based on a limited amount of fabric.
@geek sewing - Good tip, thanks. I have a couple of tailor's hams with the rounded end -- never thought about using them outside of ironing but that's cool. I'd send you this dress but I bet it's too big for you, you wisp of a woman!
@violet - Maybe this lack of built-in bras in RTW is why there were so many sew-in options at the fabric store! Not everyone does, but Victoria's Secret has been making many of their summer tops and dresses with built-in bras like swimsuits have.
@Johanna Lu - My stash of men's shirts is impressive! LOL Sadly there are many, many more shirts at thrift stores all over the world. Stubborn reminders of "disposable fashion" mentality.
@Pam - I was thinking about how swimsuits for small-busted women sometimes have little ruffles on the cups. I will have to try that sometime and report back on the optical illusion. ;)
You did a great job on this dress. It is really pretty!
ReplyDeletegreat dress! love the drapey dirty pillow part... and the plaid. which reminds me, when I made my couture plaid outfit, the undergarment was a strapless dress and needed support to stay up - I bought an inexpensive and simple strapless bra (in my model's size) and sewed it right into the dress. worked like a charm.
ReplyDelete@Muddling Through - Thank you!
ReplyDelete@glam.spoon - I was working hard to not actually use the anatomical name for... uh... the mammary glands so as not to attract the wrong crowd here at the sewing blog. And yes, I do from time to time throw in "dirty pillows" -- that part of the movie makes me laugh so hard, every time! Great idea to use an actual strapless bra to sew right into the dress.
that is a mad cute little dress you've got there, I just love it! The bra issue is one that I struggle with too, being also, *ahem* a bit small on top, though I've never attempted to try a built-in bra insert--usually I'll just go with a strapless bra (the best fashion investment I ever made, though it's really hard to find one that fits well) which I frequently pair with a cute bathing suit top. This keeps the strapless bra from sliding down and I don't have to worry about bra straps showing. It does lead to an addiction to cute swimsuit tops though.
ReplyDelete... Anywho, I've rambled on long enough, don't you think? Good work, and keep it up!
I'm dying laughing at your dirty pillows jokes, would think that standard straps would look cute along with the halter strap, and just love the whole thing in general.
ReplyDeleteLove the new header too.
The dress is not bad its good.
ReplyDeleteAubade lingerie
I haven't dropped by in ages, and I hadn't realized just how much I've missed your blog! Such a good writing style, such fun ideas, such a great spirit and willingness to share. Love it all, and glad I came back for more!
ReplyDeleteOh, and totally LOLd at your Carrie reference--that one always makes me laugh!
@Trish - It is really tough to find a nice variety of standard bras that fit me -- the specialty bras are practically impossible. All of them cost an arm and a leg. No "pretty" options. Which leads me to believe I will someday even sew my own bras.
ReplyDelete@Ambika - Thanks, lady. That part of the movie is so funny: "They're not dirty pillows. They're called breasts, mama, and every woman has them." I think I will add another set of straps, thanks for the encouragement.
@AMIT - Thank you!
@Deborah - Good to see you back 'round these parts! Thanks for the sweet comment!
This is super cute! I'd love to see a tutorial. It would be a perfect summer dress. Just found your blog and love it!
ReplyDeleteWow, this is so cute!
ReplyDeleteI super love this dress! It looks really good on you! Since I don't know how to sew (even with your detailed tutorial I'm very sure I'll mess it up) I'll look for a similar-looking one from a store (hopefully I find one) and sew on swimsuit inserts so the dress has a built-in bra. :)
ReplyDeleteIt is nice to see there are still creative people left. I don't think I know anybody who has actually sewed their own clothes, no less out of shirt. Great Job.
ReplyDelete