
Showing posts with label mens shirt refashion. Show all posts
Showing posts with label mens shirt refashion. Show all posts
13 September 2010
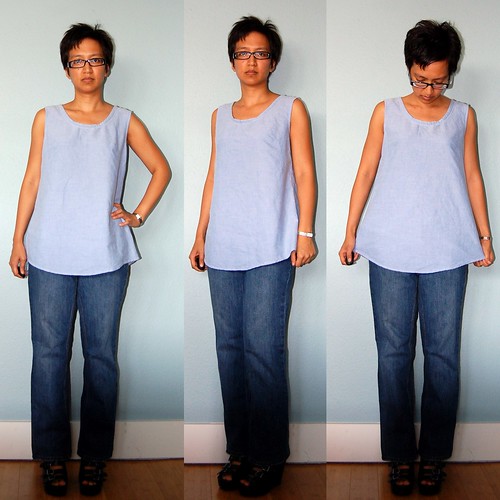
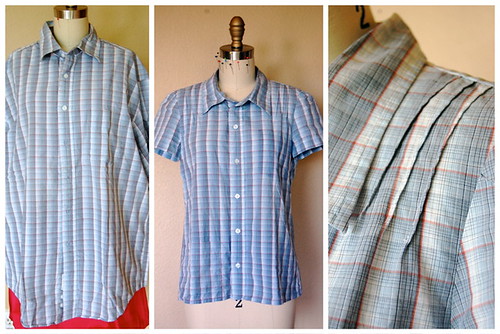
205. A whole lot of refashioning going on
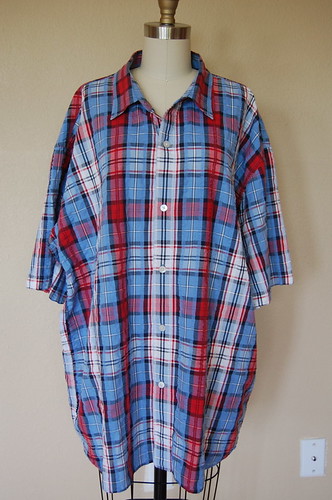
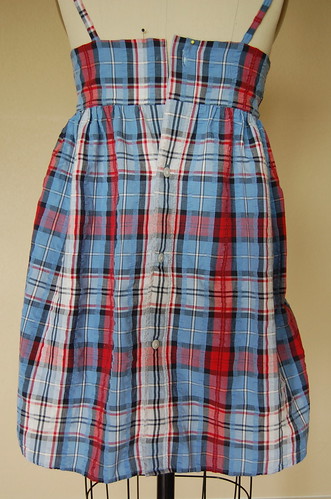
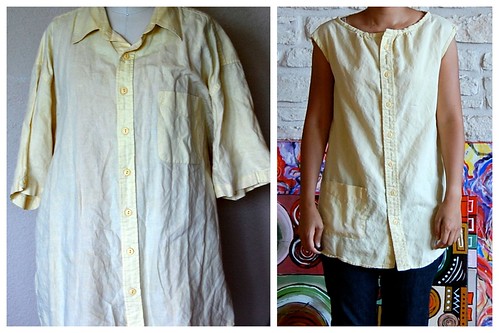
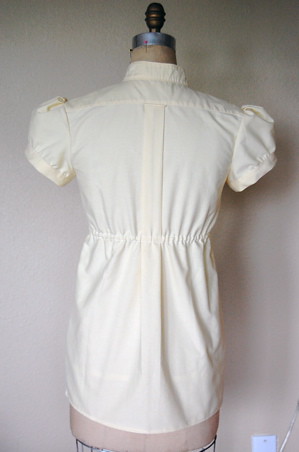
Geez, I haven't shared a sewing post with you in a month. Totally not reflective of what I've been up to. Let's start with a simple tank-style woven top and altered jeans. The tank is a refashioned men's shirt (short sleeve button down and SOFTASALLGETOUT) and the jeans were a standard pair of bootlegged Banana Republic jeans I have not worn because the bootlegs never really worked for me.
09 May 2010
194. Happy Mother's Day! Pantone 2010 Dress
Happy Mother's Day to all the mamas! It can be a tough job but we asked for it and do it with style. Hats off, sisters.
BTW, my name is Antoinette. You may have forgotten me, as it's been about six weeks since I last posted. Yeah, sorry about that. Springtime is extra-nuts around here, between spring break, family birthdays (and parties), Easter, seasonally heavy workload, and volunteer stuff at the elementary school. The school yearbook is due at the printer this Friday, which will leave me with more spare time. I've got a busy couple of weeks after that with work, and then school's.... out.. for.. summer!!!

BTW, my name is Antoinette. You may have forgotten me, as it's been about six weeks since I last posted. Yeah, sorry about that. Springtime is extra-nuts around here, between spring break, family birthdays (and parties), Easter, seasonally heavy workload, and volunteer stuff at the elementary school. The school yearbook is due at the printer this Friday, which will leave me with more spare time. I've got a busy couple of weeks after that with work, and then school's.... out.. for.. summer!!!
23 December 2009
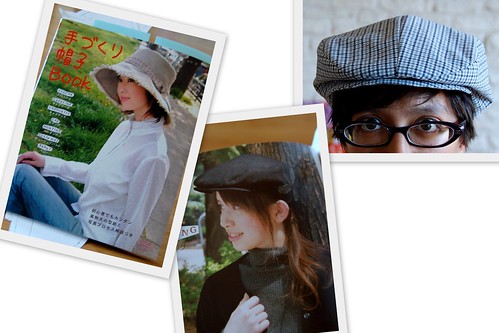
182. First garment from Japanese pattern book!
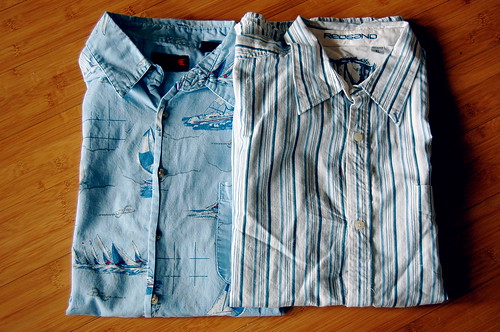
How is your winter shaping up? Mine's great -- I've been home for almost two weeks straight! Another three weeks to go before getting on another plane and that's just right. There's so much to catch you up on... bit by bit, though. Here's the first bit -- a dress, refashioned from two men's short-sleeved button down shirts. Before:


After:
And here's the photo I would have used to show the dress, if it wasn't blurry (and don't ask me what my hair is up to these days. That's a matter for another post):
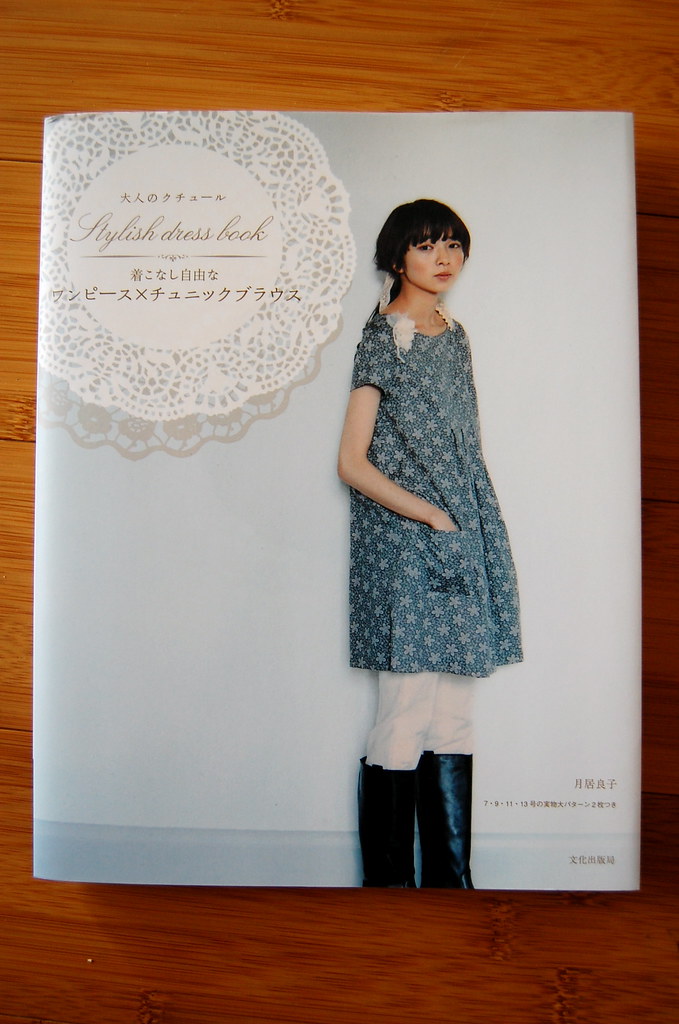
The pattern is from the popular Stylish Dress Book 1:
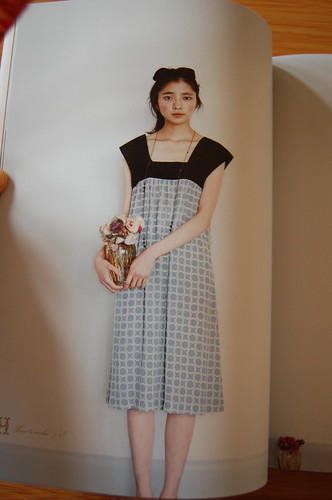
All the dresses in this book are labeled A-Z, and this one is Dress H. I was sold on the shaped, gathered straps, falling over the shoulders just so:
And I was feeling like a lunatic for having a stash of Japanese pattern books for 2 1/2 years and not sewing from a single one. Several people have suggested I sew from these books as the sizing might have a better unmodified fit for me than American patterns. Oh, and Karyn from The Workroom has sewn a bunch of garments from Japanese pattern books that are very inspirational. So I finally got off my duff and sewed this dress.
In many of these books, there is a lump of paper stapled in the back of the book with all the patterns printed on them, overlapped in a big jumble (very much like Burda and other magazines). You unfold the oversized sheets of paper and trace out the pieces you need, then add your seam allowance.
There is a great series of posts with detailed instructions on sewing from Japanese pattern books over at Label-Free. I mean, the whole thing is beautifully written and photographed. As an adult learning professional I was blown away by the quality of these instructions! Aaaaand it won't surprise you that I didn't use those great instructions at all -- I just sort of went on instinct with the whole process, from selecting the pattern to construction. I think most advanced beginners/ intermediate or vaguely adventurous sewists who aren't native Japanese speakers should be OK half-winging like I did. And for everyone else, there are those great Label-Free instructions! My strongest suggestion is to be diligent about transferring notches/ markings. Really pays off later.
As for oversized paper to trace onto... sometimes I finish a class and I've written notes for everyone on the flip chart, and I frequently don't re-use those flip chart pages because they are specific for that group of learners. Since I don't trust most hotels to recycle, I end up taking the oversized sheets from the flip chart (I think the standard size is 24" x 36", or 61cm x 91 cm for my metrically-inclined pals) home to draw on the back with my son before it goes into recycling. In this case, I recycled two of these oversized sheets to trace out the bodice pattern pieces. Bonus: I happened to recycle flip chart paper with the strip of adhesive on the top, like a sticky note -- and it's just the right stickiness to hold the tracing paper to the pattern piece and peels off easily when tracing is done!
The pattern itself was perfect for me. I chose a size 7 based on the sizing chart, and even though my measurements fall between a 7 and 9, all the styles are so loose that I went with the smaller size. It is still loose enough that I omitted the side zipper and it slips on over my head easily. Everything lined up and the shape (though on the less shaped side for sure) was already petite-ified, requiring no pinching an inch in length at the waist as I typically do for a Big 4 pattern. I shortened the dress by a good 5" at the bottom hem, as it seems many of these dresses are meant to fall mid-calf -- not the most flattering length for me. I might get away with it if I could sport a softer voice and waifish demeanor, as I imagine these models have. But not me.
I did fudge a little as this was a shirt refashion: specifically, I omitted 3" in width from the front bodice and 2.5" in width from the back bodice because the shirt simply wasn't wide enough. The fit is still fine and frankly, I think my version has a slightly more flattering shape than the original in the book. The dress buttons up the back.
I bought this pattern book and its follow-up, Stylish Dress Book 2, from YesAsia.com, which offers reasonable prices and free shipping. This is a great place to go if you know exactly which book you want to buy and they stock it, but Amazon.co.jp offers a much wider selection (and hefty shipping charges if you are buying less than about $200 in merchandise last time I checked). There are sellers on Ebay and Etsy who specialize in the Japanese sewing/ craft books, too, but the total cost including shipping sent me back to YesAsia.
I'm no expert sewing from these books so if you have some tips to share, please leave them in a comment! I can see myself using these books more in the future.
In case you're wondering why I made this dress in these fabrics in the middle of winter, it's because I'm going to Hawaii for a week in January and wanted a new dress or two to wear! Yes, a week on vacation with my BFF, sans husband and child. I know lots of men and women do this, but this is my first time and I have entertained feelings of guilt. I've left home for work tons of times, but to laze on the beach for seven full days? My husband is fully supportive! I kept reminding myself I need and deserve this trip. Maybe this new dress is a sign I'm getting on board emotionally. :)
What about you -- have you taken a luxurious holiday just for you? Did you feel guilty? Did you completely get over it?
09 October 2009
176. Pay-It-Forward: Steph from Tragically Ordinary (Refashion 32: Lined Newsboy Cap & Scarf from Men's Sport Coat and Dress Shirt)
Back in July, I joined a pay-it-forward meme, and committed to handcrafting gifts for 5 people. I recently finished this hat and scarf set for Steph from Tragically Ordinary and popped it in the mail to her. She sent me a note yesterday that she received it, so now I will blog about it:
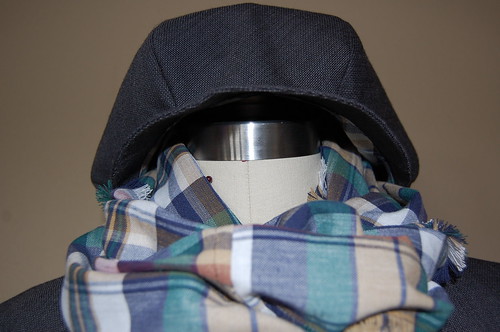
Steph deemed herself a hat girl in a previous post, and she is in love with fall. I do refashions, so after many other ideas came and went, this hat and matching scarf from repurposed fabrics was a good blend of what she likes and what I like.

Steph deemed herself a hat girl in a previous post, and she is in love with fall. I do refashions, so after many other ideas came and went, this hat and matching scarf from repurposed fabrics was a good blend of what she likes and what I like.
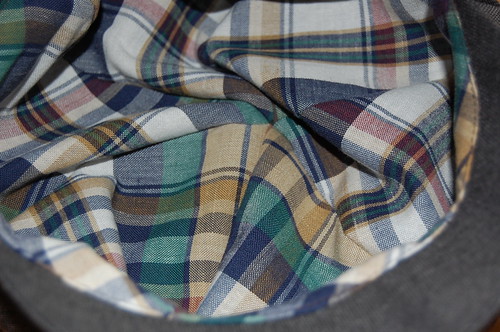
The hat is a newsboy cap from that same Japanese hat book I used to make various hats for Louis this summer, made from the sleeves of a men's sport coat. In Kyle's birthday box of goodies she included a ReadyMade magazine with instructions for a dyed plaid scarf from men's shirts by Martha McQuade of Uniform Natural, so I used a men's shirt to make a scarf and lined the hat with the same fabric.
From a construction standpoint, I'd run out of the heavyweight craft interfacing I used on the summer hats. I went back to the same store I'd gotten it from, and bought their heaviest interfacing... but it was not the same! I double-interfaced the hat brim and it was still pretty floppy. I didn't interface the hat body at all but think maybe I should have -- when I wore it, the structure of the hat got lost a little and it kind of looked like a beret:
And, surprisingly, this is the smallest hat size and it's a good 2 inches too big around the crown. Do Japanese women have big heads? I'm totally kidding! Just wondering why the pattern is drafted so darn big?
I'm so glad I signed up for this pay-it-forward thingy with my 5. It has been a really neat experience to dig around like a detective, reading through blog archives to get a sense as to who someone is. And then to create based on what I found. Now onto the other four recipients!
Have a great weekend, everyone! :)
21 August 2009
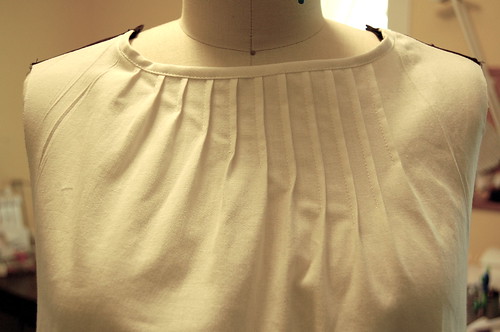
168. Refashion 29: Coco Top from Men's Dress Shirt and "Dressing Your Age"
Before I forget: PR last night was fun to watch in a large group! I highly recommend trying this if you haven't done it before!
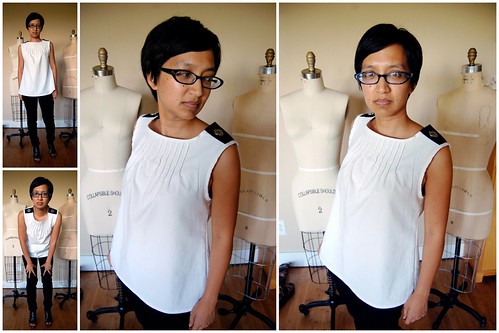 It always starts out with an idea. In this case, after a couple weeks of Chanel immersion, I got an idea to make a birthday top for myself, refashioned from a men's dress shirt, of course. I have wanted to get more comfortable with asymmetry since the start of the year, so this was a great opportunity to work on something simple and to play a little.
From Chanel: Black & white palette; "epaulets".
From me: Pintucks; asymmetry, buttoned openings at the shoulder to get in and out.
From my mistakes: Asymmetrical pintucks (below) didn't drape well so I made them symmetrical (as in photos above)... better but far from perfect; as a result neckline is a little poochy; cut the armholes way too low, so little cap sleeves were not an option; changed my mind about how I would use the shirt placket so there are no pintucks on the back; just an inverted pleat (sorry, no pics).
I have to admit that, after weeks of torturous pattern refining and production sewing, this was quite a bit of fun, even though it didn't turn out like I thought it would at all!
There have been a lot of thick topics floating around in my head...
- A question about retro styles and gender inequality
- A rebuttal and bigger inquiry into ethical fashion, and,
- With my birthday yesterday, endless internal musing on the topic of "dressing your age".
I am really curious to know what you think about "dressing your age". This is subjective and personal, but please do share what's on your mind. For me, this has a lot to do with grace. When I turned 30, I got rid of those ridiculous miniskirts and chunky platform shoes in my closet. I mostly don't wear sweats ever, have banished most capri pants and hoodies for good, and assess, each year as my birthday approaches, if I feel like I'm "dressing my age".
What does "dressing your age" mean to you?
13 August 2009
165. Revisiting the Nurse Ratched Shirtdress
The last post and a few of the comments got me thinking about why I haven't blogged more about sewing projects gone wild, i.e. the "failures". I certainly don't feel any shame in sharing the questionable along with the experiments that work. I guess I've been doing a lot of work and volunteer stuff in Excel lately, so I put my thoughts into a little worksheet, and look at what came out of that private brainstorm:

So do you think this dress looks too scrubby? Do you blog about the projects that don't go well? What do you do when it looks like a garment is headed for a sewing train wreck? Do you build little secrets into your clothes as you sew them?
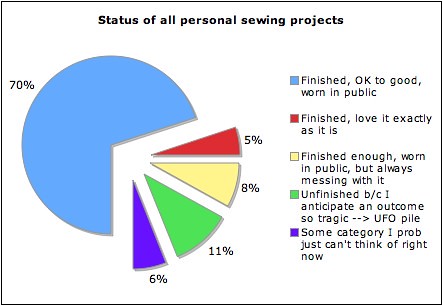
Note that these percentages are not calculations -- they are guesses, though I bet they are pretty accurate. And I purposely didn't pick round numbers like 10% and 25% because I like to counterbalance my obvious geek tendencies with a good dose of snarkiness.
Also note that a personal decision when I started blogging was to only show finished projects, not works-in-progress. The purpose behind that decision was to increase the number of finished projects, as the other goal was to blog twice a week.
So check out those numbers:
- Most of what I sew gets finished, and the results are "good". I wear these clothes.
- There is a tiny percent of clothes that are really perfect the first time out. Put them on and it's instant magic.
- Only a small percentage of the clothes are so "tragedy in the making" that I throw them in the UFO pile before they're actually done. It's good to see that I'm doing this a lot less. These are the projects that I would deem the "failures", and I am not used to blogging them because I typically don't blog unfinished projects! (Mystery solved.)
- Maybe 8% of the projects are in good functioning condition but I am always messing with them. I might wear them, but I feel when I wear them like they are not complete. Usually the clothes that land here are really simple styles need some embellishment.
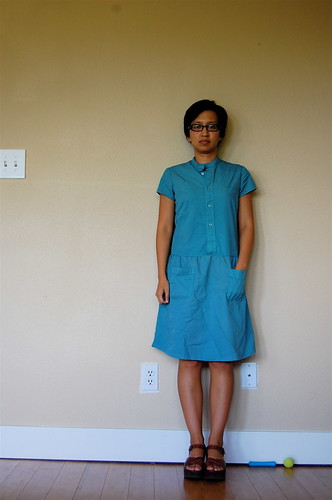
One of the projects in that always-messing-with category that I wore today is the Nurse Ratched Shirtdress. This was my sixth refashion from almost a year ago, and was a white shirtdress made of two men's shirts. I took some reader suggestions as to what to do next, and ended up dyeing it a teal blue from Rit or Dylon, can't remember now.
The original dress was white, and I thought it had looked like a nurse's uniform. I laughed after I dyed it, threw it in the laundry, and took it out of the dryer: It was the color of medical scrubs!
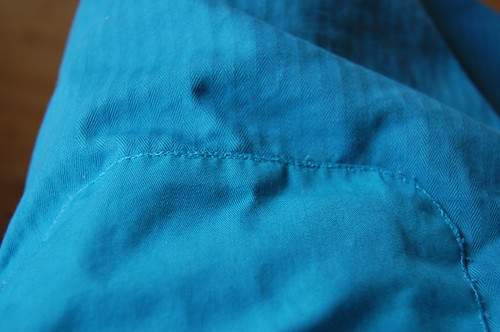
Picture taken today. I remembered one of my little secrets, that there are two patch pockets, one from each original shirt -- so one pocket is in a herringbone-weave like the shirt that the skirt is made from:
And the other pocket is in a regular twill weave, so it doesn't match the skirt fabric:
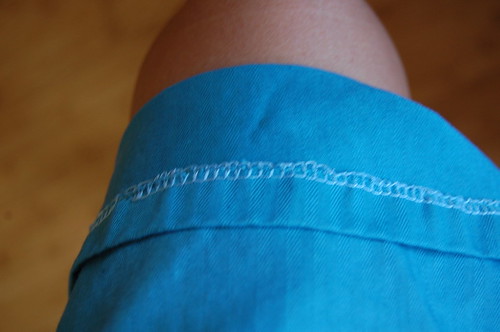
And this surprised me -- the serger thread (yes, the serger was broken when I sewed this so it is wonky) did not dye teal like the thread I used on all the seams. It stayed white, even though it has a hint of blue in it:
12 August 2009
164. Refashions 26 + 27a + 27b: All from men's shirts
1) THANK YOU
It has been a lot of fun to kick off Vocabulary and read your many supportive, encouraging comments... to see how many of you became Facebook fans, how many of you re-tweeted the shop opening announcement, how many of you wrote a whole new blog post to share the news! I've always enjoyed finding a place in the blogging community and making new friends in a new way. Launch weekend could have been way stressful but it ended up being very exciting and fun. Thank you for your friendship.
2) A disclaimer
This is my third time writing this post -- I actually deleted the first two drafts and started fresh each time. Because I am blogging about 3 tops, two of which I really don't care much for, and it made me tired to re-live the experience draping/ drafting/ sewing them up. And I thought if it was deflating for me to show you the pics and describe the challenges, maybe it would be deflating for you to see and read about them. But I've decided to document some of my lessons learned anyway in case they are interesting or helpful to you (and you can just close the window now and wait for the next post if you like, I would understand!).
3) Refashion 26: Pintucked (Shoulder) Shirt from Men's Dress Shirt
This was my first design idea for Vocabulary's summer camp shirt variations. The original was a 100% cotton, short-sleeved men's shirt. The resulting women's shirt was challenged:
- Shoulders too wide
- Neckline too big, odd shape shape (the shirt started out collarless but I didn't like it, unpicked the binding, adjusted the original collar and sewed it on)
- Silhouette boxy, unflattering
- You can't see the pintucks on most patterned fabrics unless you're up close
So I ditched the whole concept. I'd tortured the fabric on this sample enough and still couldn't get the shirt where I wanted it. I've worn the shirt a few times and you know what? It isn't really comfortable! So I moved on to the next style without tinkering with the pattern/ first sample more.
4) Refashion 27a: Gathered Raglan Top from Men's Dress Shirt
This eventually became the Dulcet Top that's in the shop. But getting there was pretty much torture for me. In summary, the process for this top was:
- Sketch the design
- Drape a sample
- Transfer to pattern
- Sew the first sample
- Refine the sample
- Alter the pattern
- Sew the second sample
- Refine second sample
- Alter the pattern
- Sew the third sample, refine it, alter the pattern
- Lather, rinse, repeat
- Sew the top in its final form
- Then grade the pattern into multiple sizes, but I'll get to that later
Honestly, I wasn't unhappy with this first sample. I like wearing it and have gotten compliments. But when I thought about how much better it needed to be in order to be sustainable, a closet staple someone else would love and pretty much wear to death, it needed some changes:
- Silhouette is straight from the front but a-line when looking from the side. Decided to make the whole thing a-line and hit at high hip.
- Neckline was higher than I wanted it to be.
I thought I'd make those changes, make a perfect second sample, and we'd be ready to production sew! Not the case.
5) Refashion 27b: Gathered Raglan Top from Men's Dress Shirt
Well, just look at it. Not ideal. When you mess with patterns, there's a very real chance that when you change one thing, it will affect something else that you might not have considered. I'm pretty comfortable modifying patterns for tops with set-in sleeves, but obvz. was thrown by the raglan style:
- Neckline binding too short
- Too much fabric in the sleeves
- Never again use seersucker for this top b/c the fabric is too stiff, won't drape well
I didn't photograph the third sample because it is pretty close to the final Dulcet top. Anyway, the point is it took 4 samples to get it just as I wanted it. Which is why people work far, far in advance of the season they are designing for. Which is why I learned my lesson and am working on Fall/ Winter ideas now, as I boil. (BTW, 52 days over 100 degrees so far this summer.)
6. Pattern grading
For the average home sewist, pattern grading is about using a commercial sewing pattern and drawing a new line from a smaller size for bust to a larger line for hips, or something to that effect. Maybe it means buying a sweet vintage pattern that's too big and drawing a new set of seamlines to get one size smaller.
Until this experience I had never done the manual pattern grading, garment industry-style, for multiple sizes. This involves taking your sample pattern, which is usually in the middle of your size range, cutting it along various vertical and horizontal lines, and separating by fractions of an inch to grade up, or overlapping by fractions of an inch to grade down.
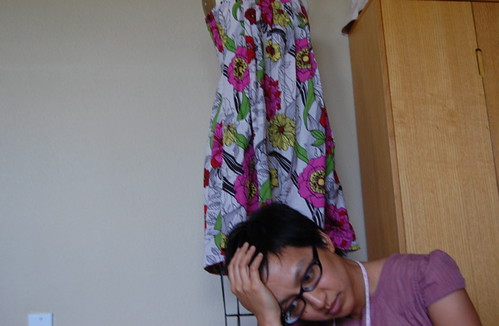
Now that I've done it, I could grade another pattern much more quickly and less painfully. But that first time, it was tough. I felt overwhelmed by the many pattern pieces now scattered about the floor like a puzzle. Louis was walking around the house with my camera, practicing his composition, and he snuck up on me and took this picture, which in retrospect says it all:
There are many more lessons to share, but another time. :)
31 July 2009
160. Refashion 25: Shirred Babydoll Sundress from Men's Dress Shirt
It's been just over a year since my very first refashion, and the dress I'm about to show you has been on my mind for almost that long!


Every time I'd cut up a men's shirt and lay the sleeves out flat, I'd marvel over the amount of fabric it takes to wrap up two arms. Just looking at the shape of one of these big sleeves, it seemed to echo the shape I would expect for a shirred bust bodice -- then I'd use the shirt front and back as the dress front and back. A few months later, I picked up Simplicity 2902 and laid the pattern pieces on top of the largest men's shirt in my stash; there wasn't enough fabric for this pattern. As always, there are lots of ideas and only so much time, so I put this on the backburner in the R&D department.
 Front view, as modeled by Clementine.
Two days I ago, this idea made it back to the front burner, and I cut a men's size XL shirt, 100% cotton seersucker, and draped this babydoll dress right on Clementine.
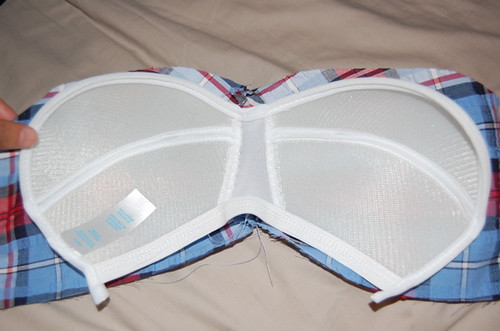
I had most of the dress done in a couple of hours -- it was fast! This bodice style does not lend itself to standard undergarments. Despite my *ahem* diminutive upper body, I feel most comfortable wearing a bra when I am ready to face the day. That's just me. So I took a Hancock break before sewing the bodice lining and evaluated their offerings for built-in bra inserts, which I've never used before. They had an impressive array of options. The "fits cup size A/B" versions were automatically out of the running, and the only "full bra" option was this one:
In the store I'd worried that the sew-in directions would be so complicated I might be frustrated, but as you can see, when I got home I discovered that the bra insert is actually bigger than the bodice front piece. So I dropped the bra insert idea, at least for the time being, and finished construction on the dress.
Front view, as modeled by Clementine.And the back view. Remember Clem's bust is a full inch larger than mine, when I'm wearing undergarments.
Me wearing the dress. It's comfy, though I still don't feel... protected up top. I'll probably buy some inserts or something, or make my own sew-in bra from some poly batting and bias tape.
Obligatory detail paragraph:
- I did not cut and re-shape the skirt part of the dress and re-sew the sides. The width of this dress is the exact width of the original shirt.
- The front of the men's shirt became the back of the dress so that the placket would be functional. I just had to add a buttonhole to the back band. (Now I need to sew on a button, haha!)
- Draping shirred pattern pieces never goes quite the way I think it will. It looked just right pinned on the form. Cut everything, gathered the fabric with thread, put it back on the form, and it was too big. There's another gap in my draping education to fill.
- I never know whether there will be quite enough length for a refashion to qualify as a dress. I thought this one would be a top, for sure, but it really is long enough! I ended up sewing the shirt placket from the second button from the bottom all the way to the bottom hem.
- I was able to match the pattern for the gathered front bodice, but after sewing in the gathering, it was harder to line up than I thought. This was one of those moments I thought I might unpick the piece and work really hard to align them. Then I decided I needed to get over it and get on with it. So it doesn't look very neat but this is the nature of research and development and trial and error, I guess.
- There was a lot of fabric left over -- the entire back yoke from the original shirt is still intact. This really surprises me! I'm thinking about adding some more random straps, you know, cause I really need the extra support. LOL
This is my optical illusion: If you stare long enough, the outwardly bending plaid design convinces you that contents are larger than they appear! ;)
It is a very easy dress/ top to just make up as you go along, and thus prob. an ideal tutorial garment. I'm just not 100% confident I can explain and photograph the steps very well... It's also very possible that one sleeve is not enough fabric to cover another woman's "dirty pillow" (I can't resist the chance to throw in that gem from Carrie). Note that one short sleeve gave enough fabric to cover both of mine! Hahahahahahahaha!!!
*crickets*
My thought is to try this on a larger form for a reality check, to see if a tutorial makes sense after all.
So, maybe another men's shirt refashion tutorial? Just in time for a beautiful spring. In Australia and New Zealand. Have a great weekend, everyone!
26 June 2009
151. Refashion 24: Boy's Shirt from Men's Dress Shirt
 This refashion has been hanging out for a few weeks, from that time when I seemed to be sewing in my sleep. I had picked up this men's shirt from the thrift store and it immediately was one of my favorites. Doesn't seem like much at first glance (and that poppy pink mess of a dress underneath it in the photo doesn't help, but we'll talk about that in another post), but let me tell you what I liked so much about the shirt:
- The simple windowpane weave
- The color
- The weight and hand of the fabric -- lightweight, almost sheer, and nearly-sateenish but not quite
- The buttons... three holed, not two or four
The label on the shirt reads "Liberty broadcloth", and whether it means THE Liberty brand or not, it was a very well-constructed shirt. After I showed my 6-year-old son the cool three-holed buttons, he asked me to make something for him from the shirt.
Can I just say that the number of interesting sewing patterns out there for boys is minimal and completely uninspired? No big surprise, as boys' clothes off the rack are boring and uninspired much of the time. Combined with the fact that my son has a long track record of not appreciating what I sew for him, I limit my sewing for him to Halloween, mostly. Luckily, I had this vintage pattern in my stash. His chest, waist, and back length measurements matched up to those on the pattern envelope exactly.

After sewing women's clothes for so long, I couldn't believe how quickly this boy's shirt went together! The pieces are so much smaller and thus faster to sew, and I only used 3 pattern pieces: front and back bodice, and the sleeve. I re-sized and re-used the collar, which I am not sure I would do again. This is a very high-quality shirt and the interfacing in the collar is very stiff and sturdy. It's not really flexible enough to be resized for a 6-year-old boy and sort of move with the new shape and dimensions of the shirt. Also, the collar now looks a little 70's Saturday Night Fever, which I don't actually mind but it's very exaggerated on the new shirt.
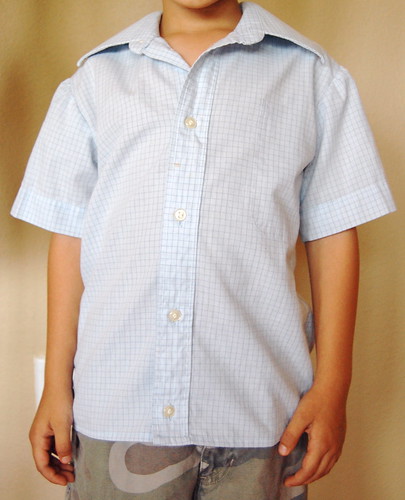
The bodice falls off the shoulder by a good inch and a half, which is not how shirts are made today, but this is exactly how the illustrations look on the pattern envelope. The thing that got me was the extra ease in the sleeve. I tried to sew in one sleeve using the tutorial on Mary Nanna's blog, which is credited to Palmer Pletsch, and I got sleeve poof! Sleeve poof is not in the pattern envelope illustrations, so I assumed it was operator error in trying out the Mary Nanna --> Palmer Pletsch method. I sewed in the other sleeve using the 2-lines-of-gathering-threads technique I'm used to, and that sleeve came out poofy, too! So I'm thinking I will need to shave a bit off the sleeve cap to eliminate the poof. I was going to try to fix it in this shirt, but Louis wore it all day yesterday and it didn't bother either of us. We'll go with it.
BTW, this pattern is so OOP that I don't know if I should bother doing a PR.com review -- what do you think/ do?
I still have a dress I made during my Vegas trip I haven't shared with you. Next time.... Hope you have a great weekend! xo
12 June 2009
147. You like the tutorial. You *really* like the tutorial!
Hello again from Las Vegas!

[BTW: If you shared your creation with me and I haven't listed you below, it's because I have been flaky and am not keeping track of your updates very well! If you can excuse my flakiness and leave me a comment here with a link to your project, I will post your project soon with a link to your tutorial-inspired refashion.]
In order of notifying me of their brand of refashion coolness and hotness:
- Allison of Heinous Shrew
- Rachael at Benbo Loves You
- Zaza at DU-MAN (with a tilde over the n... how to do this on my keyboard...?)
- Interrobang
- Christine L at Kale and Clover
And FYI, I don't sew little girls' clothes, but now I'm inspired to! These are all over the blogosphere but in case you haven't seen them yet, check out Dana's men's shirt refashions for girls. Warning: cuteness factor off the charts.
05 June 2009
146. Refashion 22: Boy's Hat from Cargo Pant Legs and Refashion 23: Vogue 8585 Dress from Men's Dress Shirt
Greetings from Las Vegas! We are visiting family and celebrating my niece's high school graduation! And, of course, I am sewing and blogging. A rolling stone collects no moss.....
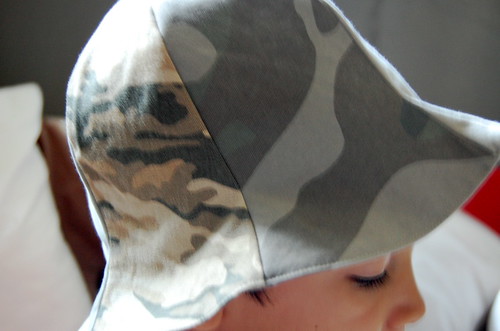
So, the story is that Louis needed a summer hat. I made him a driver's cap from a Japanese pattern book, but it was too big (BTW, it fits my dad perfectly and so now has a new owner). There's a tulip hat pattern in the same book that I've made myself a couple of floral hats from, and the shape of the hat looks great on Louis and covers his neck.
I had six Louis-size cargo pant legs in the refashion remnant pile. They came from three pairs of cargo pants that would get more love and wear as shorts, so I simply cut off the legs around the knee/ just under the thigh cargo pocket and double-folded new hems on the shorts. One set of leftover pant legs was a khaki camouflage, another was olive camouflage, and the third was plain khaki. As the tulip hat pattern calls for 6 panels, I used one of each contrasting pant leg. I lined the hat with remnants from my dad's new driver's cap. Et voila! New hat, ready for fishing with Grandpa and cousin Nick in a week.
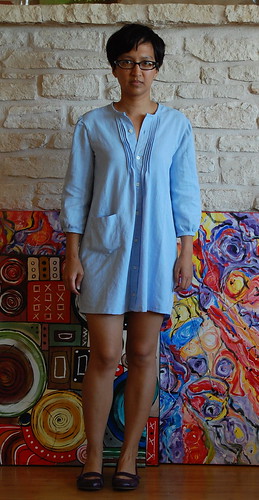
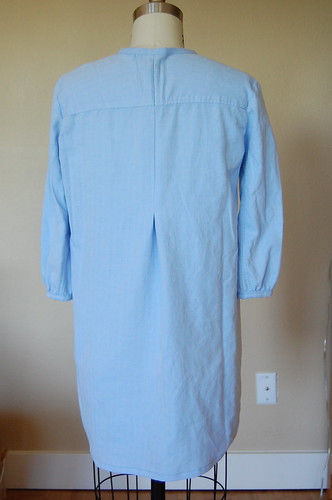
2. Dress refashioned from Men's Dress Shirt
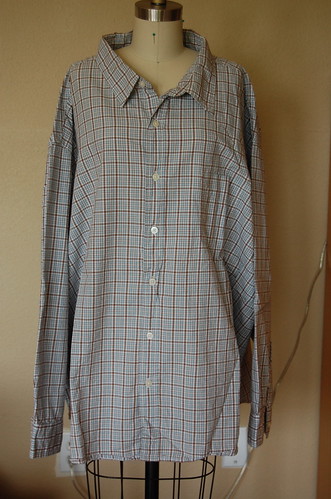
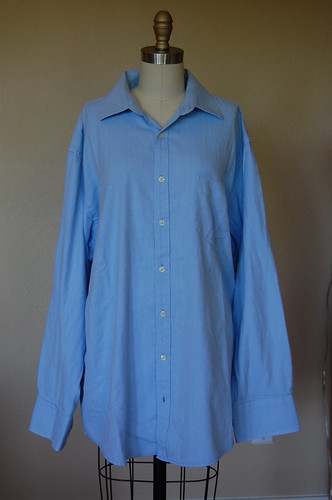
Last year, I was lucky enough to find this enormous men's shirt in a size 4XL. It was, by far, the biggest one in the stash, in great condition, and I kept waiting for the right project to make the most of the size and width of the original shirt.
Of all the Big 4 pattern companies, Vogue is the one I sew the least, and I generally like their pattern envelopes best! I bought Vogue 8585 at a $3.99 pattern sale a couple weeks ago, and bought the last yard+ of a fantastic deep pink twill to make it from. After I got home, I realized there was no way to get Vogue 8585 from the pink twill, and in fact, no other fabric from my ridiculously big stash seemed quite right. I remembered the 4XL shirt in my refashion stash and its fate was sealed.
I made a couple of changes. The most obvious one is that I didn't sew the "partial placket" as the pattern shows -- I just drew center front on the front bodice pattern piece and aligned it with center front of the men's shirt. I also chose not to sew in the back seam as I'm at my parents' house and don't have all my tools and workspace at the ready. To keep it simple, I cut the back bodice on the fold and it is thus missing some shaping around the waist.

This style, the gathered sleeveless raglan with tailored neckline, is kind of popular in home sewing patterns these past couple of years. I actually believe that I own a similar style pattern -- Vogue -- from two or almost three years ago that I never sewed! (I am kind of embarrassed to admit that, but it is the truth.)

I forgot to add another buttonhole and button on the neckband! It will look more finished. I just loved the shape of this dress, and liked that the coverage would not require unusual or uncomfortable undergarments. Despite its simplicity with only 4 pattern pieces, it's a style that required my full attention with markings. There was a lot of matching up, aligning, etc. and missing a mark meant an interruption in the flow, and a little extra work.
But worth it to me; I like wearing the final dress. I think I will try a dressier version, maybe even before I get home. Just need to get lucky finding the right fabric while I'm here....
For the full scoop, check out my Vogue 8585 review on PatternReview.com.
30 May 2009
144. Refashion 20: Gathered Neck Smock from Men's Linen Shirt / Refashion 21:Driver's Cap from Men's Dress Shirt / Gingham Sleeveless Summer Dress
I'm now officially sewing much more than I'm blogging -- I think I'm 5 or 6 posts behind, just in the last week! In the interest of catching up, here are the first three, starting with...:
I. The Dress
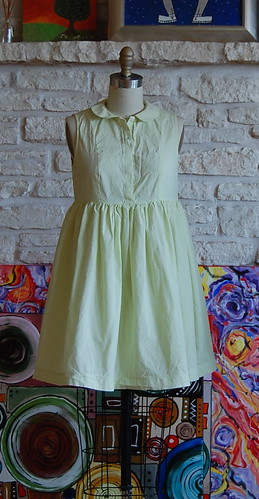 The bodice is from a shirt drafting experiment last year with simple princess lines. I drafted the pattern but never sewed it up. For the dress, I trimmed the bodice at the high waist and went rockabilly for the skirt, which is just a fancy way to say that I indiscriminately gathered two widths of 44" fabric, , and threw them on the bottom. The fabric is a dreamy, nearly gauzy cotton in chartreuse gingham. Sooooo soft and light!
I hadn't drafted a collar to go with the bodice, but an image that Geek Sewing posted on Facebook a few weeks back from the latest Mrs. Stylebook - MSB154(79/174) - had been on the brain. This MSB dress had what looked like a Peter Pan collar with pointed tips, with a little rise. Again, it gave me a leave-it-to-beaver/ 50's vibe so I went with it. I went to my new favorite drafting book, Dorothy Moore's Pattern Drafting and Dressmaking, to draft a simplified collar. I was going to use the sleeve pattern from the Pixie Shift but liked it sleeveless after everything else was done. So I bound the armholes. I left the top unlined (I wear a thin camisole underneath) but lined the skirt with some white cotton batiste.
II. The Cap

I. The Dress
The bodice is from a shirt drafting experiment last year with simple princess lines. I drafted the pattern but never sewed it up. For the dress, I trimmed the bodice at the high waist and went rockabilly for the skirt, which is just a fancy way to say that I indiscriminately gathered two widths of 44" fabric, , and threw them on the bottom. The fabric is a dreamy, nearly gauzy cotton in chartreuse gingham. Sooooo soft and light!I hadn't drafted a collar to go with the bodice, but an image that Geek Sewing posted on Facebook a few weeks back from the latest Mrs. Stylebook - MSB154(79/174) - had been on the brain. This MSB dress had what looked like a Peter Pan collar with pointed tips, with a little rise. Again, it gave me a leave-it-to-beaver/ 50's vibe so I went with it. I went to my new favorite drafting book, Dorothy Moore's Pattern Drafting and Dressmaking, to draft a simplified collar. I was going to use the sleeve pattern from the Pixie Shift but liked it sleeveless after everything else was done. So I bound the armholes. I left the top unlined (I wear a thin camisole underneath) but lined the skirt with some white cotton batiste.
Despite not putting buttonholes and buttons on the front placket (used a hidden safety pin on the inside), I wore it Sunday to the Austin Wine Festival, where it got good and sweaty. It really is just great for our summer weather. A trip through the laundry but not a subsequent trip under the iron later, it's back for our viewing pleasure. BTW, it may look snug up top on Clementine, as she is 1/2" - 1" larger around the bust than I.
II. The Cap
Louis had Track & Field Day at school a few weeks back, at which point it came to my attention that he didn't have a summer hat that fit. A Japanese hat pattern book I bought two years ago came to mind -- I'd never sewn anything from the many books I bought, and I figured if I could get comfortable tracing a hat pattern from the sort-of-confusing pattern sheet, and drawing in my own seam allowances, I might work up the courage to tackle a garment from another Japanese pattern book. I can't find an ISBN anywhere though it's got to be in the book somewhere, right? Anyway, I have always had a driving cap for Louis from when he was a small baby, so I traced out the driving cap pattern and sewed it up.
The hat and lining are from a men's shirt that was a little on the heavyish cotton side. I'm glad I used 1/4" seam allowances because there was a bit of curviness, thus made so much easier with narrow seams. All I had on hand was a pretty stiff heavyweight craft interfacing, so I interfaced both layers of the brim. The smallest size hat (56 cm) was a little big for Louis, so I'm modifying the pattern to scale it down in the right places for his head. In the meantime, the hat is still a little big for me but might be perfect for my dad.
III. Gathered Neck Smock Refashion
This started out as a men's shirt, too, in a banana-y yellow linen-cotton blend. In my eternal quest for slightly ever-new approaches to the men's shirts, I opened the neckline to a boatneck and gathered the shirt at the front neckline, then bias-bound the whole thing. The bodice fell over the shoulder enough to look like a little cap sleeve so I didn't sew in sleeves and just bound the armhole, too. (Please ignore the sloppy posture and subsequent shirt swinging to the left!)
Either this pattern needs some work or I picked the wrong fabric for the pattern. I used a self-drafted loose-fitting tunic pattern, made from my sloper, that had a side bust dart. I rotated the fullness to the neckline. But there's something odd about this shirt, how it seems to pull down at center front. Since the shirt has linen, it has eventually wrinkled along these pull lines, in a way I don't think 100% cotton would. I took the photos first thing this morning, and you can already see the tendency for that front placket to pull down from the neckline. I'll try this refashion again in 100% cotton, to determine how much of the pulling is due to a pattern problem vs. a fabric choice problem. Do you have any thoughts or experience with this?
So ends this very long post! How did I do trying to weave three projects into one photo shoot? LOL Next couple of posts: Yet another men's shirt refashion for me and one for Louis! And he likes it! It has been a busy week, hasn't it?
26 April 2009
134. Refashions 17 & 18: Thanks and a Giveaway
UPDATE: Giveaway is now closed. Thanks for participating!


This giveaway shirt is the empire waist "after" shirt above. It is made to fit like a glove on someone with 35.5" bust and 36" hips. This seems to translate to a size medium, perhaps on the smaller side of medium. But you can see it's not ultra-fitted, so there's wiggle room if your measurements are different by a little here or a little there. Plus, with the empire waist, this will still look great on you whether you are petite, average, or tall in stature. The fabric is a wrinkle-free cotton/ poly blend (55%/ 45%), in a sunny yellow. I apologize for the paled-out color in the "after" pics -- it's been very cloudy and the "before" picture shows the true color more accurately.
Borrowing an idea from Tina at glam.spoon to spread the blog-lovin', here's the low-down on the giveaway: if you would like a chance to win this shirt for yourself or someone you love, visit one or more of the blogs I read in the sidebar, and leave one quick comment with who you visited and what you liked. I'll ship internationally so get your comment on!
Every eligible comment left by Sunday, May 3 at midnight CST will be randomized and I'll let you know the winner on Monday. Sound good?
*****
She fit the clothes perfectly. How many sentences can I italicize in a row? How great to see how the tops fit and draped on a real body that moves and breathes, and to hear Meg's feedback about how it felt to wear them. I shall keep those photos under wraps for now, but to give Meg a personalized thank-you, I thought I would make her a men's dress shirt refashion. After all, now I know she and Carmen have the same measurements!
I'd never draped a men's dress shirt refashion on Carmen, and I remembered one specific comment she made while trying on the 302 refashions: She liked how the yellow & black top gathered at the empire line without making her look pregnant. So instead of using the full width of the original men's dress shirt, I draped and cut it so that the gathering would be more strategic and less... gestational. She wore it today, so I think she likes it!
How generous of Meg, right? What a spirit, so ready to give of her own time and energy. AND so generous of you to read along this past year and a bit. Thanks! Meg's shirt below, in case you're curious:

22 April 2009
132. Happy Earth Day from the Space Cadet, or Refashion 16: Earth Day Pintucked Shirtdress from Men's Button-Down Dress Shirt
Or, the post with the longest title in the world.


I see some room for improvement with my side seams on these shirt refashions, which means I will have to give up some length in exchange for more shape on the side and more visual interest from the back. It's nice to have something I like to wear that has saved another shirt from a landfill, or from someone who couldn't see the potential in this basic men's wardrobe staple!
I've felt vaguely out of it the last few days. I think it is mainly Louis' birthday and the several celebrations over the weekend that kind of knocked the (?) out of me. I've still managed to be productive, crossed things off my to-do list for sure, but for some reason there's a certain extra something that is not there. Can't even articulate what it is. So I have felt a little like a space cadet. No stress, just curiosity.
Anyway, Earth Day is here and all good refashionistas know that today is not the only day to sew something that's more considerate of our natural resources. Nonetheless, I present my latest project, the Pintucked Shirtdress, made from a 100% cotton XL men's button down dress shirt, in honor of Earth Day:
I'm not sure what to make of it even now that it's done. There's goes that space cadet thing again. I like to wear it, though it is about as short as I am comfortable with. I prefer how it looks on me to how it looks on the form. I'd been wanting to do 3/4 sleeves on one of these refashions for a while, but note that this left precious little usable fabric when all was said and done. So I bound the neckline instead of going for a collar of any kind.
The original idea was to pintuck from center front to about the princess line, but there wasn't enough width on the shirt for that. So I stopped after 4 pintucks on each side. I love how pintucks leave this graceful, gentle pool of fabric where they release. But I didn't like the collective dumpy puddle right on the inside of the bust:
This morning I decided to extend those pintucks downward by a few more inches, so that they would release just under the bust. Still not the ideal placement vertically but it's much better than before:
And here's the back. I'd started out with a pintucked yoke, but it's hard to make neat-ish pintucks through multiple layers of fabric, so I unpicked them this morning and went for the single inverted pleat. It still looks like a big bag from the bag, but a neater bag:
I see some room for improvement with my side seams on these shirt refashions, which means I will have to give up some length in exchange for more shape on the side and more visual interest from the back. It's nice to have something I like to wear that has saved another shirt from a landfill, or from someone who couldn't see the potential in this basic men's wardrobe staple!
Happy Earth Day today and every day! :)
Subscribe to:
Posts (Atom)

