

Showing posts with label draping. Show all posts
Showing posts with label draping. Show all posts
15 June 2012
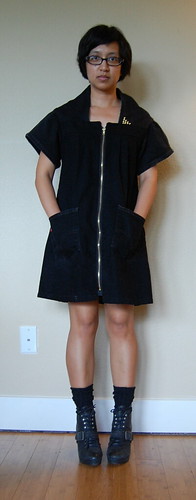
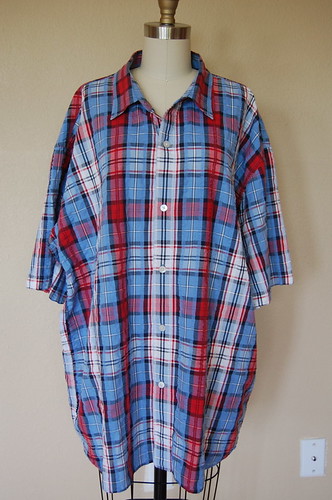
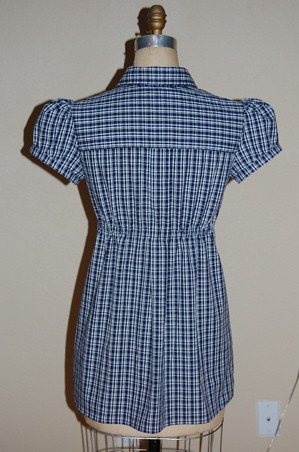
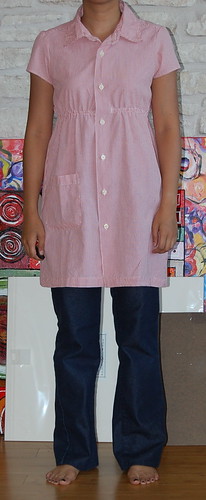
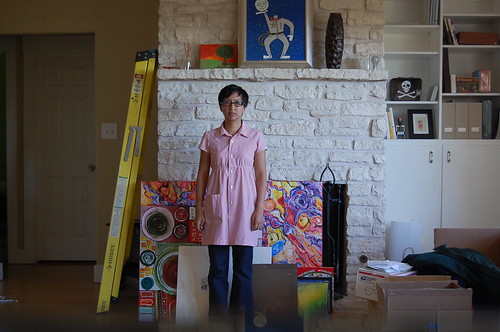
223. "Resort" Dress, aka Hazel Hack Dress
How is it that I'm drowning in work and still make time to sew? That's never happened before. Maybe my sewing mojo was blocked and all the work just hid that fact. Anyway, the recent swimsuit success seems to have really buoyed me, so here we are with another project, again with vacation in mind.
13 September 2010
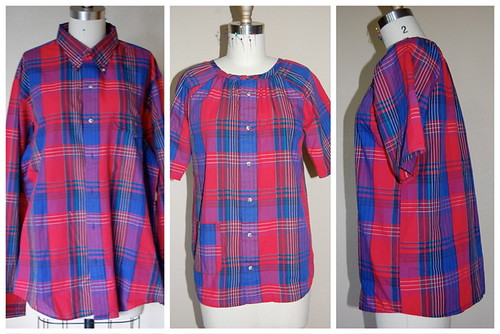
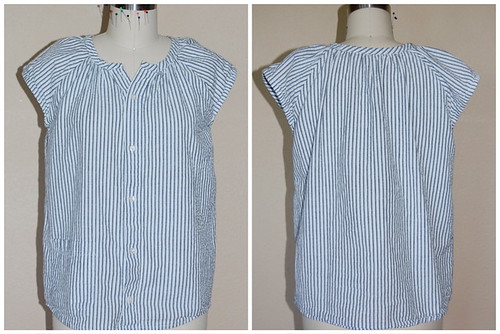
205. A whole lot of refashioning going on
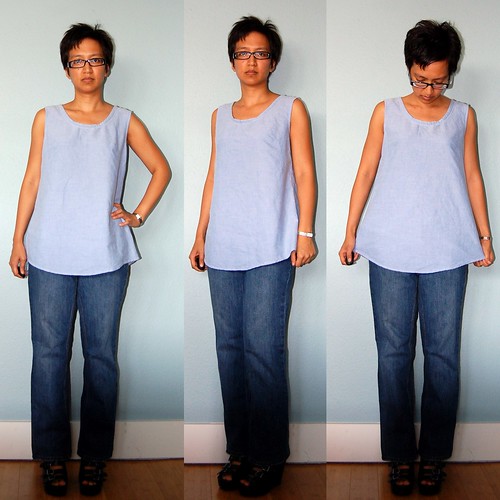
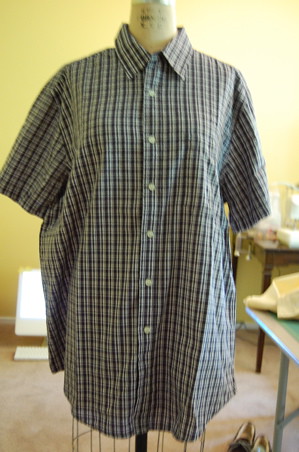
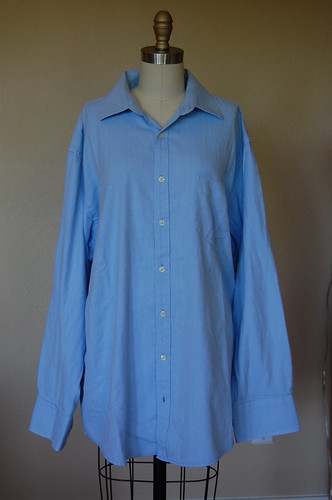
Geez, I haven't shared a sewing post with you in a month. Totally not reflective of what I've been up to. Let's start with a simple tank-style woven top and altered jeans. The tank is a refashioned men's shirt (short sleeve button down and SOFTASALLGETOUT) and the jeans were a standard pair of bootlegged Banana Republic jeans I have not worn because the bootlegs never really worked for me.
09 May 2010
194. Happy Mother's Day! Pantone 2010 Dress
Happy Mother's Day to all the mamas! It can be a tough job but we asked for it and do it with style. Hats off, sisters.
BTW, my name is Antoinette. You may have forgotten me, as it's been about six weeks since I last posted. Yeah, sorry about that. Springtime is extra-nuts around here, between spring break, family birthdays (and parties), Easter, seasonally heavy workload, and volunteer stuff at the elementary school. The school yearbook is due at the printer this Friday, which will leave me with more spare time. I've got a busy couple of weeks after that with work, and then school's.... out.. for.. summer!!!

BTW, my name is Antoinette. You may have forgotten me, as it's been about six weeks since I last posted. Yeah, sorry about that. Springtime is extra-nuts around here, between spring break, family birthdays (and parties), Easter, seasonally heavy workload, and volunteer stuff at the elementary school. The school yearbook is due at the printer this Friday, which will leave me with more spare time. I've got a busy couple of weeks after that with work, and then school's.... out.. for.. summer!!!
24 February 2010
190. Wednesday Workshop: Simple Sweatshirt Recon
It has been a busy and a bizzy February! I just got back from a short trip to New Orleans, and I had not seen the city since Hurricane Katrina in 2005. I didn't visit the Lower Ninth Ward or go on a self-guided photo tour of other areas that had been ravaged by Katrina, because I was working a lot and, in between, nursing a cold in the comfort of my hotel room. Still, it was good to see spirits so very high. The French Quarter was bustling and all outward signs say ongoing recovery. Esp. with the recent Saints Superbowl win. WHO DAT?!
I have thought a lot about sewing but don't have much new clothing to show for it (but lots of crafting! I'm just not used to blogging those crafty projects...).

I have thought a lot about sewing but don't have much new clothing to show for it (but lots of crafting! I'm just not used to blogging those crafty projects...).
Well, I have one new garment to share. After the sad news of Alexander McQueen's untimely death two weeks ago, I felt a little down and knew the best way out was to start one of the many sewing projects in my mental queue. Behold: the simple sweatshirt reconstruction.
01 December 2009
181. Refashion 34: Cocktail Dress from Homecoming Dress
Or, All 100% Polyester/ Acetate.
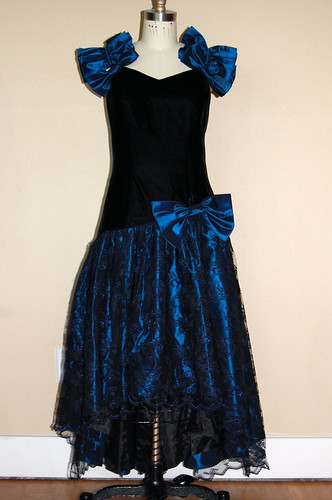
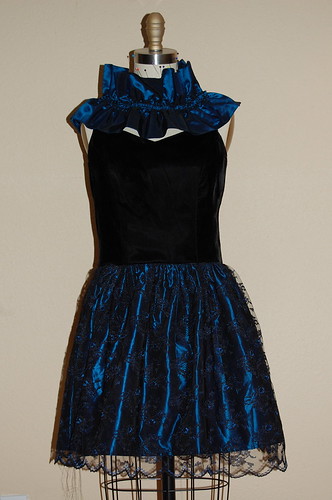
Or, The Shortest Post You'll Ever See on This Blog.
Before:
After:
Can't say I love the neckline (which used to be the sleeve puffs!) but it was quick and hid a multitude of sins the original seamstress committed on the top of the front bodice. And I wore it to a holiday party with some of my fave Austin sewists tonight! Good times. I also see from this photo that the lace hem is lower on the left. So I'll keep you posted after this dress undergoes its next revision.
Thanks for your comments on the last 2 posts. I plan to catch up this weekend with my responses. xo
15 November 2009
179. Refashion 33: Denim Coat/Dress from Men's Jeans
Well howdy, strangers!

Although I always envisioned it with sleeves, it looked much more like what I had in mind without the sleeves! My niece convinced me to try the sleeves so I did, and after trying it on with sleeves I really kind of hated it. Not so much for what it was, but for how far it seemed from what I had in mind. Now that I've washed it, taken photos, and see those photos, I am good with it! This is the second piece of Vocabulary's imaginary fall collection, with the studded capelet being the first.
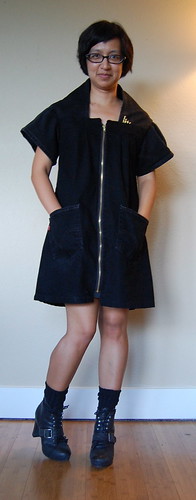
I've been working, travelling, and expanding my household by adding a 19-year-old niece (what a long story!). The sewing has come in fits and spurts. I got the idea for a coat/ dress after watching Signe Chanel this summer. Each Chanel seamstress enters the atelier in the morning, leaves her jacket in her locker, and puts on a simple white work coat. Like a lab coat, in a way. The idea of putting on a coat to signal that it's time to get to work has a lot of appeal, so I decided to sketch out a couple of "lab coats". This is the first of two in my head and on paper.
I started collecting black denim this summer, knowing that white simply wouldn't work for me. I started the pattern on October 8. I remember because Louis had a playground accident that morning, and I had to stop working on the pattern to pick him up from school and take him to the emergency room. He got all stitched up and back on his feet quickly, but everything on my cutting table stayed where it was for a full week! The next time I got back to the pattern, I had a couple of days to finish pattern work and cut out and assemble the main pieces: jacket front and back, front and back yokes, front zipper.
It hung on Clementine for about 3 weeks until I could work on it again. In one short session I draped the collar and sewed it on, and in a subsequent session I finished the insides (yoke facings) and cut the sleeves from the bottom legs of another pair of jeans and attached them. Today I washed it and put on the 1/4" brass studs. I wanted to only put them on one side of the collar, my 6-year-old said I should do it on both sides, and I intended to... until my fingertips protested after I finished the left side. So asymmetrical it is!
Although I always envisioned it with sleeves, it looked much more like what I had in mind without the sleeves! My niece convinced me to try the sleeves so I did, and after trying it on with sleeves I really kind of hated it. Not so much for what it was, but for how far it seemed from what I had in mind. Now that I've washed it, taken photos, and see those photos, I am good with it! This is the second piece of Vocabulary's imaginary fall collection, with the studded capelet being the first.
The collar was everything! The entire concept came to life because of my idea for the collar. After I attached the collar, I tried the coat (sans sleeves) on and my husband said, "I really don't care for it." I asked what he didn't like, and he was unable to articulate anything specific. At which point I went totally "Project Runway contestant" on him and declared, "Well, I like it and will wear it to your office Christmas party next month." Unlike PR contestants, I spun around and walked out of the room.
He followed me in there a few minutes later, possibly thinking he'd hurt my feelings, though still unable to tell me just what didn't work for him. I remained neither angry nor offended. It was just clear to me that he didn't get it. His tastes run pretty traditional/ conservative. With 3 years of garment sewing and 2 years of pattern play under my belt, my ability to create is catching up with my ability to imagine. And I find it hard to compromise now.
So I may look like a total weirdo to the average citizen when I wear this, but I will walk tall and feel proud of it. For the record, I probably won't wear it to my husband's office Christmas party, not because I'm ashamed of it -- but because no one wears black denim to a dressy party. :)
28 September 2009
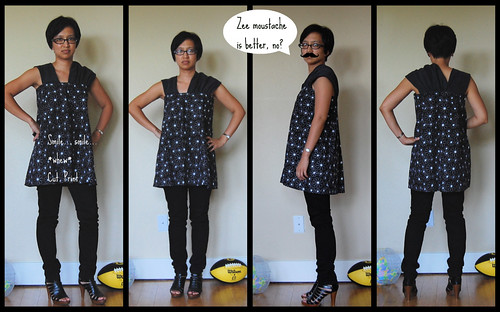
174. Refashion 31: Art Therapy Tunic from Skirt and Jeans
I've been absent from the blog.


It's been almost two weeks since my last post and I haven't even responded to the comments yet -- sorry. The last month has been a real doozy, ladies (and the occasional gentleman). It's been a tough year for my friends and family in the areas of jobs/ careers and divorce. Maybe because of our age, or the length of time most of the people we know have been married, or the economy, or some combination of all those things, there is an almost alarming frequency of major career or family upheaval around us. So the blogging has been slow. It has felt this past week like my creativity has been muffled.
After some news Saturday, it's fair to say that I felt quite funky (and not in the good way) on and off all day Sunday. I needed some art therapy big time.
Kyle recently posted a photo of her favorite skirt, and I recognized the fabric from a thrift store garment I bought to refashion. So I pulled it off the shelf and threw it on Clementine:
It was very big on Clementine as a skirt:
I didn't want to just make it a smaller skirt, though I guess that would have been the easiest route in retrospect. I pulled it up on Clementine and the size L skirt was fine around the bust with an extra inch or two to spare. From the front:
From the side:
From the back:
So I sewed pleats on the back, effectively taking up two inches of diameter around the waistband. I'd been working with some distressed black jeans, and I had one leg left from the previous project. I cut it open and draped out some sleeve-ish things. I worked up a sweat. Me, a pair of scissors, a handful of pins. I don't even know if I think it looks good! It's just barely "finished" -- but I'm done, I think:
Nothing like a fake moustache to lift the spirits. I'm 1000% sure the (un-?)sleeves were inspired by a houndstooth Alexander McQueen dress I've shown you before. Wednesday Workshop returns this week! xo
21 August 2009
168. Refashion 29: Coco Top from Men's Dress Shirt and "Dressing Your Age"
Before I forget: PR last night was fun to watch in a large group! I highly recommend trying this if you haven't done it before!
 It always starts out with an idea. In this case, after a couple weeks of Chanel immersion, I got an idea to make a birthday top for myself, refashioned from a men's dress shirt, of course. I have wanted to get more comfortable with asymmetry since the start of the year, so this was a great opportunity to work on something simple and to play a little.
From Chanel: Black & white palette; "epaulets".
From me: Pintucks; asymmetry, buttoned openings at the shoulder to get in and out.
From my mistakes: Asymmetrical pintucks (below) didn't drape well so I made them symmetrical (as in photos above)... better but far from perfect; as a result neckline is a little poochy; cut the armholes way too low, so little cap sleeves were not an option; changed my mind about how I would use the shirt placket so there are no pintucks on the back; just an inverted pleat (sorry, no pics).
I have to admit that, after weeks of torturous pattern refining and production sewing, this was quite a bit of fun, even though it didn't turn out like I thought it would at all!
There have been a lot of thick topics floating around in my head...
- A question about retro styles and gender inequality
- A rebuttal and bigger inquiry into ethical fashion, and,
- With my birthday yesterday, endless internal musing on the topic of "dressing your age".
I am really curious to know what you think about "dressing your age". This is subjective and personal, but please do share what's on your mind. For me, this has a lot to do with grace. When I turned 30, I got rid of those ridiculous miniskirts and chunky platform shoes in my closet. I mostly don't wear sweats ever, have banished most capri pants and hoodies for good, and assess, each year as my birthday approaches, if I feel like I'm "dressing my age".
What does "dressing your age" mean to you?
12 August 2009
164. Refashions 26 + 27a + 27b: All from men's shirts
1) THANK YOU
It has been a lot of fun to kick off Vocabulary and read your many supportive, encouraging comments... to see how many of you became Facebook fans, how many of you re-tweeted the shop opening announcement, how many of you wrote a whole new blog post to share the news! I've always enjoyed finding a place in the blogging community and making new friends in a new way. Launch weekend could have been way stressful but it ended up being very exciting and fun. Thank you for your friendship.
2) A disclaimer
This is my third time writing this post -- I actually deleted the first two drafts and started fresh each time. Because I am blogging about 3 tops, two of which I really don't care much for, and it made me tired to re-live the experience draping/ drafting/ sewing them up. And I thought if it was deflating for me to show you the pics and describe the challenges, maybe it would be deflating for you to see and read about them. But I've decided to document some of my lessons learned anyway in case they are interesting or helpful to you (and you can just close the window now and wait for the next post if you like, I would understand!).
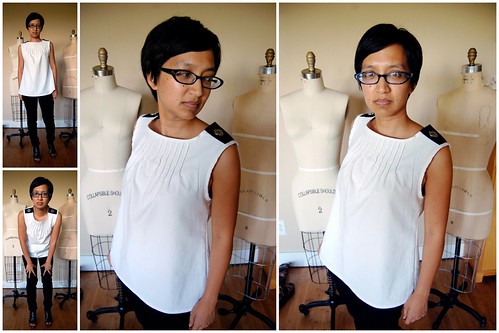
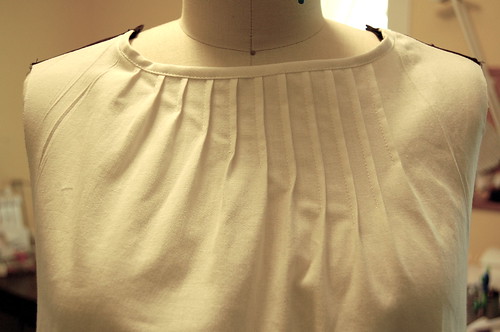
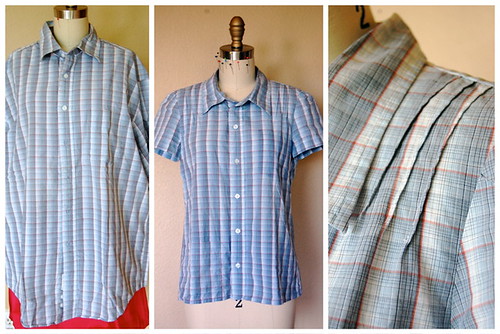
3) Refashion 26: Pintucked (Shoulder) Shirt from Men's Dress Shirt
This was my first design idea for Vocabulary's summer camp shirt variations. The original was a 100% cotton, short-sleeved men's shirt. The resulting women's shirt was challenged:
- Shoulders too wide
- Neckline too big, odd shape shape (the shirt started out collarless but I didn't like it, unpicked the binding, adjusted the original collar and sewed it on)
- Silhouette boxy, unflattering
- You can't see the pintucks on most patterned fabrics unless you're up close
So I ditched the whole concept. I'd tortured the fabric on this sample enough and still couldn't get the shirt where I wanted it. I've worn the shirt a few times and you know what? It isn't really comfortable! So I moved on to the next style without tinkering with the pattern/ first sample more.
4) Refashion 27a: Gathered Raglan Top from Men's Dress Shirt
This eventually became the Dulcet Top that's in the shop. But getting there was pretty much torture for me. In summary, the process for this top was:
- Sketch the design
- Drape a sample
- Transfer to pattern
- Sew the first sample
- Refine the sample
- Alter the pattern
- Sew the second sample
- Refine second sample
- Alter the pattern
- Sew the third sample, refine it, alter the pattern
- Lather, rinse, repeat
- Sew the top in its final form
- Then grade the pattern into multiple sizes, but I'll get to that later
Honestly, I wasn't unhappy with this first sample. I like wearing it and have gotten compliments. But when I thought about how much better it needed to be in order to be sustainable, a closet staple someone else would love and pretty much wear to death, it needed some changes:
- Silhouette is straight from the front but a-line when looking from the side. Decided to make the whole thing a-line and hit at high hip.
- Neckline was higher than I wanted it to be.
I thought I'd make those changes, make a perfect second sample, and we'd be ready to production sew! Not the case.
5) Refashion 27b: Gathered Raglan Top from Men's Dress Shirt
Well, just look at it. Not ideal. When you mess with patterns, there's a very real chance that when you change one thing, it will affect something else that you might not have considered. I'm pretty comfortable modifying patterns for tops with set-in sleeves, but obvz. was thrown by the raglan style:
- Neckline binding too short
- Too much fabric in the sleeves
- Never again use seersucker for this top b/c the fabric is too stiff, won't drape well
I didn't photograph the third sample because it is pretty close to the final Dulcet top. Anyway, the point is it took 4 samples to get it just as I wanted it. Which is why people work far, far in advance of the season they are designing for. Which is why I learned my lesson and am working on Fall/ Winter ideas now, as I boil. (BTW, 52 days over 100 degrees so far this summer.)
6. Pattern grading
For the average home sewist, pattern grading is about using a commercial sewing pattern and drawing a new line from a smaller size for bust to a larger line for hips, or something to that effect. Maybe it means buying a sweet vintage pattern that's too big and drawing a new set of seamlines to get one size smaller.
Until this experience I had never done the manual pattern grading, garment industry-style, for multiple sizes. This involves taking your sample pattern, which is usually in the middle of your size range, cutting it along various vertical and horizontal lines, and separating by fractions of an inch to grade up, or overlapping by fractions of an inch to grade down.
Now that I've done it, I could grade another pattern much more quickly and less painfully. But that first time, it was tough. I felt overwhelmed by the many pattern pieces now scattered about the floor like a puzzle. Louis was walking around the house with my camera, practicing his composition, and he snuck up on me and took this picture, which in retrospect says it all:
There are many more lessons to share, but another time. :)
31 July 2009
160. Refashion 25: Shirred Babydoll Sundress from Men's Dress Shirt
It's been just over a year since my very first refashion, and the dress I'm about to show you has been on my mind for almost that long!
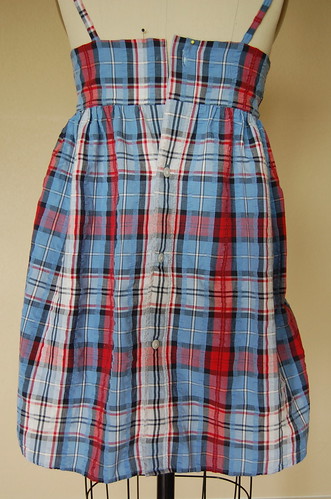


Every time I'd cut up a men's shirt and lay the sleeves out flat, I'd marvel over the amount of fabric it takes to wrap up two arms. Just looking at the shape of one of these big sleeves, it seemed to echo the shape I would expect for a shirred bust bodice -- then I'd use the shirt front and back as the dress front and back. A few months later, I picked up Simplicity 2902 and laid the pattern pieces on top of the largest men's shirt in my stash; there wasn't enough fabric for this pattern. As always, there are lots of ideas and only so much time, so I put this on the backburner in the R&D department.
 Front view, as modeled by Clementine.
Two days I ago, this idea made it back to the front burner, and I cut a men's size XL shirt, 100% cotton seersucker, and draped this babydoll dress right on Clementine.
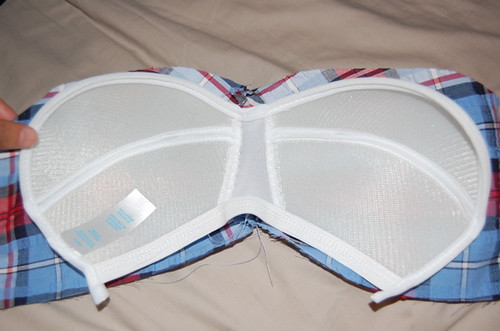
I had most of the dress done in a couple of hours -- it was fast! This bodice style does not lend itself to standard undergarments. Despite my *ahem* diminutive upper body, I feel most comfortable wearing a bra when I am ready to face the day. That's just me. So I took a Hancock break before sewing the bodice lining and evaluated their offerings for built-in bra inserts, which I've never used before. They had an impressive array of options. The "fits cup size A/B" versions were automatically out of the running, and the only "full bra" option was this one:
In the store I'd worried that the sew-in directions would be so complicated I might be frustrated, but as you can see, when I got home I discovered that the bra insert is actually bigger than the bodice front piece. So I dropped the bra insert idea, at least for the time being, and finished construction on the dress.
Front view, as modeled by Clementine.And the back view. Remember Clem's bust is a full inch larger than mine, when I'm wearing undergarments.
Me wearing the dress. It's comfy, though I still don't feel... protected up top. I'll probably buy some inserts or something, or make my own sew-in bra from some poly batting and bias tape.
Obligatory detail paragraph:
- I did not cut and re-shape the skirt part of the dress and re-sew the sides. The width of this dress is the exact width of the original shirt.
- The front of the men's shirt became the back of the dress so that the placket would be functional. I just had to add a buttonhole to the back band. (Now I need to sew on a button, haha!)
- Draping shirred pattern pieces never goes quite the way I think it will. It looked just right pinned on the form. Cut everything, gathered the fabric with thread, put it back on the form, and it was too big. There's another gap in my draping education to fill.
- I never know whether there will be quite enough length for a refashion to qualify as a dress. I thought this one would be a top, for sure, but it really is long enough! I ended up sewing the shirt placket from the second button from the bottom all the way to the bottom hem.
- I was able to match the pattern for the gathered front bodice, but after sewing in the gathering, it was harder to line up than I thought. This was one of those moments I thought I might unpick the piece and work really hard to align them. Then I decided I needed to get over it and get on with it. So it doesn't look very neat but this is the nature of research and development and trial and error, I guess.
- There was a lot of fabric left over -- the entire back yoke from the original shirt is still intact. This really surprises me! I'm thinking about adding some more random straps, you know, cause I really need the extra support. LOL
This is my optical illusion: If you stare long enough, the outwardly bending plaid design convinces you that contents are larger than they appear! ;)
It is a very easy dress/ top to just make up as you go along, and thus prob. an ideal tutorial garment. I'm just not 100% confident I can explain and photograph the steps very well... It's also very possible that one sleeve is not enough fabric to cover another woman's "dirty pillow" (I can't resist the chance to throw in that gem from Carrie). Note that one short sleeve gave enough fabric to cover both of mine! Hahahahahahahaha!!!
*crickets*
My thought is to try this on a larger form for a reality check, to see if a tutorial makes sense after all.
So, maybe another men's shirt refashion tutorial? Just in time for a beautiful spring. In Australia and New Zealand. Have a great weekend, everyone!
02 June 2009
145. Precision vs. Accuracy
ALERT: SEWING GEEK-OUT FOLLOWS....... Proceed with caution and patience...
Wikipedia has a great entry with visuals on precision and accuracy, so there's no use paraphrasing. Here's just one real-life example:
I traced around my sloper, rotated darts, added ease, etc., then traced around that pattern onto paper I would pin down to cut the fabric. Well, if I added even 1/16" around the sloper the first time I traced, then added another 1/16" around the modified pattern to the usable pattern, I added 1/8" total size all around over the sloper. Doesn't sound like much, but if you do this (*ahem*, does it sound like I have personal experience with this?) on a fitted princess seam bodice with a back zip, that totals 14 seam allowances for a total increase of 7/8" around the width of the bodice. My work was precise on each pattern piece, but the end result was very inaccurate when you compared the sewn-up sloper to the sewn-up newest pattern.
Conversely: one insomniac night, I draped a top on Clementine for the most accurate fit and compared the pieces to the flat pattern. Not even close in some areas. How bizarre and non-intuitive, right? Very accurate fit, but completely imprecise compared to the flat pattern.
For those of you who have seen The Fashion Show -- I think in episode 3, when Reco was team leader, he drew a pattern piece freehand, just eyeballing it on the paper. I know the resulting garment was spot-on, and I'd bet his results were both accurate and precise. I bet that mastery takes years and years and maybe even a special gift.
Precision vs. accuracy. Flat pattern vs. draping. I see this is what my sewing guru meant when she said that many patterns are best designed using both. (BTW, if you've read this far, I'm by no means implying that draping can't be precise. I guess I'm just not a precise draper yet.)
06 May 2009
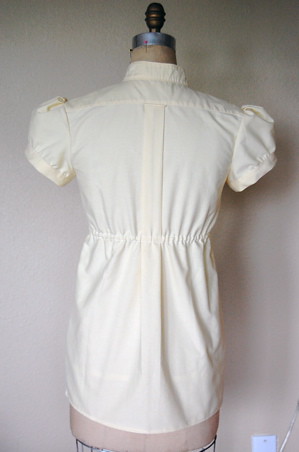
139. The Pixie Shift
We've had a lot of rain in Austin these past few weeks, which has kept the worst of the heat at bay. But the sun has come back in full force and we'll spend most of the week in the mid-90's (that would be about 35 degrees for those of you in celsius-land. I'm so global that way, haha!). My son asked me to stop walking to pick him up from school in the afternoon because it's just too hot to walk home with the heavy backpack. I find myself, as I do every spring, dreaming of a collection of loose, flowy, smocky, at least vaguely stylish summer dresses.

[I am reminded at times like this that I am a total, complete dork. Good thing I am OK with it.]
I'd like to say that this one just came to me out of nowhere, but (a) the construction is not complicated and I've seen similar styles in RTW, and (b) I actually drafted it as a flat pattern from my sloper two years ago, at tunic length. I never sewed it up, and decided Saturday night to make it by draping on Clementine instead. It's funny how little things matter to me now, like the yokes are slightly rounded in the draped version instead of straight across as in my flat pattern.
Recognize the fabric? You might have it in your home... in the form of a pillow or cafe curtains. It is from IKEA, on clearance last summer for $1.99 a yard. I can't help but be drawn to the bright colors and simple shapes. I'm like a 7-year-old that way. And in this dress, I probably look like one, too.
But I can't help but lighten up a bunch when I put this on! It's just a fun little smock to wear.
I can pinpoint the areas of my draping and patternmaking where I have not yet honed my eye and my intuition. Armholes and sleeves are two. I always make my armholes too high. I really understand quite a bit about sleeves, but the knowledge in my head doesn't always translate to good decisions for my hands to carry out. Why does that disconnect happen?
I made a pattern from this draped dress... I should compare it to the flat pattern from 2 years ago and see how well I did! Two changes are in order: narrowing the shoulders an inch, and contouring the bodice at the high waist for less tent and more a-line from the waist. Then I think I will sew it up again in a more... ahem... grown-up fabric.
BTW, you must be getting tired of seeing artwork propped up against the fireplace behind me. I finally bought more hardware to hang the rest of the pictures in the house, so maybe the next time I photograph an outfit the artwork will be on the walls instead of on the floor. ;)
26 April 2009
134. Refashions 17 & 18: Thanks and a Giveaway
UPDATE: Giveaway is now closed. Thanks for participating!


This giveaway shirt is the empire waist "after" shirt above. It is made to fit like a glove on someone with 35.5" bust and 36" hips. This seems to translate to a size medium, perhaps on the smaller side of medium. But you can see it's not ultra-fitted, so there's wiggle room if your measurements are different by a little here or a little there. Plus, with the empire waist, this will still look great on you whether you are petite, average, or tall in stature. The fabric is a wrinkle-free cotton/ poly blend (55%/ 45%), in a sunny yellow. I apologize for the paled-out color in the "after" pics -- it's been very cloudy and the "before" picture shows the true color more accurately.
Borrowing an idea from Tina at glam.spoon to spread the blog-lovin', here's the low-down on the giveaway: if you would like a chance to win this shirt for yourself or someone you love, visit one or more of the blogs I read in the sidebar, and leave one quick comment with who you visited and what you liked. I'll ship internationally so get your comment on!
Every eligible comment left by Sunday, May 3 at midnight CST will be randomized and I'll let you know the winner on Monday. Sound good?
*****
She fit the clothes perfectly. How many sentences can I italicize in a row? How great to see how the tops fit and draped on a real body that moves and breathes, and to hear Meg's feedback about how it felt to wear them. I shall keep those photos under wraps for now, but to give Meg a personalized thank-you, I thought I would make her a men's dress shirt refashion. After all, now I know she and Carmen have the same measurements!
I'd never draped a men's dress shirt refashion on Carmen, and I remembered one specific comment she made while trying on the 302 refashions: She liked how the yellow & black top gathered at the empire line without making her look pregnant. So instead of using the full width of the original men's dress shirt, I draped and cut it so that the gathering would be more strategic and less... gestational. She wore it today, so I think she likes it!
How generous of Meg, right? What a spirit, so ready to give of her own time and energy. AND so generous of you to read along this past year and a bit. Thanks! Meg's shirt below, in case you're curious:

22 April 2009
132. Happy Earth Day from the Space Cadet, or Refashion 16: Earth Day Pintucked Shirtdress from Men's Button-Down Dress Shirt
Or, the post with the longest title in the world.


I see some room for improvement with my side seams on these shirt refashions, which means I will have to give up some length in exchange for more shape on the side and more visual interest from the back. It's nice to have something I like to wear that has saved another shirt from a landfill, or from someone who couldn't see the potential in this basic men's wardrobe staple!
I've felt vaguely out of it the last few days. I think it is mainly Louis' birthday and the several celebrations over the weekend that kind of knocked the (?) out of me. I've still managed to be productive, crossed things off my to-do list for sure, but for some reason there's a certain extra something that is not there. Can't even articulate what it is. So I have felt a little like a space cadet. No stress, just curiosity.
Anyway, Earth Day is here and all good refashionistas know that today is not the only day to sew something that's more considerate of our natural resources. Nonetheless, I present my latest project, the Pintucked Shirtdress, made from a 100% cotton XL men's button down dress shirt, in honor of Earth Day:
I'm not sure what to make of it even now that it's done. There's goes that space cadet thing again. I like to wear it, though it is about as short as I am comfortable with. I prefer how it looks on me to how it looks on the form. I'd been wanting to do 3/4 sleeves on one of these refashions for a while, but note that this left precious little usable fabric when all was said and done. So I bound the neckline instead of going for a collar of any kind.
The original idea was to pintuck from center front to about the princess line, but there wasn't enough width on the shirt for that. So I stopped after 4 pintucks on each side. I love how pintucks leave this graceful, gentle pool of fabric where they release. But I didn't like the collective dumpy puddle right on the inside of the bust:
This morning I decided to extend those pintucks downward by a few more inches, so that they would release just under the bust. Still not the ideal placement vertically but it's much better than before:
And here's the back. I'd started out with a pintucked yoke, but it's hard to make neat-ish pintucks through multiple layers of fabric, so I unpicked them this morning and went for the single inverted pleat. It still looks like a big bag from the bag, but a neater bag:
I see some room for improvement with my side seams on these shirt refashions, which means I will have to give up some length in exchange for more shape on the side and more visual interest from the back. It's nice to have something I like to wear that has saved another shirt from a landfill, or from someone who couldn't see the potential in this basic men's wardrobe staple!
Happy Earth Day today and every day! :)
19 April 2009
131. Style 1003
Brown and green...... I love these colors in nature, but in t-shirts with identical screenprint designs, that will come together to make one top......
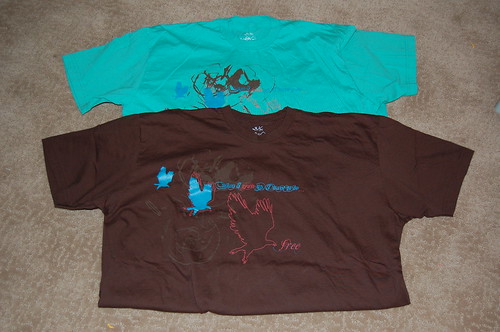
Hmmmmmmm... Brown and green...
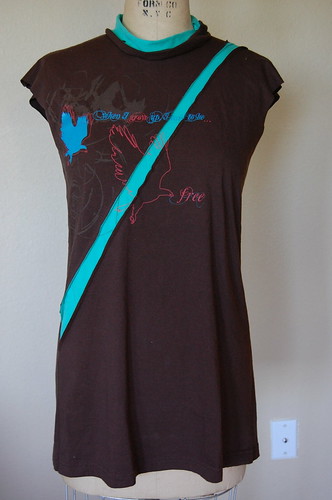
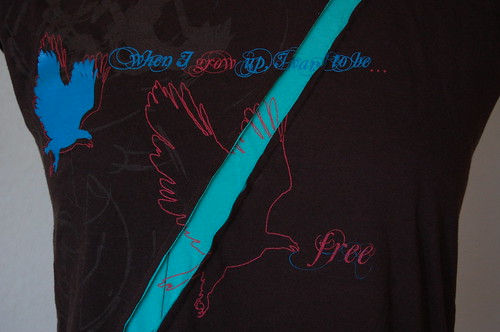
These two shirts have the same screenprint in similar colors, a series of eagles and the message, "When I grow up I want to be free." My friend Ashley felt strongly that the brown be the foundation and the green be the accent. The screenprinted message put in my mind this image of the vibrant green breaking free of the oppressive brown, and after consulting with sewing guru Shauna on the structural integrity of diagonal seams, she suggested exposed seams instead of internal seams where my green would break free from the brown. I like what happened:
Full disclosure: I knew I wanted to insert the green through the words and the big eagle, but I was terrified to cut into the fabric for fear of mis-cutting and thus mis-aligning the screenprint between the two colors of fabric. I sat on the concept for 3 days before getting up the gumption to measure and cut, and for all that worrying it took me what felt like 10 minutes to measure, cut, and insert that green strip of fabric! And it turned out A-O-K.
I've got to figure out the neckline. The "collar" in the photo above is just pinned in. I would love to scoop the neckline more but don't want to cut into the screenprint. A plain neckline looks too plain to me, but an embellished one might really take away from that green insert. I've been fussing and fidgeting with fabric but The Right Answer hasn't hit me yet. As always, I am open to suggestions if you have any and appreciate your time and considered responses. :)
12 April 2009
129. Refashion 15: The Reflex Shirt from Men's Button-Down Shirt
I'm a big believer in the idea that the most growth happens when we head outside our comfort zone, and being a fan of growth, I try to get there pretty often. I don't really associate fear with discomfort anymore -- I can feel uncomfortable and that's not usually intimidating to me. But this 302Designs thing has kept me outside my comfort zone for almost two months, and tonight I craved the comfort and reassurance of something familiar, like... oh... a men's shirt refashion. You know, made from that fabric called a "woven"?
 This Izod camp shirt was a men's size M, and because I wanted to cruise on auto-pilot pretty quickly, I decided to keep the collar and go vaguely Grainger. It was a wonderful couple of hours, with no agony, no big decisions, very few measurements, sleeves from Simplicity 4179 (this seems to be OOP now?). After sewing the casing on the inside instead of on the outside like the Grainger, I stepped back and thought, Hey, did I sew that on the correct side of the shirt? I guess an inside casing had been on my mind for so long that it was a reflexive movement. The whole thing came together like a reflex. It didn't even occur to me to try on the shirt until after it was done.
 Easy-peasy. Might need to shimmy the gathered fabric around the back more so it doesn't look so much like my bust is drooping. Drooping would require a more substantial bust anyway so it's just an inaccurate look. LOL

This Izod camp shirt was a men's size M, and because I wanted to cruise on auto-pilot pretty quickly, I decided to keep the collar and go vaguely Grainger. It was a wonderful couple of hours, with no agony, no big decisions, very few measurements, sleeves from Simplicity 4179 (this seems to be OOP now?). After sewing the casing on the inside instead of on the outside like the Grainger, I stepped back and thought, Hey, did I sew that on the correct side of the shirt? I guess an inside casing had been on my mind for so long that it was a reflexive movement. The whole thing came together like a reflex. It didn't even occur to me to try on the shirt until after it was done.Easy-peasy. Might need to shimmy the gathered fabric around the back more so it doesn't look so much like my bust is drooping. Drooping would require a more substantial bust anyway so it's just an inaccurate look. LOLOutsapop ran a blurb on the runway bunny ears at Louis Vuitton Fall 2009. I guess I felt inspired. Judging from the look on my face I could stand to work on my camera presence again for a little bit. I am hoping the helmet draws your eyes away from my tiredness!
After a few hours enjoying my distinct lack of growth, it's time to head back into the fray, to start doubting my every decision again, to hope I get this whole thing right, to feel a pang of terror as I cut into a 302 t-shirt and know there isn't another one if I make a mistake. Thanks for taking this trip with me.
[Still some boxes with contents to deal with, shelves to be filled, pictures to be hung around the house, and a ladder to do it with. This is my life, right now.]
11 April 2009
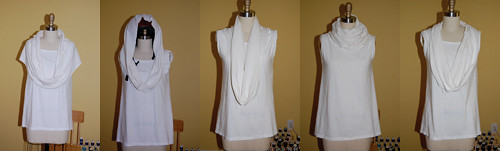
128. Style 1002
Moving right along in the 302Designs project... I had started a muslin on Clementine a few weeks back, using one of my husband's shirts. The simple sleeveless shell had ruched shoulders, was fitted around the bust and flared into a slight a-line, and truthfully it looked fine. Uneventful.
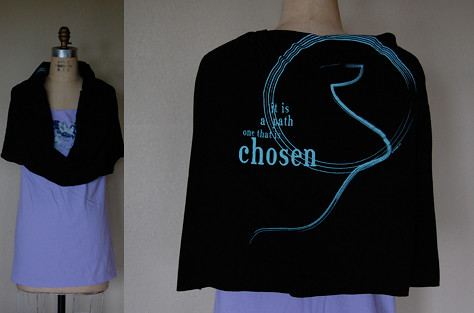
When worn as a reverse cowl, the front looks well-draped and the back looks like a hoodie:
 And below shows, from L-R, hooded, doubled over turtleneck, grecian or roman, you decide (or you tell me, Lopi, if you are reading this LOL), and high-necked front cowl.

After my exercise last week, laying out shirts in a variety of combinations to see what jumped out at me, I decided to tackle the lavender and navy shirts next. I semi-draped all over Carmen for a while and didn't feel anything coming together. The thought of "the illusion of layers" kept surfacing, and when I looked at Clementine, she still had that white shell on her. I can't explain how, or why, but the thought came to me to cut another white shirt from the underarm seam down, and attach that tube to the back of the shell. I was taken aback by how much I liked the result:
It's just this versatile garment. It can be worn like a capelet, like a hoodie, like a front or back neck cowl, doubled over into a bunchy turtleneck... It felt like divine inspiration for a few minutes, and then this fear came over me, "Where have I seen this before? Whose design is so ingrained in my subconscious that I am re-creating what has probably been done before?" I sent it to Shauna to see if she knew. She agreed that it does look inspired by someone else, but couldn't put a finger on who.
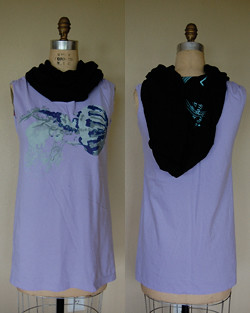
Part two of Style 1002 is, then, taking the concept from muslin stage to the "fashion fabric" -- namely, the lavender and navy shirts. The two white muslin shirts were a size Large on Clementine, which left some room to cut and play. The two 302 shirts were also a size Large, but on Carmen there was very little room to cut and play. In fact, by the time I got to the navy shirt, I had to do some very creative piecing so that it was long and wide enough to do the same things on Carmen that the muslin did on Clementine. Plus, the design on the navy shirt was sooooo big....
Anyway, the goal was to let the design on the navy shirt show when the design on the lavender was covered up, as below, shown front and back, when worn as a capelet:
And below shows, from L-R, hooded, doubled over turtleneck, grecian or roman, you decide (or you tell me, Lopi, if you are reading this LOL), and high-necked front cowl.And on to the next look...
Subscribe to:
Posts (Atom)

