Showing posts with label pattern drafting. Show all posts

06 June 2011

212. Knock-off City: Cherry Print Knock-off Dress

On the left is my latest summer dress, and on the right is the knock-off point:

But really, nothing is truly original, right?

11 March 2011

210. One (major) pattern piece

Hi, Blogland Buddies!  It has been a while!  I've missed you!  :)

Since my last post, which was just before Christmas, I've worked extensively for two very cool new clients and other very cool current clients, seen the Austin school district undergo a massive budget crisis which resulted in the threat of my son's fantastic public school being closed, lost myself in the ensuing drama, pulled myself back out with the help of good friends, and finally gotten back to sewing and life in general.

After a 2-month hiatus from sewing, I jumped back in by skinnifying 2 pairs of jeans for family members and mending a pair of Louis' shorts.  Easy stuff, projects to dip my toes back in the water.  Then came Book Character Day at school.  Louis wanted to be Curious George (again) so I made a (bigger than last year) monkey suit.  I took a McCall's boys shirt pattern and pant pattern and traced around them both, matching at the waist and (as best I could) aligning along the grainlines.  I've always appreciated those Simplicity Jiffy patterns from the 60's and 70's, with one main pattern piece, so I blended the front and back so that there was no side seam.  Et voila!  A one-piece pattern for a monkey suit:


27 March 2010

193. Wednesday Workshop: The W Bag v1 :: Free Pattern

Did you think Wednesday Workshop was limited to Wednesdays?  No way!  I just returned home from a week in White Plains/ Westchester County, NY, and Summit, NJ -- lots and lots and lots of travel, and lots of work!!!  I tried to include a day or two extra on this trip to venture into NYC, WHERE I HAVE NEVER EVER BEEN, but it wasn't meant to be.  Do you know how it is when sometimes you feel like you are pushing so hard for something to happen, but nothing falls into place no matter what?  That's how it was, so I figure NYC is meant for another trip.  Garment District, I've still got my eye on you!

Did you follow the recent story about W Magazine's search for a new editorial director?  While I was out of town, it seems they found one.  Meanwhile, this past Sunday, Kyle visited Austin and commented on my bag, which I'd made and called my "W Bag version 1," as I designed it especially to accommodate the oversized dimensions of W Magazine without damaging the corners.  Reminded me that I'd intended to share this pattern in case anyone else was looking for a brand new bag.  It has been my go-to bag all fall and winter long!  I will try it soon in a spring-appropriate fabric because the dimensions of the bag, for me, are just right.  Big enough for lots of stuff, like a big W magazine and a light sweater and wallet and keys, but not Mary-Kate-and-Ashley-Olson-bag big.  Maybe it will work for you, too?  Click through for the pattern link and directions.


26 February 2010

191. Read All About It! Newsboy Cap: Free Pattern + Tutorial


Being invited by the ever-creative Dana to participate in Celebrate the Boy month gave me an opportunity to revisit one of my favorite topics: my 6-year-old son's head.  I've traced the story back to labor: I checked into the hospital when I was 6 cm dilated, at which point the doctor remarked that, based on my baby’s head size, the baby would weigh at least 8 pounds. I was stunned and scared! Hours later I was surprised not only by my baby’s gender (BOY) but also by his 8-pound baby head on a 6-pound baby body.  Mmmm hmmmm.

After the initial head pointiness from that trip into the outside world, my son’s head bounced back into admirably round form.  It has always been enormous, enormously round, and an enormous source of pride for me, with its glossy, healthy hair and housing the most amazing, wondrous brain!  Sometimes I am allowed views into the brain in that head, with thoughts both fantastical (“When I grow up I am going to buy my own chocolate factory”) and mystifying (“If I had a turtle, I would punch it in the face”).

I will always remember his first store-bought driving cap, allowing me to Celebrate the Enormous Head.  Given that, it was exciting to be invited by Dana to participate in Celebrate the Boy and find a way to share the joys of adorning our beloved boys' heads.  When I read that newsboy caps were traditionally made of 8 panels, I scoffed at the wimpiness of the commercially made 6-panelled caps, and I vowed that our handmade caps would return to the illustrious glory of 8 panels. Don’t our boys deserve that???

Of course they do, but after drafting from scratch and sewing three total samples to get to this point, I only have a cap pattern to offer for ages 6-8.  Tiny changes in the pattern make a big difference, and I need more time to grade and fit for smaller heads.  So stay tuned for a cap pattern I'll share in the future for ages 2-4 or something like that.  Or, if you're brave and try your hand at grading it for other sizes, please let us know where we can download your version.

Keep reading for the Read All About It! Newsboy Cap: Free Pattern + Tutorial.


09 September 2009

172. Wednesday Workshop: Bikini Undies to Boy Short Undies

People, I am not even kidding! This is part 3 of 3 in a comprehensive exploration of sewing your own undies. This weekend I saw another $7 escape my life forever as a pair of nylon boy short undies from Target bit the dust, after maybe 20 wears. Never ever ever again. That was $7 that could have bought a month's worth of coffee, or a matinee ticket to The September Issue or Coco Before Chanel, or 3 jars of Nutella, or a yard of decent fabric. I'm not buying undies anymore, mark my words.

Here's my completed boy short version. You know I don't shy away from the colorful and bold when it comes to the undies:


It has actually been 2 weeks since my last Wednesday Workshop post. Things were quite busy 2 weeks ago with my training work, and I couldn't get my head around converting those bikini pattern pieces into boy shorts. I knew it could work... just took me some time to get in the right mindset to figure it out. Here's the good news: it might take 30 minutes to draft the pattern, but if you've sewn up the bikini panties from two weeks ago, putting these boy shorts together will take 15 minutes. Here's the Flickr tutorial:


This concludes the undies workshops! A few notes after wearing the three prototypes:
  • I've tried elastic casing, sewing regular elastic right on the fabric, and sewing a lingerie elastic with a picot edge right on the fabric. The most comfortable so far, which happens to be the easiest to me, is the lingerie elastic with the picot edge. I used it on the boy short undies, it is very comfortable against the skin, and it has just the right amount of give and stretch. A package of this (enough for one pair of boy shorts) was $0.38 -- yes, 38 cents -- on sale, but at regular price was $1. Worth every penny.
  • I will try two more kinds of elastic on future undies: the legendary fold-over elastic, as suggested by Johanna Lu, and elastic lace, which I had a hard time finding locally. I think the elastic lace will do a better job of hiding pantylines. If you have worked with these or end up using these in an undies project of your own, please let me know what you think.
  • The hipster undies were originally sewn with the leg hems just turned under and sewn with a zigzag stitch. This did not wear well -- the leg openings (predictably) stretched with wear, and more than I was comfortable with. I will probably sew a 1/4" elastic on this pair. But hipsters are not my favorite style of undies to wear, so I doubt I will sew them again.
  • I suspect that you can draft the boy shorts pretty easily without converting a pattern. But I'll save that experiment some other time. I'm burned out for now exploring undies.
A Flickr user asked me how sewing your own undies is more economical. Let's calculate the cost of 10 pairs of undies I've bought in the last year, several of which are already falling apart, at an average of $6 per pair: $60. I can get 4 pairs of boy short undies (which use the most fabric of all types) from a yard of 60" wide cotton jersey. Let's say that runs $6 a yard, so for 2 1/2 yards I'd pay $15. Plus 10 packages of elastic for a total of $10. Including a spool of thread for $2, that brings my monetary investment in self-made undies to $27 for the same 10 pair.

What about the time investment? I've invested about an hour of pattern drafting time and 15 minutes per pair of undies, for a 3 1/2 hour total time investment. When I purchased the last 10 pairs of undies, I probably spent more than 3 1/2 hours hemming and hawing over how much longer I could use the tattered and torn undies I had, driving to the store, trying them on over my undies in the dressing room, thinking about how poorly some fit or how uncomfortable they were while I was wearing them, and dropping to the ground to curse the heavens when some of them started falling apart within a year.

So the undies are done and it's time for a new project! Any ideas for upcoming Wednesday Workshops? I have a short list of experimental DIY kinds of projects, but am open to suggestions. :)

12 August 2009

164. Refashions 26 + 27a + 27b: All from men's shirts

1) THANK YOU

It has been a lot of fun to kick off Vocabulary and read your many supportive, encouraging comments... to see how many of you became Facebook fans, how many of you re-tweeted the shop opening announcement, how many of you wrote a whole new blog post to share the news! I've always enjoyed finding a place in the blogging community and making new friends in a new way. Launch weekend could have been way stressful but it ended up being very exciting and fun. Thank you for your friendship.


2) A disclaimer

This is my third time writing this post -- I actually deleted the first two drafts and started fresh each time. Because I am blogging about 3 tops, two of which I really don't care much for, and it made me tired to re-live the experience draping/ drafting/ sewing them up. And I thought if it was deflating for me to show you the pics and describe the challenges, maybe it would be deflating for you to see and read about them. But I've decided to document some of my lessons learned anyway in case they are interesting or helpful to you (and you can just close the window now and wait for the next post if you like, I would understand!).


3) Refashion 26: Pintucked (Shoulder) Shirt from Men's Dress Shirt

This was my first design idea for Vocabulary's summer camp shirt variations. The original was a 100% cotton, short-sleeved men's shirt. The resulting women's shirt was challenged:
  • Shoulders too wide
  • Neckline too big, odd shape shape (the shirt started out collarless but I didn't like it, unpicked the binding, adjusted the original collar and sewed it on)
  • Silhouette boxy, unflattering
  • You can't see the pintucks on most patterned fabrics unless you're up close
So I ditched the whole concept. I'd tortured the fabric on this sample enough and still couldn't get the shirt where I wanted it. I've worn the shirt a few times and you know what? It isn't really comfortable! So I moved on to the next style without tinkering with the pattern/ first sample more.


4) Refashion 27a: Gathered Raglan Top from Men's Dress Shirt

This eventually became the Dulcet Top that's in the shop. But getting there was pretty much torture for me. In summary, the process for this top was:
  1. Sketch the design
  2. Drape a sample
  3. Transfer to pattern
  4. Sew the first sample
  5. Refine the sample
  6. Alter the pattern
  7. Sew the second sample
  8. Refine second sample
  9. Alter the pattern
  10. Sew the third sample, refine it, alter the pattern
  11. Lather, rinse, repeat
  12. Sew the top in its final form
  13. Then grade the pattern into multiple sizes, but I'll get to that later
Honestly, I wasn't unhappy with this first sample. I like wearing it and have gotten compliments. But when I thought about how much better it needed to be in order to be sustainable, a closet staple someone else would love and pretty much wear to death, it needed some changes:
  • Silhouette is straight from the front but a-line when looking from the side. Decided to make the whole thing a-line and hit at high hip.
  • Neckline was higher than I wanted it to be.
I thought I'd make those changes, make a perfect second sample, and we'd be ready to production sew! Not the case.


5) Refashion 27b: Gathered Raglan Top from Men's Dress Shirt

Well, just look at it. Not ideal. When you mess with patterns, there's a very real chance that when you change one thing, it will affect something else that you might not have considered. I'm pretty comfortable modifying patterns for tops with set-in sleeves, but obvz. was thrown by the raglan style:
  • Neckline binding too short
  • Too much fabric in the sleeves
  • Never again use seersucker for this top b/c the fabric is too stiff, won't drape well


I didn't photograph the third sample because it is pretty close to the final Dulcet top. Anyway, the point is it took 4 samples to get it just as I wanted it. Which is why people work far, far in advance of the season they are designing for. Which is why I learned my lesson and am working on Fall/ Winter ideas now, as I boil. (BTW, 52 days over 100 degrees so far this summer.)


6. Pattern grading

For the average home sewist, pattern grading is about using a commercial sewing pattern and drawing a new line from a smaller size for bust to a larger line for hips, or something to that effect. Maybe it means buying a sweet vintage pattern that's too big and drawing a new set of seamlines to get one size smaller.

Until this experience I had never done the manual pattern grading, garment industry-style, for multiple sizes. This involves taking your sample pattern, which is usually in the middle of your size range, cutting it along various vertical and horizontal lines, and separating by fractions of an inch to grade up, or overlapping by fractions of an inch to grade down.

Now that I've done it, I could grade another pattern much more quickly and less painfully. But that first time, it was tough. I felt overwhelmed by the many pattern pieces now scattered about the floor like a puzzle. Louis was walking around the house with my camera, practicing his composition, and he snuck up on me and took this picture, which in retrospect says it all:


There are many more lessons to share, but another time. :)

02 June 2009

145. Precision vs. Accuracy

ALERT: SEWING GEEK-OUT FOLLOWS....... Proceed with caution and patience...

Sometimes you understand a concept and sometimes you really get it. Since I learned about precision and accuracy in elementary school science, until the past few weeks, I have merely understood the concepts of and difference between precision and accuracy. Now that I've had some time working with flat patternmaking and draping I feel that I really get it.

Wikipedia has a great entry with visuals on precision and accuracy, so there's no use paraphrasing. Here's just one real-life example:

I traced around my sloper, rotated darts, added ease, etc., then traced around that pattern onto paper I would pin down to cut the fabric. Well, if I added even 1/16" around the sloper the first time I traced, then added another 1/16" around the modified pattern to the usable pattern, I added 1/8" total size all around over the sloper. Doesn't sound like much, but if you do this (*ahem*, does it sound like I have personal experience with this?) on a fitted princess seam bodice with a back zip, that totals 14 seam allowances for a total increase of 7/8" around the width of the bodice. My work was precise on each pattern piece, but the end result was very inaccurate when you compared the sewn-up sloper to the sewn-up newest pattern.

Conversely: one insomniac night, I draped a top on Clementine for the most accurate fit and compared the pieces to the flat pattern. Not even close in some areas. How bizarre and non-intuitive, right? Very accurate fit, but completely imprecise compared to the flat pattern.

For those of you who have seen The Fashion Show -- I think in episode 3, when Reco was team leader, he drew a pattern piece freehand, just eyeballing it on the paper. I know the resulting garment was spot-on, and I'd bet his results were both accurate and precise. I bet that mastery takes years and years and maybe even a special gift.

Precision vs. accuracy. Flat pattern vs. draping. I see this is what my sewing guru meant when she said that many patterns are best designed using both. (BTW, if you've read this far, I'm by no means implying that draping can't be precise. I guess I'm just not a precise draper yet.)

30 May 2009

144. Refashion 20: Gathered Neck Smock from Men's Linen Shirt / Refashion 21:Driver's Cap from Men's Dress Shirt / Gingham Sleeveless Summer Dress

I'm now officially sewing much more than I'm blogging -- I think I'm 5 or 6 posts behind, just in the last week! In the interest of catching up, here are the first three, starting with...:

I. The Dress

The bodice is from a shirt drafting experiment last year with simple princess lines. I drafted the pattern but never sewed it up. For the dress, I trimmed the bodice at the high waist  and went rockabilly for the skirt, which is just a fancy way to say that I indiscriminately gathered two widths of 44" fabric, , and threw them on the bottom.  The fabric is a dreamy, nearly gauzy cotton in chartreuse gingham.  Sooooo soft and light!

I hadn't drafted a collar to go with the bodice, but an image that Geek Sewing posted on Facebook a few weeks back from the latest Mrs. Stylebook - MSB154(79/174) - had been on the brain. This MSB dress had what looked like a Peter Pan collar with pointed tips, with a little rise. Again, it gave me a leave-it-to-beaver/ 50's vibe so I went with it. I went to my new favorite drafting book, Dorothy Moore's Pattern Drafting and Dressmaking, to draft a simplified collar. I was going to use the sleeve pattern from the Pixie Shift but liked it sleeveless after everything else was done. So I bound the armholes.   I left the top unlined (I wear a thin camisole underneath) but lined the skirt with some white cotton batiste.

Despite not putting buttonholes and buttons on the front placket (used a hidden safety pin on the inside), I wore it Sunday to the Austin Wine Festival, where it got good and sweaty. It really is just great for our summer weather. A trip through the laundry but not a subsequent trip under the iron later, it's back for our viewing pleasure.  BTW, it may look snug up top on Clementine, as she is 1/2" - 1" larger around the bust than I.


II. The Cap

Louis had Track & Field Day at school a few weeks back, at which point it came to my attention that he didn't have a summer hat that fit. A Japanese hat pattern book I bought two years ago came to mind -- I'd never sewn anything from the many books I bought, and I figured if I could get comfortable tracing a hat pattern from the sort-of-confusing pattern sheet, and drawing in my own seam allowances, I might work up the courage to tackle a garment from another Japanese pattern book.  I can't find an ISBN anywhere though it's got to be in the book somewhere, right?  Anyway, I have always had a driving cap for Louis from when he was a small baby, so I traced out the driving cap pattern and sewed it up.

The hat and lining are from a men's shirt that was a little on the heavyish cotton side.  I'm glad I used 1/4" seam allowances because there was a bit of curviness, thus made so much easier with narrow seams.  All I had on hand was a pretty stiff heavyweight craft interfacing, so I interfaced both layers of the brim.  The smallest size hat (56 cm) was a little big for Louis, so I'm modifying the pattern to scale it down in the right places for his head.  In the meantime, the hat is still a little big for me but might be perfect for my dad.


III. Gathered Neck Smock Refashion

This started out as a men's shirt, too, in a banana-y yellow linen-cotton blend.  In my eternal quest for slightly ever-new approaches to the men's shirts, I opened the neckline to a boatneck and gathered the shirt at the front neckline, then bias-bound the whole thing.  The bodice fell over the shoulder enough to  look like a little cap sleeve so I didn't sew in sleeves and just bound the armhole, too.  (Please ignore the sloppy posture and subsequent shirt swinging to the left!)


Either this pattern needs some work or I picked the wrong fabric for the pattern.  I used a self-drafted loose-fitting tunic pattern, made from my sloper, that had a side bust dart.  I rotated the fullness to the neckline.  But there's something odd about this shirt, how it seems to pull down at center front.  Since the shirt has linen, it has eventually wrinkled  along these pull lines, in a way I don't think 100% cotton would.  I took the photos first thing this morning, and you can already see the tendency for that front placket to pull down from the neckline.  I'll try this refashion again in 100% cotton, to determine how much of the pulling is due to a pattern problem vs. a fabric choice problem.  Do you have any thoughts or experience with this?


So ends this very long post!  How did I do trying to weave three projects into one photo shoot?  LOL  Next couple of posts: Yet another men's shirt refashion for me and one for Louis!  And he likes it!  It has been a busy week, hasn't it?

06 May 2009

139. The Pixie Shift

We've had a lot of rain in Austin these past few weeks, which has kept the worst of the heat at bay. But the sun has come back in full force and we'll spend most of the week in the mid-90's (that would be about 35 degrees for those of you in celsius-land. I'm so global that way, haha!). My son asked me to stop walking to pick him up from school in the afternoon because it's just too hot to walk home with the heavy backpack. I find myself, as I do every spring, dreaming of a collection of loose, flowy, smocky, at least vaguely stylish summer dresses.

[I am reminded at times like this that I am a total, complete dork. Good thing I am OK with it.]

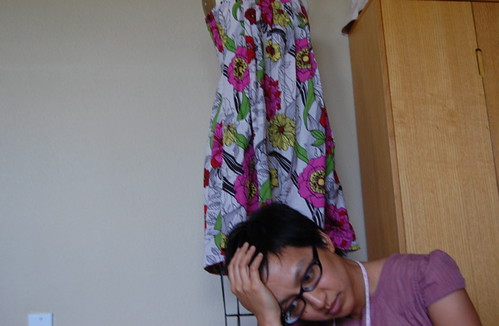
I'd like to say that this one just came to me out of nowhere, but (a) the construction is not complicated and I've seen similar styles in RTW, and (b) I actually drafted it as a flat pattern from my sloper two years ago, at tunic length. I never sewed it up, and decided Saturday night to make it by draping on Clementine instead. It's funny how little things matter to me now, like the yokes are slightly rounded in the draped version instead of straight across as in my flat pattern.

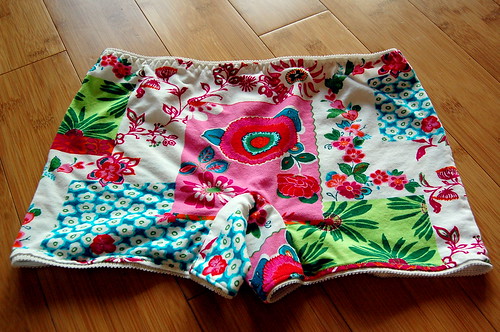
Recognize the fabric? You might have it in your home... in the form of a pillow or cafe curtains. It is from IKEA, on clearance last summer for $1.99 a yard. I can't help but be drawn to the bright colors and simple shapes. I'm like a 7-year-old that way. And in this dress, I probably look like one, too.

But I can't help but lighten up a bunch when I put this on! It's just a fun little smock to wear.

I can pinpoint the areas of my draping and patternmaking where I have not yet honed my eye and my intuition. Armholes and sleeves are two. I always make my armholes too high. I really understand quite a bit about sleeves, but the knowledge in my head doesn't always translate to good decisions for my hands to carry out. Why does that disconnect happen?

I made a pattern from this draped dress... I should compare it to the flat pattern from 2 years ago and see how well I did! Two changes are in order: narrowing the shoulders an inch, and contouring the bodice at the high waist for less tent and more a-line from the waist. Then I think I will sew it up again in a more... ahem... grown-up fabric.

BTW, you must be getting tired of seeing artwork propped up against the fireplace behind me. I finally bought more hardware to hang the rest of the pictures in the house, so maybe the next time I photograph an outfit the artwork will be on the walls instead of on the floor. ;)
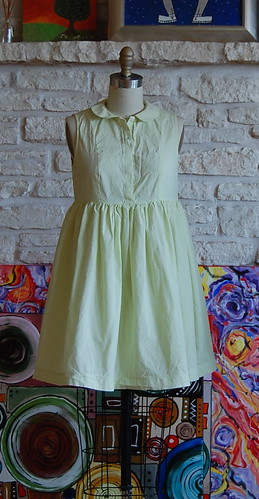