Did you think Wednesday Workshop was limited to Wednesdays? No way! I just returned home from a week in White Plains/ Westchester County, NY, and Summit, NJ -- lots and lots and lots of travel, and lots of work!!! I tried to include a day or two extra on this trip to venture into NYC, WHERE I HAVE NEVER EVER BEEN, but it wasn't meant to be. Do you know how it is when sometimes you feel like you are pushing so hard for something to happen, but nothing falls into place no matter what? That's how it was, so I figure NYC is meant for another trip. Garment District, I've still got my eye on you!
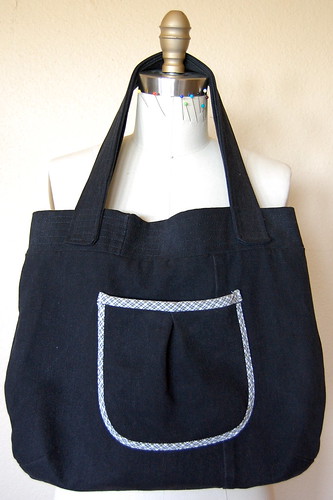
Did you follow the recent story about W Magazine's search for a new editorial director? While I was out of town, it seems they found one. Meanwhile, this past Sunday, Kyle visited Austin and commented on my bag, which I'd made and called my "W Bag version 1," as I designed it especially to accommodate the oversized dimensions of W Magazine without damaging the corners. Reminded me that I'd intended to share this pattern in case anyone else was looking for a brand new bag. It has been my go-to bag all fall and winter long! I will try it soon in a spring-appropriate fabric because the dimensions of the bag, for me, are just right. Big enough for lots of stuff, like a big W magazine and a light sweater and wallet and keys, but not Mary-Kate-and-Ashley-Olson-bag big. Maybe it will work for you, too? Click through for the pattern link and directions.
Showing posts with label Wednesday Workshop. Show all posts
27 March 2010
24 February 2010
190. Wednesday Workshop: Simple Sweatshirt Recon
It has been a busy and a bizzy February! I just got back from a short trip to New Orleans, and I had not seen the city since Hurricane Katrina in 2005. I didn't visit the Lower Ninth Ward or go on a self-guided photo tour of other areas that had been ravaged by Katrina, because I was working a lot and, in between, nursing a cold in the comfort of my hotel room. Still, it was good to see spirits so very high. The French Quarter was bustling and all outward signs say ongoing recovery. Esp. with the recent Saints Superbowl win. WHO DAT?!
I have thought a lot about sewing but don't have much new clothing to show for it (but lots of crafting! I'm just not used to blogging those crafty projects...).
Well, I have one new garment to share. After the sad news of Alexander McQueen's untimely death two weeks ago, I felt a little down and knew the best way out was to start one of the many sewing projects in my mental queue. Behold: the simple sweatshirt reconstruction.
09 September 2009
172. Wednesday Workshop: Bikini Undies to Boy Short Undies
People, I am not even kidding! This is part 3 of 3 in a comprehensive exploration of sewing your own undies. This weekend I saw another $7 escape my life forever as a pair of nylon boy short undies from Target bit the dust, after maybe 20 wears. Never ever ever again. That was $7 that could have bought a month's worth of coffee, or a matinee ticket to The September Issue or Coco Before Chanel, or 3 jars of Nutella, or a yard of decent fabric. I'm not buying undies anymore, mark my words.
Here's my completed boy short version. You know I don't shy away from the colorful and bold when it comes to the undies:


It has actually been 2 weeks since my last Wednesday Workshop post. Things were quite busy 2 weeks ago with my training work, and I couldn't get my head around converting those bikini pattern pieces into boy shorts. I knew it could work... just took me some time to get in the right mindset to figure it out. Here's the good news: it might take 30 minutes to draft the pattern, but if you've sewn up the bikini panties from two weeks ago, putting these boy shorts together will take 15 minutes. Here's the Flickr tutorial:
This concludes the undies workshops! A few notes after wearing the three prototypes:
- I've tried elastic casing, sewing regular elastic right on the fabric, and sewing a lingerie elastic with a picot edge right on the fabric. The most comfortable so far, which happens to be the easiest to me, is the lingerie elastic with the picot edge. I used it on the boy short undies, it is very comfortable against the skin, and it has just the right amount of give and stretch. A package of this (enough for one pair of boy shorts) was $0.38 -- yes, 38 cents -- on sale, but at regular price was $1. Worth every penny.
- I will try two more kinds of elastic on future undies: the legendary fold-over elastic, as suggested by Johanna Lu, and elastic lace, which I had a hard time finding locally. I think the elastic lace will do a better job of hiding pantylines. If you have worked with these or end up using these in an undies project of your own, please let me know what you think.
- The hipster undies were originally sewn with the leg hems just turned under and sewn with a zigzag stitch. This did not wear well -- the leg openings (predictably) stretched with wear, and more than I was comfortable with. I will probably sew a 1/4" elastic on this pair. But hipsters are not my favorite style of undies to wear, so I doubt I will sew them again.
- I suspect that you can draft the boy shorts pretty easily without converting a pattern. But I'll save that experiment some other time. I'm burned out for now exploring undies.
What about the time investment? I've invested about an hour of pattern drafting time and 15 minutes per pair of undies, for a 3 1/2 hour total time investment. When I purchased the last 10 pairs of undies, I probably spent more than 3 1/2 hours hemming and hawing over how much longer I could use the tattered and torn undies I had, driving to the store, trying them on over my undies in the dressing room, thinking about how poorly some fit or how uncomfortable they were while I was wearing them, and dropping to the ground to curse the heavens when some of them started falling apart within a year.
So the undies are done and it's time for a new project! Any ideas for upcoming Wednesday Workshops? I have a short list of experimental DIY kinds of projects, but am open to suggestions. :)
26 August 2009
170. Wednesday Workshop: Bikini Undies to Hipster Undies
Last week, Gattolina responded to my Wednesday Workshop tweet/ post on copying your own undies. The pair I chose were bikini-style undies and she asked for suggestions for hipster or boy short-style undies. So I decided to try converting the bikini undies pattern to hipster panties. The short story is that is was very simple to do. The longer story is that so much depends on your style, preferences, etc. I grabbed two pairs of hipster-ish undies to study them more closely:
The top pair are from AE, and they are probably a size too small. They are more bikini than hipster, but the leg openings offer much more coverage than a bikini. The waistband and legbands are elasticized, and the casings are sewn from a coordinating solid knit. The bottom pair are from Target. I think the center front and center back seam are a big mistake, though they obvz do lend some, well, definition between the cheeks. There is no elastic at the waist or in the legs -- the raw edge was turned in and coverstitched.

Original vs. new DIY pair. I know the new ones look huge, but they do fit. Not sure about the non-elasticized leg openings though. I'll test them out and let you know. I also don't have any shirts to cut up that are knit w/ spandex but I'd like to modify the pattern with negative ease and a stretchy fabric to see if they are more comfortable, etc. Stay tuned for the next Wednesday Workshop....

Two extra notes: From a design perspective, the leg openings on hipsters are much lower than on bikinis. And these undies are made of 94% cotton, 6% spandex, which have so much more stretch than 100% cotton jersey that they are tiny and have negative ease. I worked with the remains of the kelly green t-shirt from last week's Wednesday Workshop, so here's how to modify the bikini pattern without adjusting for negative ease:
I decided to lengthen the side seam for a total length (incl. seam allowances) of 5". I suspect this will be longer for taller folks. Then I used my french curve ruler to connect the bottom of the new side seam with the point where the panty front will meet the crotch piece.

Then I lengthened the side seam on the panty back to the same 5" as I did on the front. I drew a line connecting the bottom of the side seam to the bottom of the pattern piece using my hip curve.

Then I lengthened the side seam on the panty back to the same 5" as I did on the front. I drew a line connecting the bottom of the side seam to the bottom of the pattern piece using my hip curve.

Original vs. new DIY pair. I know the new ones look huge, but they do fit. Not sure about the non-elasticized leg openings though. I'll test them out and let you know. I also don't have any shirts to cut up that are knit w/ spandex but I'd like to modify the pattern with negative ease and a stretchy fabric to see if they are more comfortable, etc. Stay tuned for the next Wednesday Workshop....
I've also posted the whole thing as a Flickr set again.
19 August 2009
166. HBD and Wednesday Workshop: Sew Your Own Skivvies Tutorial (Refashion 28: Panties from T-Shirt)
1. Happy Birthday
I read a Chanel biography a few weeks back and noticed her birthday was fast approaching. Today's the day. Happy Birthday, Mlle. Chanel.
To view and sew along from right here, click play above, then click on the fullscreen icon. When the fullscreen slide show comes up, you can press pause at the first slide, then click Show info in the upper right, and all my notes will came up in this translucent window.
2. Sew Your Own Skivvies Tutorial
I've been mulling over sewing my own underwear for a long time now but didn't want to buy a bunch of patterns that I would have to modify for best fit. So I deconstructed a pair of my all-time favorite, on-their-last-leg panties and copied them. The original panties were regular 100% cotton jersey so I used a t-shirt in excellent condition to refashion into my new panties.
Of course, I took photos in case it might help anyone heading down a similar path, and I posted a Sew Your Own Skivvies Tutorial on Flickr:
3. Wednesday Workshop
My "day job" title is corporate trainer and business consultant, and it's always in me to share and teach what I learn when it's appropriate. This week I'm kicking off a blog series called "Wednesday Workshop". I'd like to post something every Wednesday -- might be an idea, a peek into a fast-and-furious DIY project (might not necessarily be related to sewing), a link to someone else's cool idea or project, or maybe a full-blown tutorial. It will probably be related to sustainability in some form or fashion... sustainability is on my mind all the time... thanks for letting me share. :)
Subscribe to:
Posts (Atom)