
Did you follow the recent story about W Magazine's search for a new editorial director? While I was out of town, it seems they found one. Meanwhile, this past Sunday, Kyle visited Austin and commented on my bag, which I'd made and called my "W Bag version 1," as I designed it especially to accommodate the oversized dimensions of W Magazine without damaging the corners. Reminded me that I'd intended to share this pattern in case anyone else was looking for a brand new bag. It has been my go-to bag all fall and winter long! I will try it soon in a spring-appropriate fabric because the dimensions of the bag, for me, are just right. Big enough for lots of stuff, like a big W magazine and a light sweater and wallet and keys, but not Mary-Kate-and-Ashley-Olson-bag big. Maybe it will work for you, too? Click through for the pattern link and directions.
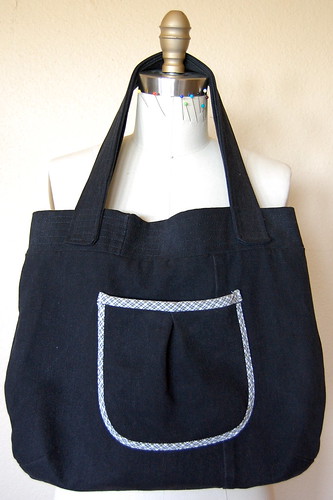
My prototype is made from a pair of reconstructed black denim -- feel free to gather any variety of refashion-worthy materials or start from scratch.
You'll need:
- A yard of fabric or repurposed materials
- The printed pattern (download W Bag v1 pattern here; requires 6 pages of 8 1/2" x 11" paper and tape to assemble, approx. 1.6 MB download)
- Matching or contrasting thread to spice up solid fabrics (optional)
- A gob of bias tape (optional) and FYI, mine was 1.25" wide since I used extra-narrow seam allowances
Remember:
- All seam allowances 1/4"!
- My version is unlined but you could absolutely line yours if you cut two extra body pieces out of lining fabric. I am usually a stickler for finished seams so I bound all mine. More info below.
Here we go! This is not a photo tutorial, but a list of directions with a few photos of how I carried out the bag construction:
1. Print the pattern and put it together.
2. Sew the darts in both body pieces.
3. Baste the pocket pleat and finish the pocket edges. The easiest solution for my heavy denim was binding with bias tape. Sew the pocket onto the bag body.

4. Place the two body pieces right sides together, and sew in one continuous stitch down one side, along the bottom, and up the other side. Finish this seam with binding or serging -- you choose.
5. Place the two band pieces right sides together, and sew only the short ends of the rectangles together. Press both seams flat. Fold in half, wrong sides together, along fold line. Baste the raw edges together. I also topstitched mine in long rows of stitching parallel to the folded edge, approx. 3/8" apart.
6. Sew the band to the bag. There are a hundred ways to do this, so pick what's best for you. I simply sewed the band to the bag with raw edges aligned. I finished this seam with seam binding but you can serge it if you prefer. Here's a photo of the inside of the bag, so you can see both the vertical bound seam that holds the body of the bag together, and the horizontal bound seam that attaches the band to the body:
7. Now sew the straps. Once again, there are several different ways you can sew the straps, like sewing them into tubes with right sides together and then turning them out. I used such a thick denim that I sewed each strap with right sides together and sewed along each short edge, pivoting at the corner and then sewing just a few inches on the long edge. I trimmed the corners and turned everything right side out, pressed the seam along the long edge, and stitched it closed. I also topstitched each strap in long rows about 3/8" apart.
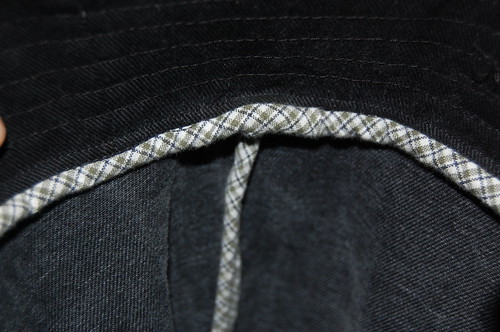
8. Attach the straps. I sewed mine to the outside of the bag. Just pinned them in place, tried the bag over my shoulder and adjusted to taste, then topstitched them on in rows of stitching perpendicular to the strap's topstitching. Here's an up-close shot of that action:

And here's another detail photo of the top of the bag with its many rows of topstitching:

Please let me know if you make this! I am curious to see how others' interpretations look! I will be sure to post photos of my next one. BTdubs, this is my first multi-page pattern and I hope it makes sense to match up those little triangles so you know which page goes where. I sort of followed the instructions for making your own downloadable patterns from Burdastyle, but, you know... had to change the instructions to make sense for me. I hope they make sense for you. :)


very cute bag! The pocket is a nice detail.
ReplyDeleteI like your new look blog page. It's a very clean look, and somewhat strangely, I didn't have to reboot the computer to make this comment so that's very nice too...
That looks like a nice, useful bag and doesn't sound too hard to make. But I'll have to wait until my Mary-Kate & Ashley bag wears out first ;-)
ReplyDeleteCute bag! Would great in a floral!!
ReplyDeleteI feel so lucky that I got to see the bag in action!
ReplyDeleteLove your blog redesign, by the way!
This is going into my "One Day" file!
ReplyDeleteCute bag!! Thanks for the pattern!
ReplyDeleteThanks so much for sharing the pattern, this bag is so cute! I love the pocket. I'll be linking.
ReplyDeletebeautifully done, of course, and I like the new blog look as well.
ReplyDeletewow, if you visited Summit you were right in my neck of the woods! :)
ReplyDeleteThis is an awesome bag pattern- you have great timing, I was just looking for a bigger sized bag to make with a piece of Anna Maria Horner's Drawing Room fabric that I just got. So, all bookmarked, now I just need an hour or two to stitch it up!!
Oh, I love it! And chiming in with much love for the new blog look as well. :)
ReplyDeleteso love this! I'm definitely making one from a pair of jeans of mine that I can't stand!!! Thank you.
ReplyDeleteNice-looking! And the directions look simple enough to follow. I'll have to give this one a try at some point for sure.
ReplyDeleteJust out of curiosity (since I haven't downloaded the pattern yet), what are the finished dimensions?
Very cute. Black denim was a great choice. And I'm digging the new blog header!
ReplyDelete@Pam - Thanks!
ReplyDelete@Mary Nanna - I am SO GLAD you aren't having the hiccups with this new blog code... I have been messing around with Blogger in Draft and saw that they have made look and feel much more customizable. Side benefit: I think all the buggy code that was there before is gone.
@Violet - I love the look of the big designer bags! But they are big, aren't they?
@Laura - Thank you, and the floral is a great suggestion!
@Kyle - I would have forgotten to post the pattern at all if you hadn't said anything. Thank you!
@Sarah - It's a pretty quick sew. Hope you enjoy yours if you get to making it.
@NGLaLaLa - Thanks, girl!
@Rachel - I love One Pretty Thing, and it's so easy to search through the archives. Thanks for sharing.
@Christy - Thank you, dear. I am so glad we can make little changes to our blogs now without having to revamp an entire template.
@wendy - It looks like I might be back in your neck of the woods again sometime this year! Maybe we can meet in person. Hope to see how your bag sews up!
@Steph - Thanks so much!
@Anna - Funny how our old castoffs can enjoy a new, loved life! Good luck with it.
@Becky - My finished measurements are 15.5"W x 14"H with approx. 10" drop from where the strap hangs from the shoulder to the top of the bag.
@dana - I had no choice -- black denim chose me. LOL Thanks!
I made this bag over the Easter weekend and it went wonderfully! I love it and can't wait to start showing it off. Thank you so much for the pattern!
ReplyDeleteI am always SO impressed by the things you make. So much of what is "repurposed" or "upcycled" today is just badly done. You always add those little finishing touches that really make it worth doing. I was just telling my daughter last night about how you've taken men's shirts and made them into the cutest little dresses. And they are not just cute; they are quality-constructed and finished.
ReplyDeleteThanks for sharing the bag pattern! I'll have to try it!
gorgeous bag!
ReplyDeleteadore the colour :)
XOXO, BECCA
http://fashion-train.blogspot.com
p.s don't forget to enter the prada giveaway on my blog! x
that cracks me up that you designed it specifically for your huge magazine. love. i really like it! downloading.
ReplyDelete@Lindsey - I am glad the pattern worked for you! The size and dimensions are really perfect for my life and projects. Hope you are finding the same.
ReplyDelete@Jen - Thank you so much for your comment! If something I make isn't finished well, I probably won't wear it, which defeats the purpose of recycling a garment to begin with! Plus, I don't want someone to ask if I sewed something because it's shoddily constructed. Unique, yes. Perfectly fitting, yes. But poorly constructed, no.
@Becca - Thank you!
@Heather - Well, it might crack you up further to know that I have two other variations of this bag, which makes 3 that accommodate W perfectly. Ironically, my subscription ran out and I haven't renewed yet...
@Fashion-Veronique - Thanks!
I'm having trouble finding the link for the free download of this pattern. Can someone please point me in the right direction? Judy
ReplyDeleteRight here, Judy: http://docs.google.com/fileview?id=0B3ieQgz4dU4WNTg4NDk1NzYtMmJmZi00OGUzLTg3YzEtYzZlMjZlNmY0YTc0&hl=en
ReplyDeleteThank you Antoinette, I now have it and cannot wait to make it! Judy
ReplyDelete