Another set of related updates... Happy Belated Thanksgiving to all who celebrated last weekend! I am thankful for a great family. I am thankful for fall foods, which are my favorite from any season. I am thankful for the enduring handsome that is Kenneth Branagh, and it is clear many of you are, too (and if I can get my hands on those Swedish Wallander DVD's a couple of you mentioned, I will, but Netflix doesn't have them). I am thankful for my friends, both in real life and in Blogland. Super-thankful for this lady, Kyle...:
... who, in late September, took a half day off work to drive to Philadelphia to pick me up from the airport, take me to Jomar, experience vegan cupcakes from Virago Baking Company in Lansdale, and ultimately drop me off at my hotel in yet another town when the car rental company wouldn't rent me a car without my drivers license (which I'd lost at an airport and not replaced yet). Can we say "national drivers license database, please"?! Whatever - I first met Kyle in person less than two years ago and I think she's super-nifty. So, so glad we are both friends in Blogland and friends IRL. She blogged about our Septmber meeting in Philly here.
Showing posts with label refashioning. Show all posts
29 November 2010
20 October 2010
207. Zero Waste
My infrequent blogging creates a backlog of things I want to share with you, and then comes the task of grouping some of those things together into one post in an attempt to catch up. Zero waste seems like a good place to start.
I really, really dig the concept of zero waste! The idea that nothing is wasted while making something new is super-cool. Soy jersey is probably the softest and most luxurious fabric I've ever laid hands on, and it happens to make full use of the soy plant. (Technically I wouldn't say closed loop and zero waste are the same, but they both apply to soy fabric production.) Zero waste can apply to clothing design, too. This gentleman has certainly made waves in his pursuit of zero-waste fashion by designing zero-waste garments, and this lady is refashioning straight from the fast fashion sale racks.
Appreciating zero waste means I have a few bags and piles of fabric scraps and remnants. My sewing room looks like a pit at the moment for lots of reasons (too much travel, not enough sewing, too many friends/ family members cleaning out their closets and forwarding perfectly usable castoffs, my deep love of a good challenge, I keep lots of scraps because I like zero waste), so I watched the entire first season of Hoarders and concluded that I'm messy, but not a hoarder.
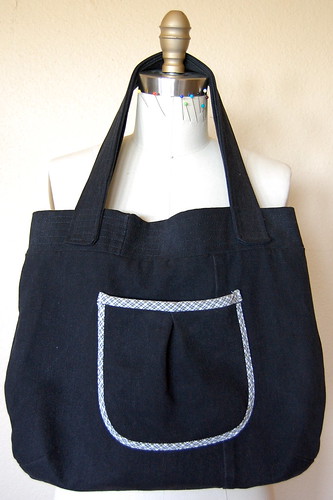
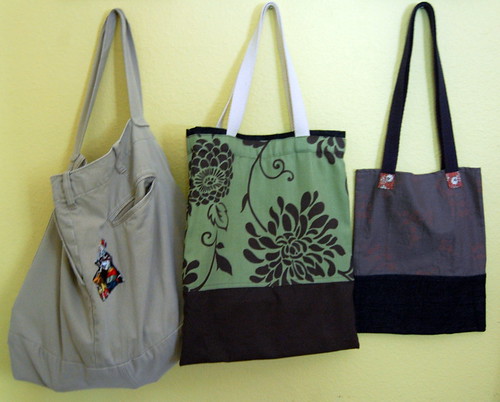
I sewed a few bags, to get rid of some of the larger scraps and remnants. There is always a need for bags in my house, between the shopping and sewing meetups and hauling food to PTA meetings and my sister and niece, who are always ready to claim a new tote as soon as it rolls off the back of the presser foot! I'm happy to report that I had no emotional issues using the fabric and giving the bags away. The bag on the left was made with parts of khakis left over from the Austin Museum of Art khaki dress, the bag in the middle used a printed home dec remnant and the bottom of a bedskirt that my nephew didn't want, and the bag on the right was just scrap cotton print and scrap denim:
Then I turned to the pile of knit scraps. My 7-year-old needs long sleeved t-shirts. Correction: he needed them for the two weeks of fall-like weather we had last month, and since has lived in short sleeved tees and shorts in the lingering heat. But I bet he will need those long sleeved t-shirts at least by Christmas. So I snagged a stack of brand new t-shirts my dad gave me last summer -- some promotional t-shirts and some plain ol' men's cotton tees -- and using a pattern made from a traced tee in my son's drawer, cranked out a couple of new long sleeved shirts.
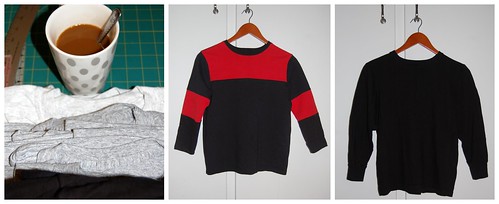
The first (all black tee) was a quick cut-up and small-izing of a men's long sleeved tee, keeping the ribbing at the neckline and wrists. The second tee was a little more challenging, because I used a black promo tee with a logo so prominent that I couldn't cut an entire new shirt front from the existing shirt front. So I grabbed some red knit from my scrap pile, leftover from a previous t-shirt project, and used it for the top of the new tee. And because the original tee had short sleeves, I used the red and some other black knit scraps to cobble together long sleeves. I didn't think I'd like the shirt while I was putting it together, but I kind of do now.
Totally unrelated to hoarding and the sad state of my sewing room, but related to my 15+ year crush on Kenneth Branagh and my love of all things Scandinavian, is the PBS series Wallander. All three of the new episodes have aired on PBS but they are available to watch online till mid-November. See them! Love them! They are excellent and the bullies meet their right fates. ;)
I really, really dig the concept of zero waste! The idea that nothing is wasted while making something new is super-cool. Soy jersey is probably the softest and most luxurious fabric I've ever laid hands on, and it happens to make full use of the soy plant. (Technically I wouldn't say closed loop and zero waste are the same, but they both apply to soy fabric production.) Zero waste can apply to clothing design, too. This gentleman has certainly made waves in his pursuit of zero-waste fashion by designing zero-waste garments, and this lady is refashioning straight from the fast fashion sale racks.
Appreciating zero waste means I have a few bags and piles of fabric scraps and remnants. My sewing room looks like a pit at the moment for lots of reasons (too much travel, not enough sewing, too many friends/ family members cleaning out their closets and forwarding perfectly usable castoffs, my deep love of a good challenge, I keep lots of scraps because I like zero waste), so I watched the entire first season of Hoarders and concluded that I'm messy, but not a hoarder.
I sewed a few bags, to get rid of some of the larger scraps and remnants. There is always a need for bags in my house, between the shopping and sewing meetups and hauling food to PTA meetings and my sister and niece, who are always ready to claim a new tote as soon as it rolls off the back of the presser foot! I'm happy to report that I had no emotional issues using the fabric and giving the bags away. The bag on the left was made with parts of khakis left over from the Austin Museum of Art khaki dress, the bag in the middle used a printed home dec remnant and the bottom of a bedskirt that my nephew didn't want, and the bag on the right was just scrap cotton print and scrap denim:
Then I turned to the pile of knit scraps. My 7-year-old needs long sleeved t-shirts. Correction: he needed them for the two weeks of fall-like weather we had last month, and since has lived in short sleeved tees and shorts in the lingering heat. But I bet he will need those long sleeved t-shirts at least by Christmas. So I snagged a stack of brand new t-shirts my dad gave me last summer -- some promotional t-shirts and some plain ol' men's cotton tees -- and using a pattern made from a traced tee in my son's drawer, cranked out a couple of new long sleeved shirts.
The first (all black tee) was a quick cut-up and small-izing of a men's long sleeved tee, keeping the ribbing at the neckline and wrists. The second tee was a little more challenging, because I used a black promo tee with a logo so prominent that I couldn't cut an entire new shirt front from the existing shirt front. So I grabbed some red knit from my scrap pile, leftover from a previous t-shirt project, and used it for the top of the new tee. And because the original tee had short sleeves, I used the red and some other black knit scraps to cobble together long sleeves. I didn't think I'd like the shirt while I was putting it together, but I kind of do now.
Totally unrelated to hoarding and the sad state of my sewing room, but related to my 15+ year crush on Kenneth Branagh and my love of all things Scandinavian, is the PBS series Wallander. All three of the new episodes have aired on PBS but they are available to watch online till mid-November. See them! Love them! They are excellent and the bullies meet their right fates. ;)

13 September 2010
205. A whole lot of refashioning going on
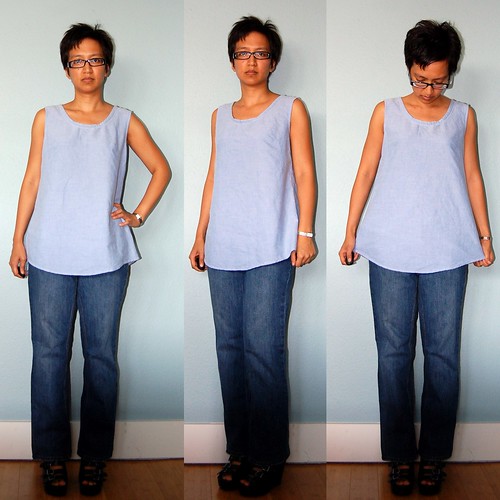
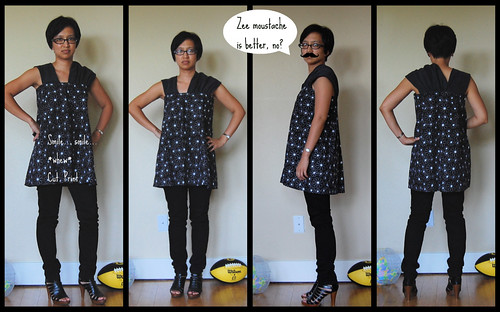
Geez, I haven't shared a sewing post with you in a month. Totally not reflective of what I've been up to. Let's start with a simple tank-style woven top and altered jeans. The tank is a refashioned men's shirt (short sleeve button down and SOFTASALLGETOUT) and the jeans were a standard pair of bootlegged Banana Republic jeans I have not worn because the bootlegs never really worked for me.
18 August 2010
203. Austin Museum of Art Fashion Show
Or, How Lucky I Am.
I know, every day, how lucky I am. Not everyone gets to do something they love for a living and do stuff they love for fun. I know that.
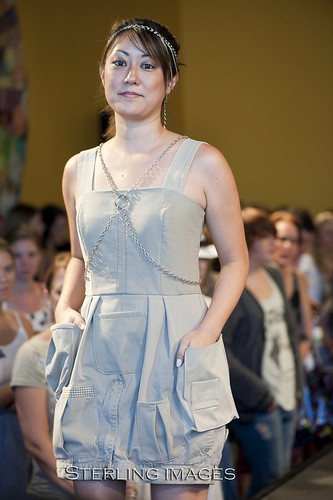
These are two dresses I made for a fashion show this past Sunday, one from two pairs of men's black denim jeans, and one from two pairs of men's khaki pants:
I know, every day, how lucky I am. Not everyone gets to do something they love for a living and do stuff they love for fun. I know that.
These are two dresses I made for a fashion show this past Sunday, one from two pairs of men's black denim jeans, and one from two pairs of men's khaki pants:
runway photos courtesy of Sterling Images
Labels:
apparel,
design,
family,
goodness,
refashioning,
sewing,
style,
sustainable
09 May 2010
194. Happy Mother's Day! Pantone 2010 Dress
Happy Mother's Day to all the mamas! It can be a tough job but we asked for it and do it with style. Hats off, sisters.
BTW, my name is Antoinette. You may have forgotten me, as it's been about six weeks since I last posted. Yeah, sorry about that. Springtime is extra-nuts around here, between spring break, family birthdays (and parties), Easter, seasonally heavy workload, and volunteer stuff at the elementary school. The school yearbook is due at the printer this Friday, which will leave me with more spare time. I've got a busy couple of weeks after that with work, and then school's.... out.. for.. summer!!!
27 March 2010
193. Wednesday Workshop: The W Bag v1 :: Free Pattern
Did you think Wednesday Workshop was limited to Wednesdays? No way! I just returned home from a week in White Plains/ Westchester County, NY, and Summit, NJ -- lots and lots and lots of travel, and lots of work!!! I tried to include a day or two extra on this trip to venture into NYC, WHERE I HAVE NEVER EVER BEEN, but it wasn't meant to be. Do you know how it is when sometimes you feel like you are pushing so hard for something to happen, but nothing falls into place no matter what? That's how it was, so I figure NYC is meant for another trip. Garment District, I've still got my eye on you!
Did you follow the recent story about W Magazine's search for a new editorial director? While I was out of town, it seems they found one. Meanwhile, this past Sunday, Kyle visited Austin and commented on my bag, which I'd made and called my "W Bag version 1," as I designed it especially to accommodate the oversized dimensions of W Magazine without damaging the corners. Reminded me that I'd intended to share this pattern in case anyone else was looking for a brand new bag. It has been my go-to bag all fall and winter long! I will try it soon in a spring-appropriate fabric because the dimensions of the bag, for me, are just right. Big enough for lots of stuff, like a big W magazine and a light sweater and wallet and keys, but not Mary-Kate-and-Ashley-Olson-bag big. Maybe it will work for you, too? Click through for the pattern link and directions.
26 February 2010
191. Read All About It! Newsboy Cap: Free Pattern + Tutorial
Being invited by the ever-creative Dana to participate in Celebrate the Boy month gave me an opportunity to revisit one of my favorite topics: my 6-year-old son's head. I've traced the story back to labor: I checked into the hospital when I was 6 cm dilated, at which point the doctor remarked that, based on my baby’s head size, the baby would weigh at least 8 pounds. I was stunned and scared! Hours later I was surprised not only by my baby’s gender (BOY) but also by his 8-pound baby head on a 6-pound baby body. Mmmm hmmmm.
After the initial head pointiness from that trip into the outside world, my son’s head bounced back into admirably round form. It has always been enormous, enormously round, and an enormous source of pride for me, with its glossy, healthy hair and housing the most amazing, wondrous brain! Sometimes I am allowed views into the brain in that head, with thoughts both fantastical (“When I grow up I am going to buy my own chocolate factory”) and mystifying (“If I had a turtle, I would punch it in the face”).
I will always remember his first store-bought driving cap, allowing me to Celebrate the Enormous Head. Given that, it was exciting to be invited by Dana to participate in Celebrate the Boy and find a way to share the joys of adorning our beloved boys' heads. When I read that newsboy caps were traditionally made of 8 panels, I scoffed at the wimpiness of the commercially made 6-panelled caps, and I vowed that our handmade caps would return to the illustrious glory of 8 panels. Don’t our boys deserve that???
Of course they do, but after drafting from scratch and sewing three total samples to get to this point, I only have a cap pattern to offer for ages 6-8. Tiny changes in the pattern make a big difference, and I need more time to grade and fit for smaller heads. So stay tuned for a cap pattern I'll share in the future for ages 2-4 or something like that. Or, if you're brave and try your hand at grading it for other sizes, please let us know where we can download your version.
Keep reading for the Read All About It! Newsboy Cap: Free Pattern + Tutorial.
24 February 2010
190. Wednesday Workshop: Simple Sweatshirt Recon
It has been a busy and a bizzy February! I just got back from a short trip to New Orleans, and I had not seen the city since Hurricane Katrina in 2005. I didn't visit the Lower Ninth Ward or go on a self-guided photo tour of other areas that had been ravaged by Katrina, because I was working a lot and, in between, nursing a cold in the comfort of my hotel room. Still, it was good to see spirits so very high. The French Quarter was bustling and all outward signs say ongoing recovery. Esp. with the recent Saints Superbowl win. WHO DAT?!
I have thought a lot about sewing but don't have much new clothing to show for it (but lots of crafting! I'm just not used to blogging those crafty projects...).
Well, I have one new garment to share. After the sad news of Alexander McQueen's untimely death two weeks ago, I felt a little down and knew the best way out was to start one of the many sewing projects in my mental queue. Behold: the simple sweatshirt reconstruction.
23 December 2009
182. First garment from Japanese pattern book!
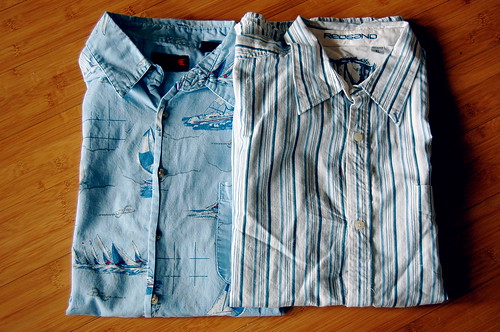
How is your winter shaping up? Mine's great -- I've been home for almost two weeks straight! Another three weeks to go before getting on another plane and that's just right. There's so much to catch you up on... bit by bit, though. Here's the first bit -- a dress, refashioned from two men's short-sleeved button down shirts. Before:


After:

And here's the photo I would have used to show the dress, if it wasn't blurry (and don't ask me what my hair is up to these days. That's a matter for another post):

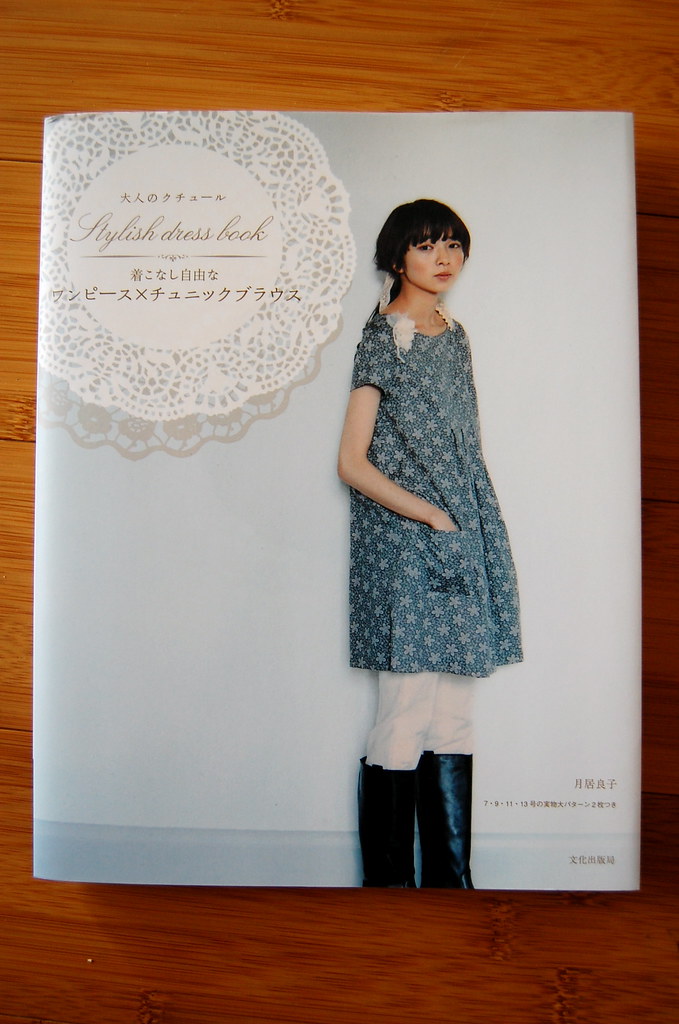
The pattern is from the popular Stylish Dress Book 1:

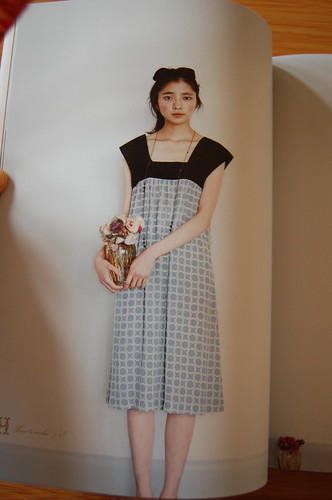
All the dresses in this book are labeled A-Z, and this one is Dress H. I was sold on the shaped, gathered straps, falling over the shoulders just so:

And I was feeling like a lunatic for having a stash of Japanese pattern books for 2 1/2 years and not sewing from a single one. Several people have suggested I sew from these books as the sizing might have a better unmodified fit for me than American patterns. Oh, and Karyn from The Workroom has sewn a bunch of garments from Japanese pattern books that are very inspirational. So I finally got off my duff and sewed this dress.
In many of these books, there is a lump of paper stapled in the back of the book with all the patterns printed on them, overlapped in a big jumble (very much like Burda and other magazines). You unfold the oversized sheets of paper and trace out the pieces you need, then add your seam allowance.
There is a great series of posts with detailed instructions on sewing from Japanese pattern books over at Label-Free. I mean, the whole thing is beautifully written and photographed. As an adult learning professional I was blown away by the quality of these instructions! Aaaaand it won't surprise you that I didn't use those great instructions at all -- I just sort of went on instinct with the whole process, from selecting the pattern to construction. I think most advanced beginners/ intermediate or vaguely adventurous sewists who aren't native Japanese speakers should be OK half-winging like I did. And for everyone else, there are those great Label-Free instructions! My strongest suggestion is to be diligent about transferring notches/ markings. Really pays off later.
As for oversized paper to trace onto... sometimes I finish a class and I've written notes for everyone on the flip chart, and I frequently don't re-use those flip chart pages because they are specific for that group of learners. Since I don't trust most hotels to recycle, I end up taking the oversized sheets from the flip chart (I think the standard size is 24" x 36", or 61cm x 91 cm for my metrically-inclined pals) home to draw on the back with my son before it goes into recycling. In this case, I recycled two of these oversized sheets to trace out the bodice pattern pieces. Bonus: I happened to recycle flip chart paper with the strip of adhesive on the top, like a sticky note -- and it's just the right stickiness to hold the tracing paper to the pattern piece and peels off easily when tracing is done!
The pattern itself was perfect for me. I chose a size 7 based on the sizing chart, and even though my measurements fall between a 7 and 9, all the styles are so loose that I went with the smaller size. It is still loose enough that I omitted the side zipper and it slips on over my head easily. Everything lined up and the shape (though on the less shaped side for sure) was already petite-ified, requiring no pinching an inch in length at the waist as I typically do for a Big 4 pattern. I shortened the dress by a good 5" at the bottom hem, as it seems many of these dresses are meant to fall mid-calf -- not the most flattering length for me. I might get away with it if I could sport a softer voice and waifish demeanor, as I imagine these models have. But not me.
I did fudge a little as this was a shirt refashion: specifically, I omitted 3" in width from the front bodice and 2.5" in width from the back bodice because the shirt simply wasn't wide enough. The fit is still fine and frankly, I think my version has a slightly more flattering shape than the original in the book. The dress buttons up the back.
I bought this pattern book and its follow-up, Stylish Dress Book 2, from YesAsia.com, which offers reasonable prices and free shipping. This is a great place to go if you know exactly which book you want to buy and they stock it, but Amazon.co.jp offers a much wider selection (and hefty shipping charges if you are buying less than about $200 in merchandise last time I checked). There are sellers on Ebay and Etsy who specialize in the Japanese sewing/ craft books, too, but the total cost including shipping sent me back to YesAsia.
I'm no expert sewing from these books so if you have some tips to share, please leave them in a comment! I can see myself using these books more in the future.
In case you're wondering why I made this dress in these fabrics in the middle of winter, it's because I'm going to Hawaii for a week in January and wanted a new dress or two to wear! Yes, a week on vacation with my BFF, sans husband and child. I know lots of men and women do this, but this is my first time and I have entertained feelings of guilt. I've left home for work tons of times, but to laze on the beach for seven full days? My husband is fully supportive! I kept reminding myself I need and deserve this trip. Maybe this new dress is a sign I'm getting on board emotionally. :)
What about you -- have you taken a luxurious holiday just for you? Did you feel guilty? Did you completely get over it?
01 December 2009
181. Refashion 34: Cocktail Dress from Homecoming Dress
Or, All 100% Polyester/ Acetate.


Or, The Shortest Post You'll Ever See on This Blog.
Before:

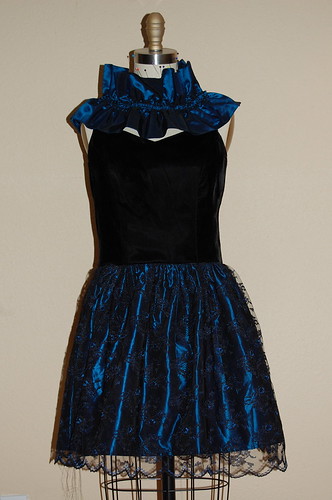
After:

Can't say I love the neckline (which used to be the sleeve puffs!) but it was quick and hid a multitude of sins the original seamstress committed on the top of the front bodice. And I wore it to a holiday party with some of my fave Austin sewists tonight! Good times. I also see from this photo that the lace hem is lower on the left. So I'll keep you posted after this dress undergoes its next revision.
Thanks for your comments on the last 2 posts. I plan to catch up this weekend with my responses. xo
26 November 2009
180. Coming Home & Homecoming Dress
Happy Thanksgiving! Hope you're enjoying the holiday, all you who are celebrating today. Autumn is always so busy for my work and I had a bonus trip out of town last week. So I'm extra- glad to be home, with extended family visiting, cooking and eating up a storm, and taking some time off.


I am surprised in the best way at the responses to the coat/dress in my last post! I figured there wouldn't be (m)any polite comments, only from the few who truly appreciated it. I didn't think it would see much support, and I appreciate every comment! When faced with unavoidable opposition I somehow feel fine, but I prefer it when everyone is happy with my work. It is cooling down 'round here so I might get to wear it soon!
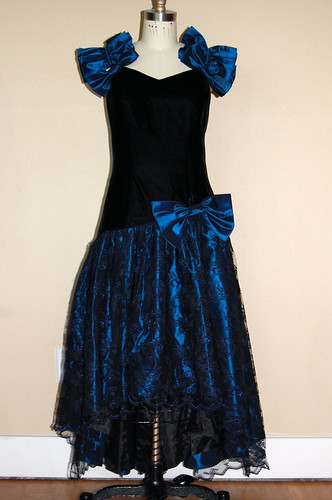
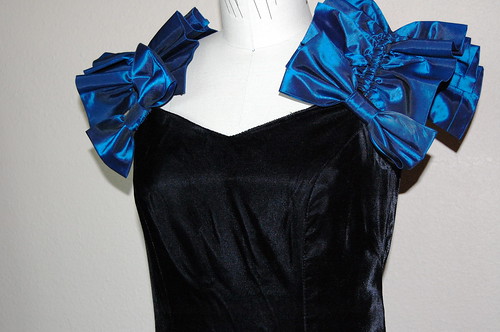
A few weeks ago, I happened to work in my hometown for a few days. I missed my high school's homecoming by two weeks! I stayed with my parents instead of bunking in a hotel, and they ended up sending me back to Austin with a bunch of clothes, many new, to refashion. One of the not-new refashion candidates was my high school homecoming dress. (!!!!!) After I got back to Austin, I put it on Clementine and found that it is in the same size range as I am now:

In fact, the armhole princess seamed bodice fits Clementine quite beautifully!:

And from the back:

Not only was I excited to wear this dress in 1990, I selected the pattern and all the fabric and it was made just for me! (Technically, I didn't wear this to Homecoming because I ended up very inconsiderately standing up my date that very day. I was quite a mean little shrew back then. But my would-be Homecoming date and I have def. made up and gotten over it since then. I did wear this dress to the parades and what-not that candidates for Homecoming court attend. But I didn't actually wear this to the dance.....)
How much my tastes have changed in 19 years! I don't wear drop-waists anymore, my sewing is pretty void of frou-frou, and I don't think a shred of this dress includes natural fiber.
And yet... I consider what's right with this dress: the bodice looks like a good fit, the velvet is soft, and there's black involved. I think those are the only redeemable qualities I can see here. I've got my first holiday party of the season on Tuesday, and this dress is screaming out for a makeover so I can re-introduce it to the world, 19 years later, with a kindler, gentler, more mature owner/ wearer. I have some interesting ideas but know that time is of the essence. So I will keep you apprised of developments! (If you have any unusual and simple ideas, let me know! I am considering the simplest version, which includes shortening the bodice at the natural waist and re-attaching a simplified, symmetrical, gathered skirt.)
15 November 2009
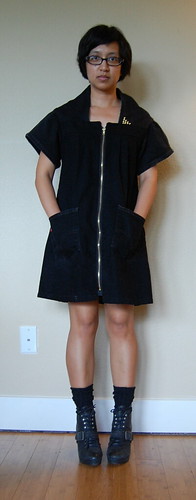
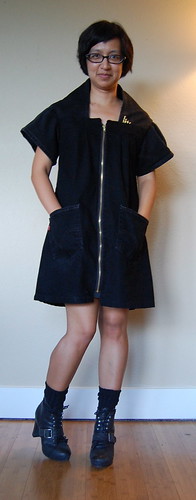
179. Refashion 33: Denim Coat/Dress from Men's Jeans
Well howdy, strangers!

Although I always envisioned it with sleeves, it looked much more like what I had in mind without the sleeves! My niece convinced me to try the sleeves so I did, and after trying it on with sleeves I really kind of hated it. Not so much for what it was, but for how far it seemed from what I had in mind. Now that I've washed it, taken photos, and see those photos, I am good with it! This is the second piece of Vocabulary's imaginary fall collection, with the studded capelet being the first.

I've been working, travelling, and expanding my household by adding a 19-year-old niece (what a long story!). The sewing has come in fits and spurts. I got the idea for a coat/ dress after watching Signe Chanel this summer. Each Chanel seamstress enters the atelier in the morning, leaves her jacket in her locker, and puts on a simple white work coat. Like a lab coat, in a way. The idea of putting on a coat to signal that it's time to get to work has a lot of appeal, so I decided to sketch out a couple of "lab coats". This is the first of two in my head and on paper.


I started collecting black denim this summer, knowing that white simply wouldn't work for me. I started the pattern on October 8. I remember because Louis had a playground accident that morning, and I had to stop working on the pattern to pick him up from school and take him to the emergency room. He got all stitched up and back on his feet quickly, but everything on my cutting table stayed where it was for a full week! The next time I got back to the pattern, I had a couple of days to finish pattern work and cut out and assemble the main pieces: jacket front and back, front and back yokes, front zipper.
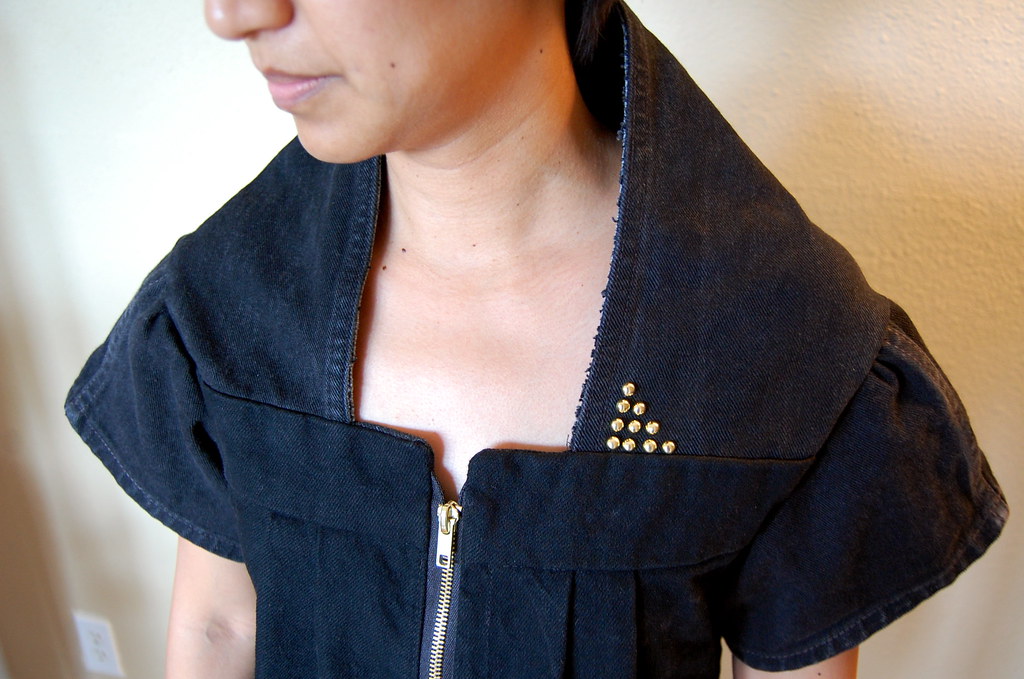
It hung on Clementine for about 3 weeks until I could work on it again. In one short session I draped the collar and sewed it on, and in a subsequent session I finished the insides (yoke facings) and cut the sleeves from the bottom legs of another pair of jeans and attached them. Today I washed it and put on the 1/4" brass studs. I wanted to only put them on one side of the collar, my 6-year-old said I should do it on both sides, and I intended to... until my fingertips protested after I finished the left side. So asymmetrical it is!

Although I always envisioned it with sleeves, it looked much more like what I had in mind without the sleeves! My niece convinced me to try the sleeves so I did, and after trying it on with sleeves I really kind of hated it. Not so much for what it was, but for how far it seemed from what I had in mind. Now that I've washed it, taken photos, and see those photos, I am good with it! This is the second piece of Vocabulary's imaginary fall collection, with the studded capelet being the first.

The collar was everything! The entire concept came to life because of my idea for the collar. After I attached the collar, I tried the coat (sans sleeves) on and my husband said, "I really don't care for it." I asked what he didn't like, and he was unable to articulate anything specific. At which point I went totally "Project Runway contestant" on him and declared, "Well, I like it and will wear it to your office Christmas party next month." Unlike PR contestants, I spun around and walked out of the room.
He followed me in there a few minutes later, possibly thinking he'd hurt my feelings, though still unable to tell me just what didn't work for him. I remained neither angry nor offended. It was just clear to me that he didn't get it. His tastes run pretty traditional/ conservative. With 3 years of garment sewing and 2 years of pattern play under my belt, my ability to create is catching up with my ability to imagine. And I find it hard to compromise now.
So I may look like a total weirdo to the average citizen when I wear this, but I will walk tall and feel proud of it. For the record, I probably won't wear it to my husband's office Christmas party, not because I'm ashamed of it -- but because no one wears black denim to a dressy party. :)
Labels:
apparel,
design,
draping,
family,
refashioning,
sewing,
style,
Vocabulary
01 November 2009
178. The 3-Hour Jack Skellington Costume
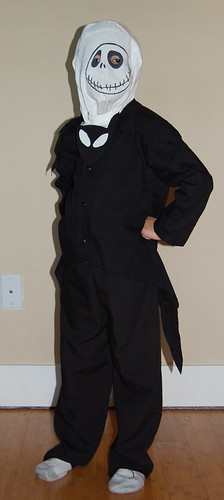
People who know me first through my work as a business trainer often comment that I must be the most meticulous, prepared person they know. They are often surprised to hear what my blog buddies know: I am meticulous when it counts, and the rest of the time I fly by the seat of my pants. When Louis told me a week before Halloween he wanted to be Jack Skellington from The Nightmare Before Christmas, I jumped on the idea of putting this cool costume together: skinny suit with nipped-in waist, cool bat dickey/ whatever, long coattails, etc. I didn't consider that I'd just come out of a busy and exhausting work and volunteer week, and that I was about to go out of town and return to my sewing machine on Oct. 30.

You know how the evening of Oct. 29 went, with smoke alarm and all, so after I got home Friday afternoon I found myself ready to doze by 6 p.m. There was no sewing to be done that night! I decided to spend Saturday sewing his costume, remembering that his Halloween party was at 3 p.m. I was wrong. Saturday morning, at 10, after an hour of sewing (during which time I finished his pants), I looked at the party invite and saw the start time was 11. (!!!!!!!!!!)


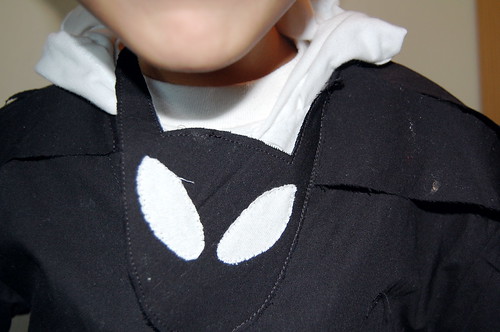
And don't forget that bat detail! With more time, I would have sewn in boning or done something to make the "batwing collar" stand out more, but I couldn't leave out the bat detail closure at the front neck.


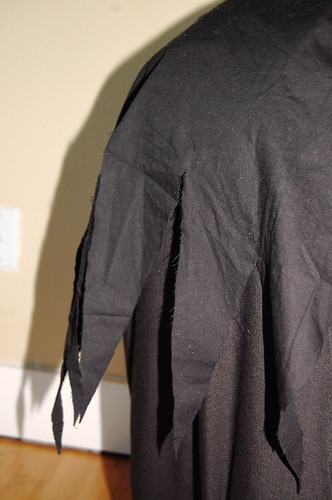
I took a short-sleeved black men's shirt from the stash and hacked away at it, with the help of Simplicity 4760. I cut those "tails" while he was wearing the shirt, and attached them by machine to the collar. Funny how easy my son complied when I asked him to let me take a photo of the coattails. That Ace Ventura instinct to put one's rear end on display is alive and well for him.


I sewed up a white hood from cotton jersey -- literally draped it on Louis' head, pinching fabric and drawing on it with pencil, and then I sewed it onto the neckline of a plain white t-shirt. Louis had a white night shirt on which we'd freezer paper stenciled Jack's likeness last summer. The night shirt was getting small and badly stained, so I just cut the face out and sewed it to the top of the hood, leaving the bottom open so he could lift Jack's face out of the way and see better when he needed to.

And don't forget that bat detail! With more time, I would have sewn in boning or done something to make the "batwing collar" stand out more, but I couldn't leave out the bat detail closure at the front neck.
We got to the party late, but just in time for cake and an hour of company. I felt like the costume was a total hack job, not worthy of Halloween, but my husband was impressed and my son was happy. So much for meticulous and prepared!
30 October 2009
177. Studded Capelet from Men's Jeans
Whew, it's been a while since I've checked into ye olde blog. Usually October-December is the busiest time for my training work, so I'm on the road a bunch, and when I'm not, I'm preparing for training -- freshening up the content, making travel arrangements, ironing out contract details, etc. etc. Sewing fits in the spaces in between.


The funny thing is that I tweeted a hilarious quote about Tibet from one of the contestants, and today The Tyra Banks Show started following my tweets! I totally need some modeling lessons, so maybe Tyra will take up this lost cause I am and bestow upon me some personalized supermodel tips. Ha!
I'm up much later than I should be. I decided to indulge in an episode of my beloved Law & Order: Criminal Intent at 9. As I snuggled under the covers near the end of the episode, I decided it was cool in the room and maybe it would get cold tonight. So I turned on the heater. Little did I know that, this being San Antonio, the heater probably had not been turned on in at least a year. It roared to life and gave off burning fumes! It took me about 5 seconds to turn the heater off, but the smoke alarm in my room had already been set off. You should have seen me, jumping on the second queen bed in the room, frantically waving my Art Issue of W toward the ceiling to shoo the smoke away from the alarm. I was already in my PJ's and preferred not to run into the hallway for a full-on fire drill. After the smoke alarm stopped sounding, I was so worked up I didn't feel tired. And the room still smells like smoke, and the safety latch on the windows won't let me prop it open to air out the room. And I'm close to the elevator and prefer not to keep the door open. So here I sit, in my dark, smoky room, praying that nothing catches on fire overnight, and hoping I get enough rest for the second day of my class tomorrow, and catching up on my blogging. Obviously. :D

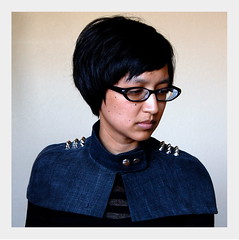
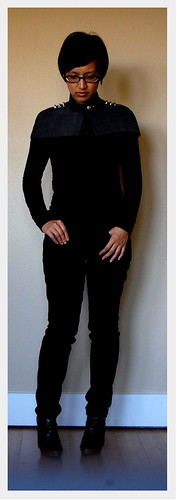
This denim capelet is made from repurposed men's jeans, and the studs are from www.studsandspikes.com (which shipped really quickly and has great customer service, BTW. Highly recommend). I'd like to make the capelet to order in the Vocabulary shop but won't list it until November, when I have any hope of filling orders.
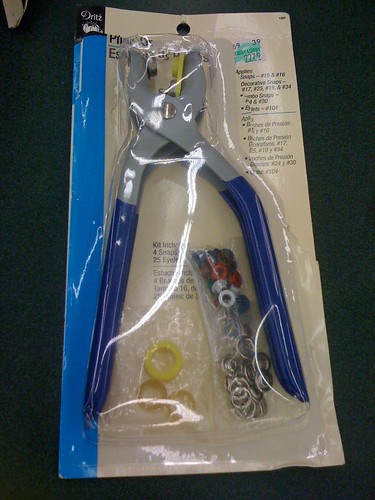
I sketched this capelet back in the summer, but wasn't inspired enough to get sewing until the weather started cooling down. I finished the construction of the capelet end of Sept or early Oct, but had a doozy of a time putting those stinkin' snaps in! Dritz makes a killing with their $6 packages of 7 jumbo snaps. It takes three failed attempts for me to get one snap installed correctly, and you can't re-use these things after they've been messed up! I made the mistake of buying the Dritz "convertible" snap pliers. It absolutely did not work for the jumbo snaps. Here are the pliers to avoid -- the "convertible" ones with all their unhelpful attachments:

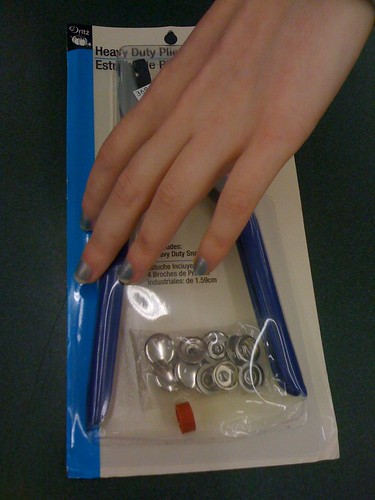
And the pliers that work -- the "heavy duty jumbo snap" pliers (BTW, the hand belongs to the checkout gal at the craft store. My skin has more pigment, hahaha):
It took me a couple of weeks after the snaps went on the capelet to dress up and take photos. We had rain for a few days so lighting wasn't conducive, and then it got so hot that I was wearing short dresses for a few days (not dark mystery studded capelet kind of weather, you know), and the day I finally took pics I saw that Tina had just posted a capelet on her glam.spoon blog! We had never even uttered the word "capelet" to each other and there we were, with our individual interpretations that looked so different! We traded messaged about it, and she commented that my capelet was like the tomboyish little sister to her luxe cashmere version. And it probably echoes who we would be in person with each other! So fun. Love ya, girl.

It took me a couple of weeks after the snaps went on the capelet to dress up and take photos. We had rain for a few days so lighting wasn't conducive, and then it got so hot that I was wearing short dresses for a few days (not dark mystery studded capelet kind of weather, you know), and the day I finally took pics I saw that Tina had just posted a capelet on her glam.spoon blog! We had never even uttered the word "capelet" to each other and there we were, with our individual interpretations that looked so different! We traded messaged about it, and she commented that my capelet was like the tomboyish little sister to her luxe cashmere version. And it probably echoes who we would be in person with each other! So fun. Love ya, girl.
I happened to catch America's Next Top Model last night in my hotel room, and noticed that all the models were 5'7" or shorter! I missed my chance to become America's Next Top Model! :p

I'm up much later than I should be. I decided to indulge in an episode of my beloved Law & Order: Criminal Intent at 9. As I snuggled under the covers near the end of the episode, I decided it was cool in the room and maybe it would get cold tonight. So I turned on the heater. Little did I know that, this being San Antonio, the heater probably had not been turned on in at least a year. It roared to life and gave off burning fumes! It took me about 5 seconds to turn the heater off, but the smoke alarm in my room had already been set off. You should have seen me, jumping on the second queen bed in the room, frantically waving my Art Issue of W toward the ceiling to shoo the smoke away from the alarm. I was already in my PJ's and preferred not to run into the hallway for a full-on fire drill. After the smoke alarm stopped sounding, I was so worked up I didn't feel tired. And the room still smells like smoke, and the safety latch on the windows won't let me prop it open to air out the room. And I'm close to the elevator and prefer not to keep the door open. So here I sit, in my dark, smoky room, praying that nothing catches on fire overnight, and hoping I get enough rest for the second day of my class tomorrow, and catching up on my blogging. Obviously. :D
09 October 2009
176. Pay-It-Forward: Steph from Tragically Ordinary (Refashion 32: Lined Newsboy Cap & Scarf from Men's Sport Coat and Dress Shirt)
Back in July, I joined a pay-it-forward meme, and committed to handcrafting gifts for 5 people. I recently finished this hat and scarf set for Steph from Tragically Ordinary and popped it in the mail to her. She sent me a note yesterday that she received it, so now I will blog about it:

Steph deemed herself a hat girl in a previous post, and she is in love with fall. I do refashions, so after many other ideas came and went, this hat and matching scarf from repurposed fabrics was a good blend of what she likes and what I like.


Steph deemed herself a hat girl in a previous post, and she is in love with fall. I do refashions, so after many other ideas came and went, this hat and matching scarf from repurposed fabrics was a good blend of what she likes and what I like.
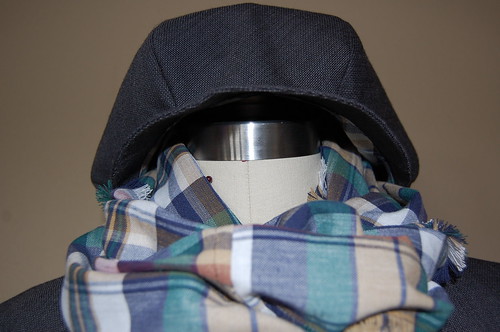
The hat is a newsboy cap from that same Japanese hat book I used to make various hats for Louis this summer, made from the sleeves of a men's sport coat. In Kyle's birthday box of goodies she included a ReadyMade magazine with instructions for a dyed plaid scarf from men's shirts by Martha McQuade of Uniform Natural, so I used a men's shirt to make a scarf and lined the hat with the same fabric.

From a construction standpoint, I'd run out of the heavyweight craft interfacing I used on the summer hats. I went back to the same store I'd gotten it from, and bought their heaviest interfacing... but it was not the same! I double-interfaced the hat brim and it was still pretty floppy. I didn't interface the hat body at all but think maybe I should have -- when I wore it, the structure of the hat got lost a little and it kind of looked like a beret:

And, surprisingly, this is the smallest hat size and it's a good 2 inches too big around the crown. Do Japanese women have big heads? I'm totally kidding! Just wondering why the pattern is drafted so darn big?
I'm so glad I signed up for this pay-it-forward thingy with my 5. It has been a really neat experience to dig around like a detective, reading through blog archives to get a sense as to who someone is. And then to create based on what I found. Now onto the other four recipients!
Have a great weekend, everyone! :)
28 September 2009
174. Refashion 31: Art Therapy Tunic from Skirt and Jeans
I've been absent from the blog.
It's been almost two weeks since my last post and I haven't even responded to the comments yet -- sorry. The last month has been a real doozy, ladies (and the occasional gentleman). It's been a tough year for my friends and family in the areas of jobs/ careers and divorce. Maybe because of our age, or the length of time most of the people we know have been married, or the economy, or some combination of all those things, there is an almost alarming frequency of major career or family upheaval around us. So the blogging has been slow. It has felt this past week like my creativity has been muffled.
After some news Saturday, it's fair to say that I felt quite funky (and not in the good way) on and off all day Sunday. I needed some art therapy big time.
Kyle recently posted a photo of her favorite skirt, and I recognized the fabric from a thrift store garment I bought to refashion. So I pulled it off the shelf and threw it on Clementine:
It was very big on Clementine as a skirt:
I didn't want to just make it a smaller skirt, though I guess that would have been the easiest route in retrospect. I pulled it up on Clementine and the size L skirt was fine around the bust with an extra inch or two to spare. From the front:
From the side:
From the back:
So I sewed pleats on the back, effectively taking up two inches of diameter around the waistband. I'd been working with some distressed black jeans, and I had one leg left from the previous project. I cut it open and draped out some sleeve-ish things. I worked up a sweat. Me, a pair of scissors, a handful of pins. I don't even know if I think it looks good! It's just barely "finished" -- but I'm done, I think:
Nothing like a fake moustache to lift the spirits. I'm 1000% sure the (un-?)sleeves were inspired by a houndstooth Alexander McQueen dress I've shown you before. Wednesday Workshop returns this week! xo
15 September 2009
173. Refashion 30: Men's T to Women's T (New Look 6762)
Oh boy... this is one of the least exciting refashions I've done, but so very practical. I made a t-shirt for myself from a men's XL tee.


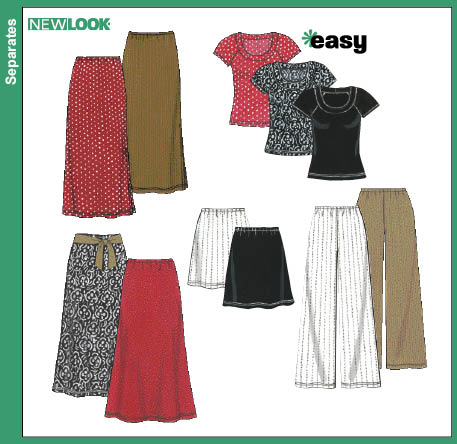
Kyle was kind enough to send me New Look 6762 in my recent goody box, which she made and narrowly averted disaster with last fall. Her finished product looked so different from the pattern envelope that when I saw the pattern envelope, no alarms went off. She reminded me, and I checked out all the reviews of NL6762 at PR.com, so I felt ready to tackle this beast -- view E, the raglan tee.
I didn't bother taking a photo of the original men's tee because you know very well at this point what an oversized tee on Clementine looks like. :)
There is strangeness and oddity with this pattern. Specifically, there is a sleeve dart which has befuddled and perplexed my predecessors. I've sewn raglan-sleeve garments with 2-piece sleeves so I figured closer contours were the goals behind the sleeve darts in NL6762. Also, previous reviewers noted that the neckband notches didn't match well with the notches on the bodice front and back. A recent reviewer said she did fine when she divided everything in quarters and stretched the neckband evenly around the neckline.
Also, the t-shirt I used for this is not the ideal knit. A swatch of my t-shirt does not stretch as the pattern envelope suggests it should for this pattern. I knew all this going in.
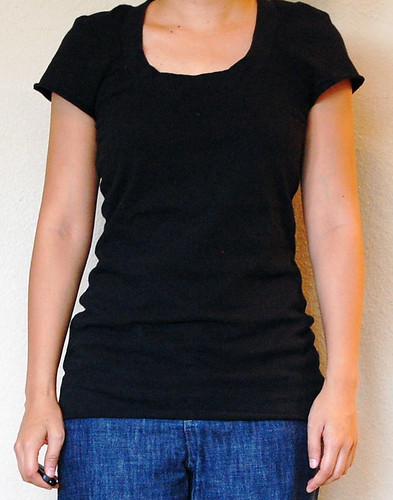
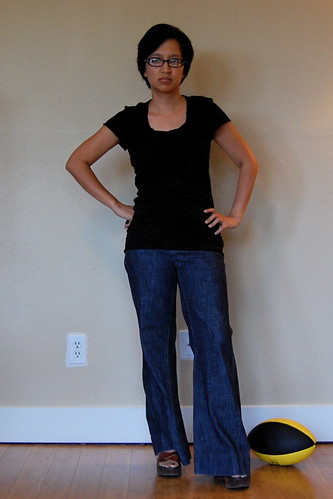
As a result, it took me about 30 minutes to deconstruct my men's tee and cut out the pattern pieces, and 45 minutes to sew it all together. I had to fight the neckband a little because it really did not want to stretch as much as I was forcing it to. I also did not hem the sleeves because they are already an inch shorter than the pattern piece (not enough fabric from the original tee), and decided to leave the bottom hem unfinished as well to match.
The sleeve darts are kind of pointy, even though I took extra care to sew them a little longer and more rounded than the pattern showed. At times, like when I've been moving a bunch and haven't smoothed out the shirt in a while, you can really tell, like in the photo at the end of the post. Most of the time, you can't tell the pointy shoulder darts from rumply cotton:

Other notes:
- I took my usual 1" petite alteration at the waist.
- I added about 4-5" at the bottom because the original t-shirt had enough fabric. This is tunic-length, and I really like it.
- I like the overall silhouette of the tee, and more importantly, I think the neckline is the perfect shape and size for me.
26 August 2009
170. Wednesday Workshop: Bikini Undies to Hipster Undies
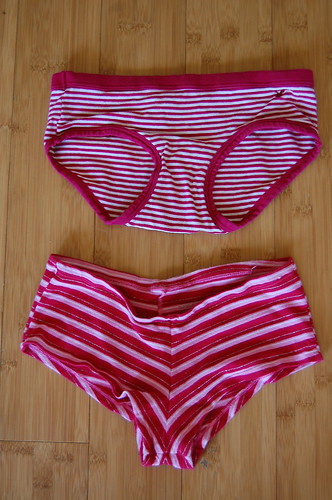
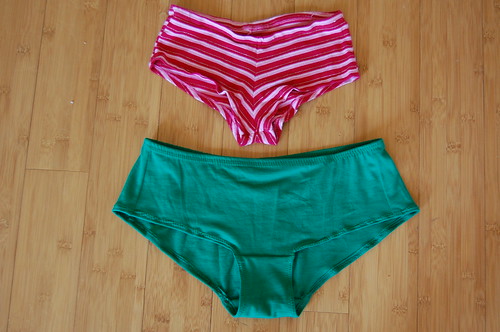
Last week, Gattolina responded to my Wednesday Workshop tweet/ post on copying your own undies. The pair I chose were bikini-style undies and she asked for suggestions for hipster or boy short-style undies. So I decided to try converting the bikini undies pattern to hipster panties. The short story is that is was very simple to do. The longer story is that so much depends on your style, preferences, etc. I grabbed two pairs of hipster-ish undies to study them more closely:
The top pair are from AE, and they are probably a size too small. They are more bikini than hipster, but the leg openings offer much more coverage than a bikini. The waistband and legbands are elasticized, and the casings are sewn from a coordinating solid knit. The bottom pair are from Target. I think the center front and center back seam are a big mistake, though they obvz do lend some, well, definition between the cheeks. There is no elastic at the waist or in the legs -- the raw edge was turned in and coverstitched.

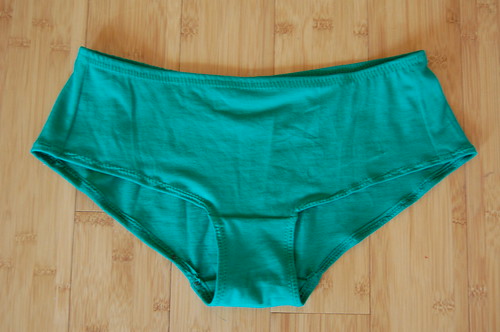
Original vs. new DIY pair. I know the new ones look huge, but they do fit. Not sure about the non-elasticized leg openings though. I'll test them out and let you know. I also don't have any shirts to cut up that are knit w/ spandex but I'd like to modify the pattern with negative ease and a stretchy fabric to see if they are more comfortable, etc. Stay tuned for the next Wednesday Workshop....
The top pair are from AE, and they are probably a size too small. They are more bikini than hipster, but the leg openings offer much more coverage than a bikini. The waistband and legbands are elasticized, and the casings are sewn from a coordinating solid knit. The bottom pair are from Target. I think the center front and center back seam are a big mistake, though they obvz do lend some, well, definition between the cheeks. There is no elastic at the waist or in the legs -- the raw edge was turned in and coverstitched.Two extra notes: From a design perspective, the leg openings on hipsters are much lower than on bikinis. And these undies are made of 94% cotton, 6% spandex, which have so much more stretch than 100% cotton jersey that they are tiny and have negative ease. I worked with the remains of the kelly green t-shirt from last week's Wednesday Workshop, so here's how to modify the bikini pattern without adjusting for negative ease:
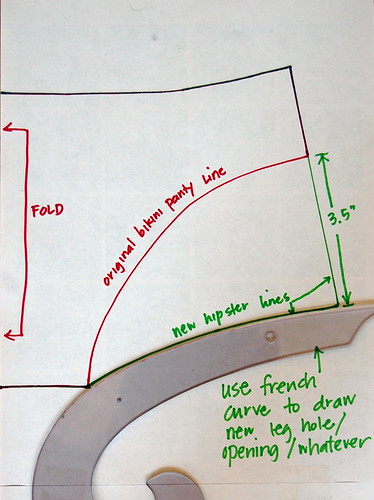
I decided to lengthen the side seam for a total length (incl. seam allowances) of 5". I suspect this will be longer for taller folks. Then I used my french curve ruler to connect the bottom of the new side seam with the point where the panty front will meet the crotch piece.

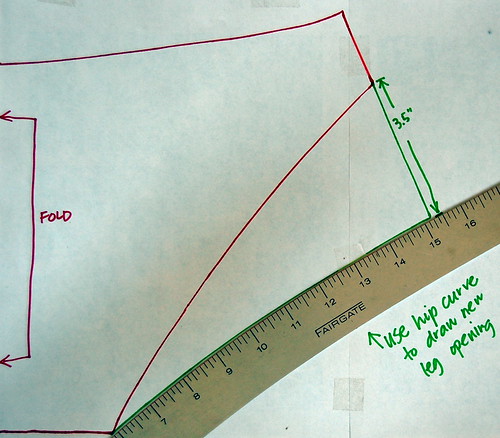
Then I lengthened the side seam on the panty back to the same 5" as I did on the front. I drew a line connecting the bottom of the side seam to the bottom of the pattern piece using my hip curve.

Then I lengthened the side seam on the panty back to the same 5" as I did on the front. I drew a line connecting the bottom of the side seam to the bottom of the pattern piece using my hip curve.

Original vs. new DIY pair. I know the new ones look huge, but they do fit. Not sure about the non-elasticized leg openings though. I'll test them out and let you know. I also don't have any shirts to cut up that are knit w/ spandex but I'd like to modify the pattern with negative ease and a stretchy fabric to see if they are more comfortable, etc. Stay tuned for the next Wednesday Workshop....
I've also posted the whole thing as a Flickr set again.
Subscribe to:
Posts (Atom)