
First up in the new year is a free pattern and pseudo-tutorial (you'll see what I mean in a moment) for an envelope clutch. I was OBSESSED this summer with sewing pleather, and faux suede, and other new-to-me fabrics, and I was digging the envelope clutches all over street style blogs and Pinterest. I'm comfortable sewing clothes, so putting together a bag has never been a technical concern. But when it comes to bags, there are often curves and proportions that look better when they're planned, and not made up on the fly.
I drafted a pattern and sewed the first prototype for this envelope clutch in October, and when I took it out one evening, my friend Norma gushed. Norma has a very strong sense of personal style -- a way of looking appropriate and trendsetting and fashionable -- and I could not have been more surprised how much she liked the clutch! I had to make her one for her recent birthday, and name this in her honor. :)
Download the Norma Envelope Clutch Pattern here. And the brief pseudo-tutorial follows the jump.
You'll need:
- 3/4 yard (27 inches) fabric for bag
- 3/4 yard (27 inches) fabric for lining
- magnetic closures
- approx. 40 inches piping (optional)
- Norma Envelope Clutch Pattern, printed and assembled, which will look like this if you can decipher the little matching code system I tried hard to remember from Burdastyle patterns of yore:

Use 3/8" seam allowance all around. The quickie directions / pseudo-tutorial for sewing together:
- Cut out bag piece and lining piece and mark notches for piping and magnets.
- Sew one magnetic closure to the right side of the bag, as marked, and the other magnetic closure to the right side of the lining, as marked.
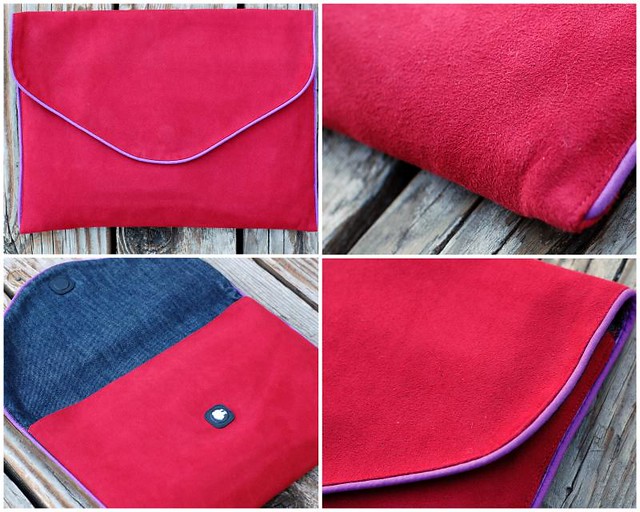
- Baste piping to right side of bag fabric. You don't have to use piping but I think it looks cleaner and helps finesse little oopsies like fabric slippage, etc.
- Place bag on top of lining, right sides together, and sew, leaving an opening along the bottom straight edge of the clutch.
- Turn the clutch right side out, press, and sew the opening closed.
- Fold the bottom of the clutch along the fold line (where the piping begins) and topstitch all around. The topstitching will be functional where it holds the sides of the clutch together, and decorative along the flap. Choose thread color accordingly. :)
You have no idea how many patterns and ideas I haven't shared on the web because I avoid technical writing and photography! But I can handle writing 6 steps, and scanning in my hand-drafted patterns. I hope that works for you if you plan to download the pattern and sew the clutch.
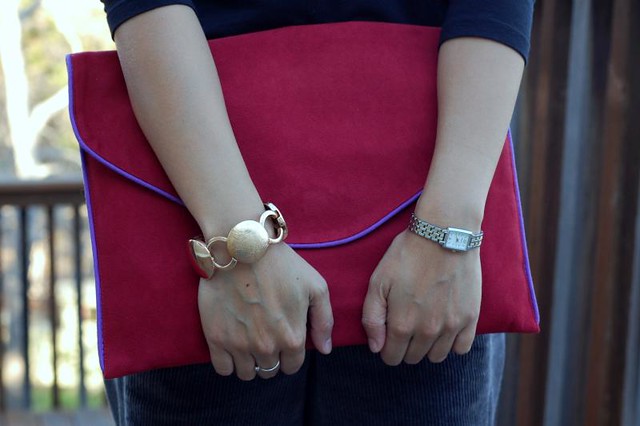
This finished clutch is a versatile size -- it can accommodate netbooks, small laptops, iPads, and thin letter-sized notebooks beautifully. I sewed a pocket into my prototype version, but never use it because everything I put in the pocket makes it bulky. The fabric I used is an upholstery faux suede, and most home dec fabrics come in 60"widths, which means not only can you probably find a right-sized remnant in 3/4 yard, but it might also be wide enough that you can make 4 of these clutches from one remnant! (Save the other three as birthday gifts for your friends and family?)
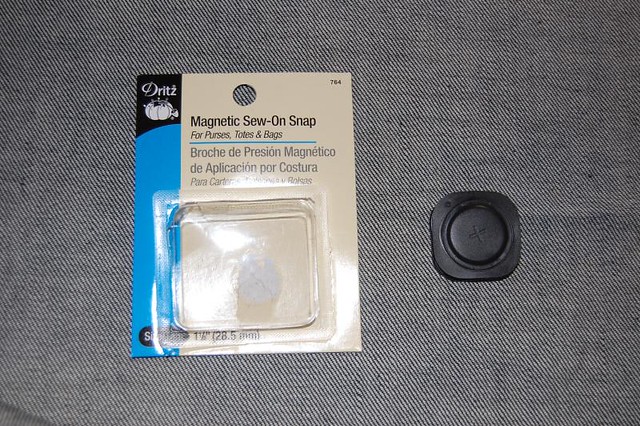
Although I'd imagined a nickel magnetic closure, all I found at my local fabric store was this Dritz Magnetic Sew-On Snap. The magnets are strong, and encased in this rubbery plastic. You actually sew in the little groove. It was easy, I didn't break any needles, and I really like how flat they lay on the clutch. All good!
That's all for now. I hope you are all enjoying a safe, beautiful, fresh new year! Welcome 2012!


Love the purse, and great color you used. Thanks for the free pattern, and all the best in 2012
ReplyDeleteThanks for the free pattern I have several bags just like this. I am thrilled you have enabled people to download this pattern.
ReplyDeletenice! tho personally I like my bags to have handles...
ReplyDeletealso, did you make those trousers? they're very cool.
Thank you for this wonderful pattern! I've been wanting to make one of these for a while. I hope 2012 is a great year for you.
ReplyDeleteLook at all that hot piping!
ReplyDeleteI am surprised to read you don't like technical pix and writing--as you know I love your undies tutorial and think you are excellent at explaining things.
Can't wait to see what you sew in the new year! Happy happy!
I love it!! It's already pinned!! Happy New Year! Here's to reading more from you in the new year.
ReplyDeletehappy new year!
ReplyDeletei might have to try adapting this to a kindle cover, it's a neat design :)
Happy New Year! Thanks for the pattern-- it's a lovely bag.
ReplyDeleteAdorable!!! :)
ReplyDeleteYour tutorial was so easy to follow, I might just make the Norma my first ever handmade bag. :) Thanks! and Happy New Year!
ReplyDeleteAm definitely doing this. In more than one size - netbook and laptop! I think I might add in some stiff interfacing to give it a bit more body.
ReplyDeleteglad you are back with a blog post. i stopped blogging for many months but am now picking it up again.
ReplyDeletei'm glad that you will post more in 2012. you are such a sewing maven and i always like to see what awesome funky outfits you have made for yourself!
Hi, Im your newest follower. Loved this tutorial. xx
ReplyDeletewww.houseofpinheiro.blogspot.com
Nice to see you back - love the envelope clutch, the piping detail is just adorable!
ReplyDeleteHappy new year! Love the clutch, the purple piping is perfect.
ReplyDeleteDon't ever talk yourself out of posting tutorials! You'd be surprised at what we, out here in the ether, could use help with =).
That's a great bag - love the red faux-suede. Happy New Year, looking forward to your tutorials!
ReplyDeleteLove this! Made one yesterday with herringbone & a red and white toille! Wish I could post a picture but I can't find out where to do that?
ReplyDeleteThanks again!
Ooh I love this! It's one of my favorite styles. Thanks so much for the pattern, I'll be spreading the word.
ReplyDeleteA, you are everywhere (or your bag is, anyway)! and I didn't even realize it was you until I popped on over to your blog to see what you've been up to. Though come to think, those do look like your hands and shoes. Glad to see you are still busy and sewing, p.s. I also dig those trousers.
ReplyDeleteThanks so much for the great pattern. You have done a great job with pictures and directions. I love this bag. Thanks for sharing all your hard work and for sharing this with us all!!!
ReplyDeleteThis is truly lovely! I need something smart and not office-supplyish for my shtuff. I'm planning on making a few - one for each take-along project with paperwork involved!
ReplyDeleteI saw this envelope clutch a while back, and as much I wanted to make one of my own, I couldn't think of when I'd use it. Then I released it would make a perfect laptop/ ipad sleeve with some padding/foam core. Love love love the tutorial. I have linked you over on my blog here (http://mel-allwrappedup.blogspot.com.au/p/link-love-to-amazing-free-craft.html).
ReplyDeleteMel@allwrappedup
such an amazing DIY!
ReplyDeleteI really like your blog, I´m following you :D
... maybe if you have time, you could visit my blog too, and if you like it, follow me back ;)
Kisses!
http://modacapital-blog.com
I think the bag is so cute where did you get the pattern?
ReplyDeleteI made the pattern. :)
DeleteQuestion!!!! And help i guesss...your clutch looks likes its stiff and can withhold alot...which is how i want mine...how did you do that???
ReplyDeleteI just love this ..the minute i saw it i had to have it!!! But i need help!!! How does yours look soo stiff and can withold weight???? How did you do it?
ReplyDeleteMy iPad was in the clutch for these photos. I have given these to friends who will slip cardboard into them when they need structure. You could always cut the cardboard to size and insert it into the back of the clutch just after you turn it inside out. If I wanted mine to be stiff all the time, I'd probably sew an extra pocket to the inside back of the clutch, and put in cardboard or quilter's plastic to help it stay stiff. Hope this helps!
DeleteI have a 13 inch MacbookPro. Would it fit?
ReplyDelete