

Being invited by the ever-creative Dana to participate in Celebrate the Boy month gave me an opportunity to revisit one of my favorite topics: my 6-year-old son's head. I've traced the story back to labor: I checked into the hospital when I was 6 cm dilated, at which point the doctor remarked that, based on my baby’s head size, the baby would weigh at least 8 pounds. I was stunned and scared! Hours later I was surprised not only by my baby’s gender (BOY) but also by his 8-pound baby head on a 6-pound baby body. Mmmm hmmmm.
After the initial head pointiness from that trip into the outside world, my son’s head bounced back into admirably round form. It has always been enormous, enormously round, and an enormous source of pride for me, with its glossy, healthy hair and housing the most amazing, wondrous brain! Sometimes I am allowed views into the brain in that head, with thoughts both fantastical (“When I grow up I am going to buy my own chocolate factory”) and mystifying (“If I had a turtle, I would punch it in the face”).
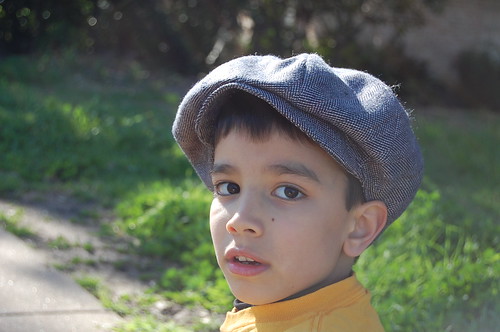
I will always remember his first store-bought driving cap, allowing me to Celebrate the Enormous Head. Given that, it was exciting to be invited by Dana to participate in Celebrate the Boy and find a way to share the joys of adorning our beloved boys' heads. When I read that newsboy caps were traditionally made of 8 panels, I scoffed at the wimpiness of the commercially made 6-panelled caps, and I vowed that our handmade caps would return to the illustrious glory of 8 panels. Don’t our boys deserve that???
Of course they do, but after drafting from scratch and sewing three total samples to get to this point, I only have a cap pattern to offer for ages 6-8. Tiny changes in the pattern make a big difference, and I need more time to grade and fit for smaller heads. So stay tuned for a cap pattern I'll share in the future for ages 2-4 or something like that. Or, if you're brave and try your hand at grading it for other sizes, please let us know where we can download your version.
Keep reading for the Read All About It! Newsboy Cap: Free Pattern + Tutorial.
Download the pattern (PDF) here. The tutorial below is also on Flickr if you prefer that way of navigating through.
A few notes:
* The crown is the part of the hat that hugs the head, and the brim is the part that sticks away from the head. We will use these two terms a lot in the tutorial
* Sew with 1/4" seam allowance, except where noted (the end)
* Try not to over-handle your crown pieces, before or after sewing, as there is a strong tendency for the fabric to stretch
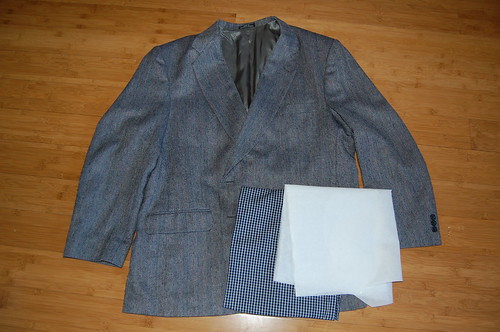
* I used a men's sport coat and some cotton remnants for the lining. If you want to buy yardage for this, you'll need 1/3 yard for the outer hat, 1/3 yard for the lining (a bit more if you think the fabric will pre-shrink), and some longish scraps of interfacing.
* Try not to over-handle your crown pieces, before or after sewing, as there is a strong tendency for the fabric to stretch
* I used a men's sport coat and some cotton remnants for the lining. If you want to buy yardage for this, you'll need 1/3 yard for the outer hat, 1/3 yard for the lining (a bit more if you think the fabric will pre-shrink), and some longish scraps of interfacing.
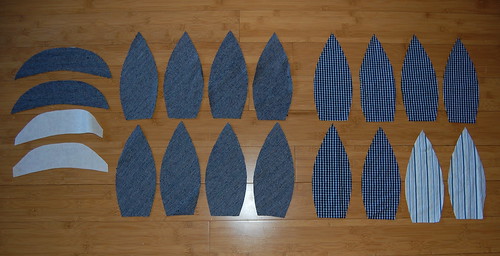
Cut:
* 8 crown pieces from outer fabric ("self") - strongly suggest cutting on the bias!
* 8 crown pieces from lining
* 2 brim pieces from self
* 1 or 2 brim pieces of heavy craft weight fusible interfacing (you choose depending on how stiff your interfacing is and how stiff you want your brim)
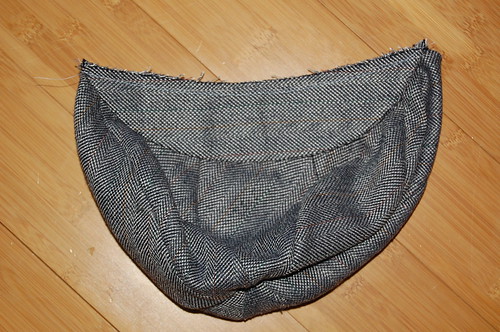
ASSEMBLE THE CROWN
1. Take two crown pieces, right sides together, matching notches, and stitch along one long side. Press seam open. Align another crown piece, right sides together, and stitch along one long side so your crown now has three pieces. Press seam open. Add a fourth crown piece the same way. Press seam open.

2. Repeat with remaining four crown pieces. These don't look like two halves of the crown, but they are -- they are just flopping around differently in the photo.

3. With right sides facing, sew the two halves of the crown together along the long edges in one continuous stitch. Press seam open.
4. Repeat steps 1-3 with all 8 pieces of crown lining.
ASSEMBLE THE BRIM
1. Trim 1/4" off the outer edge of interfacing. Apply interfacing to each brim piece.
2. With right sides together, sew brim along outer edge. Turn right side out and press. Baste raw edge together.
3. Topstitch outer edge of brim.
ASSEMBLE THE HAT
1. Place brim on crown self, right sides facing, matching notches on brim to seam lines on crown. Baste 1/2" from raw edge.
2. Place hat inside crown lining, right sides of crown self and crown lining together. Starting @1 1/2" from center back, stitch IN A 1/2" SEAM around perimeter of cap, leaving about 3" open.
3. Turn hat inside out. Roll the hat toward the lining, press neatly, and topstitch around perimeter of the cap.

4. It helps to secure the brim to the cap so it doesn't get uber-floppy in all the wrong ways with a quick hand stitch.

This hat is on the full, floppy side, sometimes resulting in a 70's Fat Albert look, but dang, I sure like it anyway! Now go find a big ol' handsome head to put that hat on!

4. It helps to secure the brim to the cap so it doesn't get uber-floppy in all the wrong ways with a quick hand stitch.
This hat is on the full, floppy side, sometimes resulting in a 70's Fat Albert look, but dang, I sure like it anyway! Now go find a big ol' handsome head to put that hat on!


could you relink the pdf when you get a chance? It doesn't seem to be working. Thank you SO much for sharing this tutorial. I can't wait to try it out.
ReplyDeleteHello, smallgrapes, the link to the file appeared to be fine, but I had not opened the file for all to access! I think I changed that... it looks like I changed that... I will test it again but let me know if you have additional problems accessing this. Thanks!
ReplyDeleteThanks so much for the pattern and tutorial! I have a very handsome boy (if I do say so myself) who has a very large head. When he was 6 months old I bought him one of these hats at Children's place to go with his Easter outfit and I've been wanting another one ever since. Now I can make one myself. Thanks again!
ReplyDeleteI've been stopping over at MADE and MADE by Rae for the celebrate the boy month and was thrilled to see you there. Kudos to you! I've got a big head boy and girl too! They get it from mommy:)
ReplyDeleteMy oldest daughter would love to wear one! She is into hats. My son...not so much. Wish he would! Great tutorial.
ReplyDeleteSo fortunate to have found u. The hat is fabulous! (MADE sent me)
ReplyDeletemy son has a giant head too! (just for the record, HOW big is your kiddos head? I find my son wearing "adult small," and I don't want to invest the time/effort in a hat that will be too small... but I WILL try grading this if it's too small... cause this hat is ADORABLE)
ReplyDeletei'm in love with that cap! thanks for sharing...
ReplyDeletecute as!! Will have to save this pattern for when my boys head is a little larger. thanks for a great tutorial!
ReplyDeleteI was thinking, "Where did she find that fabric?" and then I saw that you CUT UP AN OLD JACKET and made me deeply, deeply happy. I totally want to make these. Great tute. Great pattern. Thank tons.
ReplyDeleteToo Cute!
ReplyDeleteWhat a wonderful project (and a wonderful little boy). Just gotta try this. My little boys aren't so little anymore, but my oldest loves these kinds of hats. I've got plans for him and his head now. Thank you...
ReplyDeleteThis is so, so fantastic! Thanks so much for sharing. And I love how you did the tute in two different places- that's so thoughtful! I am just LOVING this boy series! I'll be linking.
ReplyDeleteThat is so adorable!
ReplyDeleteWhat a great tutorial. Thank you.
ReplyDeleteWith Easter holiday just around the corner it's perfect timing.
What a lot of fabric for a hat! But it looks great though. The newsboy is my favorite hat style
ReplyDeleteWhat an awesome hat!! I linked to your tutorial on Craft Gossip Sewing:
ReplyDeletehttp://sewing.craftgossip.com/free-pattern-newsboy-style-cap-for-boys/2010/02/27/
--Anne
Thanks so much for that great Tutorial! It was simple and fun. I linked to you in a post on my blog at http://noggintoppers.wordpress.com/
ReplyDeleteMore! More!
wow! i saw the link for your tutorial on MADE. thanks for sharing how to make this sweet hat. i can't wait to try it.
ReplyDeleteOh my God! The past month I was browsing the net like crazy for a newsboy cap tutorial but everything I found didn't look appealing, so I left the idea aside. Discovering yours through oneprettything has really made my day! THANK you a bunch!
ReplyDeleteI love this and I love "celebrate the boy." I have 3 grown and when they were small boys I'd get so irritated - everything and still seems to be all about girls. Thanks for posting the cap is awesome.
ReplyDeleteOh, Antoinette, it's SO cute! Very nice. :)
ReplyDeleteThank you for sharing your tutorial. I love this and can't wait to make it for my hat loving little guy!
ReplyDeleteoooOOOO! I love this and can't wait to give it a try!
ReplyDeleteI would love for you to come link up (this and any other boy-friendly crafts) to my What are little boys made of? Weekly Round-Up! Happens every Thursday at seven thirty three - - - a creative blog
oh well done - my boy loves a selection of beanies and hats so we instituted the family hat box and it is a great success. I love the turtle story - made me giggle!
ReplyDeleteTHanks os much for this tutorial! Straight forward, easy to follow.
ReplyDeleteI made it Friday afternoon.
http://wp.me/pBKLs-av
This is wonderful! Your son is so cute and a great model! Thanks for the tutorial!
ReplyDeleteI loved your comments about your sons big head. It took me back. sigh. Mine is 16 now and I think he has finally grown into his. He turned out very handsome so I think big boy heads are a good sign.
ReplyDeleteI have a little boy who will love this hat. But I also needed 20 newsboy caps for girls camp this summer. Our theme is Oliver. I can't thank you enough for sharing!
I used to make caps for my girls when they were little. It was such fun.
ReplyDeleteGreat post. Love, love the cap.
ReplyDeleteHe looks super cute in that hat, although he looks to be the age where he'd prefer to be called handsome.
ReplyDeleteI've referenced this posting on my site because I think its so special (http://flamingoks.blogspot.com/2010/03/great-little-tutorial-by-clevergirl.html).
ReplyDeletehi!!! he is so so so so so so cute! i can't wait to show this photo to max tomorrow and see if he'd like hat like this!
ReplyDeletemade one :)
ReplyDeletehttp://jarenandkathryngilbert.blogspot.com/2010/03/easter-outfit.html
i LOVE IT!!
thank you for sharing your pattern!
Thanks for the tutorial! It is great and easy to do. FYI - I made it for my 4 year old and it just fits him perfectly. You might want to measure the circumference of your son's head and post that so others have an idea of the size it would fit. Obviously my son's noggin is big! :)
ReplyDeleteyay thank you! You're the best for sharing this. I love newsboy hats I'm going to make one for me and one for my son :) the best part about the whole thing is the cute things you said about your son :) crafting mommys rule!
ReplyDeletei love this hat! i made one and mine turned out super small. i didn't cut on the bias. is this my problem? help. i want one for my 7 yr old.
ReplyDeleteLove this, thank you so much for posting. I made one in teal taffetas for my 5th grader's class play - I've costumed all of the Jackson 5 and needed a funky hat for one - voila!
ReplyDeleteThank you, thank you! This was just the tutorial I needed for the finishing touch for a costume for my son.
ReplyDeleteLike everyone else, I love this hat. I'm taking my little one with me to Paris next week, what do you think the chances are that I could adjust this pattern to look like the girl at the top of this post:
ReplyDeletehttp://hipparis.com/2010/02/13/paris-kid-street-style-french-childrens-fashion/
with basic sewing skills?
Thanks!
Responses -- sorry I'm late for some of the comments:
ReplyDelete@Ramona Burke - My son's head is approx. 20.25" circumference. At the moment.
@Violet - A men's jacket does leave a lot of extra fabric after you've cut what you need for the hat. I think the hat actually only used up the sleeves.
@Anonymous - It's very possible that the hat you made is tight because you didn't cut it on the bias. My finished hat came out at a 22.75" circumference.
@MizzE - This is a great retro 70's style -- I didn't mean for it to be, but it sort of is!
@Alison Wright - I think as long as the fit is fine and you want to add those cute lace embellishments, the only thing you need to do is adjust the brim to extend to half the circumference of the hat, and then play around with where you want to secure the brim to the crown, if you want to do that at all.
Thank you for this tutorial. I've just made one for my 5 & 1/2 yr-old boy, I added a rubber band as it was too big in the 1st time.
ReplyDeletehttp://leblogdelafamillewald.over-blog.com/article-la-casquette-de-papi-52351161.html
I know you did this tutorial ages ago, and probably aren't looking at the comments anymore, but just in case you see this...Do you think I could add a strip of elastic in the back so that the hat would fit a much smaller child? And then of course they could grow with the hat as they get older...
ReplyDelete@Admitted Fabricaholic - The circumference of the hat might fit but the proportions of the crown and bill will remain the same. Having said that, I have seen photos on the web of this hat on much younger children and it still looks pretty cute! Good luck!
ReplyDeleteI just made the hat for myself, and it is totally adorable! I resized the pattern in Photoshop to make it fit, then used a bunch of old plaid flannel shirts to give it a hippie patchwork look. It turned out even better than I had expected. Thanks so much for posting this.
ReplyDeletethank you...this is now on my to-do list! it's very handsome :D
ReplyDeletekudzu
One thing I realized is the size of the pattern might come up on other people's computers a different size. This might be why someone made it and it turned out very small. When you download the pattern and as you look at your computer screen, take a tape measure and measure the 1/2" seam on the crown piece to make sure it's true. If it's not, adjust the percentage at the top of the download screen until that seam measures 1/2". My computer brought up the pattern at 131% size which was gigantic. My pattern was perfect when I changed the percentage to 80%. But that's just my computer.
ReplyDeleteI love this tutorial!!! I made it for my son about a year ago and he wears it so much that people ask him if he sleeps in it!! I was able to make it out of my grandpa's flannel shirt, so that makes it more special. :) Now I am making him another one, and a couple for his little brother. Thanks so much!
ReplyDeleteI made this cap last night for a 4-year old and it is TOO SMALL. Measured his hat today and the circumference is 55 cm!!!!! which is 22"
ReplyDeleteWill slighly enlarge the pattern and made it again. Did get a pair of men's trousers from the recyclin g shop to keep the cost down. The cap is adorable.
In my previous post I said I measured his hat ; I meant of course his HEAD.
ReplyDeleteThanks for your pattern, i've just made one for miself.
ReplyDeleteto the ones with sizing problems, you can edit the pattern with microsoft word as it has a ruller in its window
Thank so much for sharing your technique. I have always love this style of hat for little gentlemen. I have so many suits that no longer fit but you have kindly given me anew use them.
ReplyDeleteFound your tutorial online and used one of my dad's old sport coats to make a cap for my four year old grandson. Sewing is not my favorite thing to do, but when it comes to my grandkids...
ReplyDeleteI measured his head and adjusted your pattern accordingly. It was very easy to make, and the results were well worth the afternoon of sewing. He looks very dapper wearing his newsboy cap with his new church coat!
P.S. The added bonus us that it cost me less than $3 since I already had the coat! Thanks again!
Thanks so much for the tutorial. I added 1/4 inch all the way around the pieces to make these caps for teens in the play Oliver Twist.
ReplyDeleteSO appreciate it. Great tutorial, I found the hat quick and easy to assemble.
Thank you for the great tute. I was sent your way by me sew crazy. I can't wait to try this pattern for the strawberry shortcake hat for my oldest daughters Halloween Costume!
ReplyDeleteThanks so much for the pattern and tutorial. I want to make this for my son, but he is a little younger than yours. Do you know the approximate circumference of the hat (or of your son't head at the time you made the hat)? I want to know if I need to size down the pattern. Thanks so much!
ReplyDeleteHey there -- my finished hat came out at a 22.75" circumference. Good luck!
DeleteTHANKS YOU!! I made one from denim as a gift to a 2 years old. I scaled the pattern when i printed it, 90%.
ReplyDeleteyou can see it here: https://fbcdn-sphotos-h-a.akamaihd.net/hphotos-ak-ash4/1108_10151118435886947_1208966914_n.jpg
Just finished a pink hat for my 3 yr old daughter from this pattern. I reduced the length (at point) by 1" and sewed .33 seams (not .25) and it came out to be 16.5" circumfrence. Check it out:
ReplyDeletehttp://www.facebook.com/photo.php?fbid=485739568113822&set=a.479273915427054.112161.478567848830994&type=1&theater
Christine
Thank you!!!
ReplyDeleteTerrific pattern. I whipped one up yesterday in just over an hour for my daughter to wear in her production of Oliver. I enlarged the pattern slightly, then realized I didn't need to (oops). It went together quickly. I cut it out of an old wool skirt with lining and it looks fab! Thank you!
ReplyDeleteI edited the pattern just a hair. So, it wouldn't be so floppy on top. Have to say attaching the brim on was a pain!! Over all they turned out cute! Thanks for sharing!!!!!
ReplyDeleteYour visual pattern saved my fanny! I am sewing this hat for my son's talent show tomorrow!!!! I am the queen of improve sewing, sooooo this was just perfect!
ReplyDeleteWhoops, please notify me if the pattern link is reposted - I forgot to check the "Notify Me" box.
ReplyDeleteJan
I'm a goof about Google Docs -- it says it is shared but I must be missing a setting somewhere. If you want me to email it to you, please leave me your email address. I've got the PDF, obvz. :)
DeleteI was able to download it once I had signed in to comment! Crazy as all I got before signing in was a bunch of gibberish and an error message! So glad I tried one more time!
DeleteHow do I send you my email address without it being public?
DeleteSue, I guess you can email me directly at phthooey [at] gmail [dot] com.
DeleteHi again! Just tried to download the pdf after I'd signed in to comment and it worked perfectly! I guess you have to sign in in order to get the pdf. Hope that helps others who have a hard time downloading the pattern.
ReplyDeleteThanks so much!